UPDATE 31-01-2022: An updated blog has been published by me which includes an explanation with PowerShell script to update authentication methods for users in bulk based on a .CSV input file! The script is fully based on the Microsoft.Graph PowerShell module. If you are looking to update single users or want to use the Graph API to update users the information below still applies and can therefore be used!
I still see lot’s of organizations struggle with the adoption and enrollment of Azure multi-factor Authentication when it comes to end users. Some of them want to pre-define / configure mobile phone numbers onto the end user accounts, others want to bulk import them from their previous SMS multi-factor authentication solution.
As you may know I always prefer to use the Authenticator app to be used with Azure multi-factor authentication as this can be used to enable password-less in your organization via Phone Sign-in (Please do note that Phone Sign-in currently is limited to be enabled for just one account). There are however always cases where the end user denies to use their personal mobile device with the authenticator app. In that case the best option you have is providing the end user a FIDO2 security key which they than can use to work password-less. This last option however still requires the initial registration of multi-factor authentication, for which in this case the user is required to do an enrollment.
To overcome the Azure MFA registration for end users administrators can pre-define / configure the phone number which the user can use as multi-factor authentication method. This will remove the requirement of the initial multi-factor authentication registration for end users so they only need to enroll their FIDO2 Security key to go password-less and beyond!
Pre-defining / configuring the authentication methods today can be done in two ways:
- Use the Authentication Methods option in the GUI of the Azure Active Directory;
- Use the Graph API to upload or change this information in bulk;
In this blog post I will describe how both options can be used.
OPTION 1: Use the Azure Active Directory GUI to update authentication methods.
The first option is the most convenient one if you need to change the authentication methods for just one single user. For this you need to go to https://portal.azure.com and open the ‘Azure Active Directory’ blade. Once you have opened the blade hit ‘Users’.

Once you’ve opened the ‘Users’ view, search for the user account for which you want to change or add their phone number and open the settings of the user account.

Within the settings of the user account go to ‘Authentication Methods’ and fill in the details of ‘Phone’ and/or ‘AlternatePhone’ to provision the phone number to the end user so it can be used for multi-factor authentication. Once you’re done hit ‘Save’.

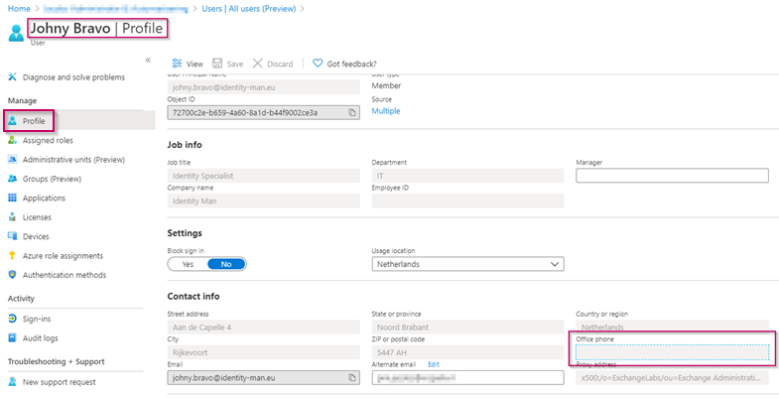
If you want to use the ‘Office phone’ as authentication method, which is possible, you need to change the value within the ‘Profile’ settings on the user account. Keep in mind that if you’re using synchronized accounts, which are sources from Active Directory, this value comes from the on-premises Active Directory and can’t be changed within Azure Active Directory.
Now if we try to logon to https://myworkaccount.microsoft.com with the user account, which we just used to provision a mobile phone number for, I’m prompted to do multi-factor authentication with SMS.

Once logged in we can start the enrollment of a FIDO2 Security key from the ‘Security info’ option.

Once the FIDO2 Security key is enrolled you can start working password-less!
OPTION 2: Use the Graph API to update authentication methods.
If you need to do bulk updates or want to build your own process around provisioning of Azure MFA authentication methods within the Azure AD, I would strongly recommend you to use Microsoft Graph.
Biggest advantage of using Microsoft Graph is that you can automate actions via PowerShell. Meaning you can write a PowerShell script which connects to the Graph API to change values on user accounts.
The first step to use the Microsoft Graph API is to make sure you have set the correct permissions and have an access token. The easiest way if you’re not quite familiar with the Microsoft Graph API is to do this via the web browser.
For that go to the Microsoft Graph website and hit ‘Sign in to Graph Explorer’.

Once signed in we are first going to check if you do have the correct permissions to read or write the Authentication Methods for user accounts. For that hit the ‘wheel’ and click on ‘Select Permissions’.

On the right side of the screen search for ‘AuthenticationMethod’ and make sure that all four permissions do have a consent. You can do this by selecting them all four and hit the ‘Consent’ button on the bottom of the screen (this will require you to consent with a global administrator account if the consent wasn’t given already).


Once you’ve given the consent you can see this within the ‘Graph Explorer Enterprise application’ permissions within the ‘Azure Active Directory’.

Now the consent is given we need to get the ‘Access Token’ so we can use it within our PowerShell script. Therefore within the Microsoft Graph website hit ‘Access Token’ and hit the ‘Copy’ image.
NOTE 1: There are PowerShell scripts which can request a token for you so you can automate getting an ‘Access Token’.
NOTE 2: Access Tokens are valid for 1 hour, keep in mind that after an hour you need to request a new access token.

Now open a PowerShell window and connect to the Azure Active Directory via the command ‘Connect-AzureAD’ and logon with your admin account. Once you’re logged on within the PowerShell session copy the ‘Access Token’ you copied from the Microsoft Graph website into a variable with the command:
$Token = “<Access Token>”
NOTE: If you don’t have this PowerShell Module installed please install it via ‘Install-module AzureAD’ or ‘Install-module AzureADPreview’

We’re now ready to use PowerShell scripts which can talk to the Microsoft Graph API. To Add, Update or Delete Authentication methods I’ve written a script which can be downloaded here.
To check the current authentication method values for an end user the following PowerShell command can be used with the script you just downloaded:
Configure-AuthenticationMethods.ps1 -Token $token -UPN johny.bravo@identity-man.eu
As you can see in the image below the current authentication method settings of my user account are empty (which is correct).

To add the Mobile Phone within the authentication method on the user account the following PowerShell command can be used with the script you just downloaded:
Configure-AuthenticationMethods.ps1 -Token $token -UPN johny.bravo@identity-man.eu -ActionType Add -PhoneNumber “+310612345657” -PhoneType Mobile
As you can see below it will first show the current settings configured on the user account and after the PowerShell command has been executed the new configured settings are shown to you in green.

If you afterwards would check the GUI within the Azure Active Directory, this would also show the value you just configured on the user account.

When looking at the ‘Sign-in logs’ in the ‘Azure Active Directory’, you can see that I did a successful logon to the Azure AD and retrieved my token via the Microsoft Graph API website.

Next to the Sign-in logs we can also see within the ‘Audit Logs’ in the ‘Azure Active Directory’ that I did set Authentication Methods for the johny.bravo@identity-man.eu user object.

Looking at the details of the ‘Audit Log event’, which is marked above, I can see that I registered a phone method within the security info of the johny.bravo@identity-man.eu account. As you can see this action was ‘Initiated from’ the Graph Explorer, which is the Enterprise Application we used to copy the token from.
To revert this ‘Audit log event’ back to an (admin) user account, we need to look at the ‘Initiated By Object ID’ value.

This ‘Object ID‘ value can be reverted back to my admin account as that’s the ‘Object ID’ of my admin account as you can see below.

So no worries, everything you’re doing with the Graph API can still be tied together :-).
Once you now try to logon to https://myworkaccount.microsoft.com with the account for which you just configured authentication methods and the account is matching a multi-factor authentication conditional access policy, you can see I’m prompted automatically for multi-factor authentication via SMS without the user needing to enroll itself.

Once logged in we can start the enrollment of a FIDO2 Security key from the ‘Security info’ option.

Once the FIDO2 Security key is enrolled you can start working password-less!
To update the Mobile Phone within the authentication method on the user account the following PowerShell command can be used with the script you just downloaded:
Configure-AuthenticationMethods.ps1 -Token $token -UPN johny.bravo@identity-man.eu -ActionType Update -PhoneNumber “+310612345678” -PhoneType Mobile

Again as you see below the value will also change within the GUI in the Azure Active Directory.

And at last to delete the Mobile Phone within the authentication method on the user account the following PowerShell command can be used with the script you just downloaded:
Configure-AuthenticationMethods.ps1 -Token $token -UPN johny.bravo@identity-man.eu -ActionType Delete -PhoneType Mobile

And again as you see below the value will also be deleted within the GUI in the Azure Active Directory.

As you maybe noticed we have only updated the Mobile Phone field during the above steps in Azure Active Directory. The script I’ve written can update more than only the Mobile Phone field, therefore I’ve written a short explanation on the switches you can use:
ActionType (Used to Add, Update or delete an Authentication Method):
- Add
- Update
- Delete
PhoneType (Used to define the phone Type):
- Mobile
- AlternateMobile
- Office
SMSSignIn (Used to enable or disable SMSSignIn within the Authentication Methods):
- Enable
- Disabled
NOTE: As described earlier the Office PhoneType can ONLY be set for Azure Active Directory account which aren’t synced from the on-premises Active Directory.
Now you’ve read all of the above you know how you can manually set Azure MFA Authentication Methods on end user accounts, do bulk updates or have found out ways to automate this process for your end users. All with the result that end users don’t need to walk through the Azure MFA registration process themselves.
Especially during these times (COVID-19) when we mostly work remotely being able to provision (which in some scenarios you can only do from the office) or reset authentication methods for your end users can become quite helpful.
I hope you enjoyed reading my blog and are able to re-use my PowerShell script so you’re able to provision multi-factor authentication settings for your end users via the Graph API.
Stay safe and be tuned for more password-less blogs and hope to see you again soon!

You mention using a PowerShell script to retrieve a token but I have not been able to do this successfully. I have my app registered in AAD and I can see the “access_token” in the splat. However, I get an error that says the user is unauthenticated.
Any thoughts on token retrieval via PowerShell?
LikeLike
Hi Caleb,
I’ve just published an updated script with the same options but which also request an access token which can be used in the Graph API. The script can be found here: https://github.com/IdentityMan/AzureAD/blob/master/Configure-AuthenticationMethods_including_token_request.ps1.
Important to know is that you need to do two things to get this working, which is:
1. Run the command ‘Install-Module -Name MSAL.PS’ to install the new MSAL module which is needed here to request a token.
2. Make sure to create a new App Registration with the value ‘urn:ietf:wg:oauth:2.0:oob’ as Redirect URI with the type ‘Public Client/Native’.
3. Once the app is created assign the correct permissions so you can request the correct information via PowerShell.
4. Retrieve the App ID and Tenant Name and configure these values within the PowerShell Script as provided above.
Hope this helps you out and answers your question :-).
LikeLike
Do you have a walk-through on how to do this? I am a noob when it comes to apps in Azure. I just create an application? there are so many options.
LikeLike
I wrote another blog in the meantime, hope this one helps you out!
LikeLike
Just wanted to drop a thank you on this. I’m migrating from the legacy on prem azure MFA server to cloud service and I used a fair amount of your code to populate all the users. No way I was figuring this API out on my own.
LikeLike
You’re very welcome Tim:-)!
LikeLike
Hi Guys,
Thank you so much for the detailed information.
I’m still having some issues with permissions:
“code”: “accessDenied”,
“message”: “Request Authorization failed”,
“innerError”: {
“message”: “Request Authorization failed”,
Do you guys have an idea which permissions I need to implement?
Thank you.
Kind regards
LikeLike
Hi Dimitri,
Are you using an App Registration which you have created yourself or are you using the ‘standard’ Graph Explorer App Registration in Azure AD? This as the app defines the permissions you get and not the account you are using, not matter if you are using a global admin account.
The permissions are described in my blog, search for the word ‘Consent’. Beneath the description you will find the exact permissions which are required.
Hope this helps you out!
LikeLike
Hi Pim,
Is there any way to do a bulk update? I need to add phonenumbers for 2000 users
Thank you.
Kind Regards
LikeLike
Hi Jack,
Sorry for my late reply, yes there are always ways to do that, most likely you will need to create a function in PowerShell, which you can trigger from a for each loop. That for each loop will contain the user info (UPN & Phone Number), and will call the function with actions required to set the phone number.
I’m planning to release an updated version of this script somewhere later this year with lots of more fun (including functions!), so I hope the above gives you some ideas for the meantime?
Regards.
LikeLike
Hi Pim,
we are using Azure’s OAuth support for our Citrix desktop virtualization logon and it is working fine (thin client with locked OS, no browser). The only challenge is to handle with users which have left their primary auth device at home (e.g. Microsoft Auth App installation on smartphone). How can I change the default auth method (order) for a user as an admin? Found a dirty temporary workaround by wiping all the user’s methods and setting up the office phone as new one, but… not a real good solution.
I am thankful for any kind of advice! 🙂
Kind regards
Alex
LikeLike
Hi Alex,
There is unfortunately no option yet to do this in Azure Active Directory. I however know that if you have two methods (primary authenticator app, and as a secondary the office phone) configured whereby you delete the primary method as an admin, that is now possible via the Graph API for the authenticator app. The secondary method (office phone) becomes therefore primary. It requires the user to put in two methods and give you the ability to delete the primary one whereby the secondary becomes primary.
I fully agree with you that it stays a workaround and let’s hope Microsoft introduces a new functionality to have this manageable in an easy way for admins.
Hope this helps.
Regards,
Pim
LikeLike
Very nice article! Our problem is that we need to view/modify the Default method used in Sign ins for our users. We have many cases where do not select the preffered method (FIDO2 Key) and select the Microsoft Authenticator one.
I read the whole authentication/methods documentation and didn’t find any way of setting (or at least reporting) on this aspect.
Any ideas?
LikeLike
Hi Alex,
The feature you’re reffering to (change the default MFA method for a user) is not possible today. Let’s hope this is something which Microsoft will bring us as a feature in the near future as you’re not the only one waiting for this functionality :-).
LikeLike
I’m a little late here, but this looks great, thanks.
We’re rolling out Azure MFA for 12k+ users so being able to bulk update would be a god send. Any update on a newer script that includes functions as mentioned above, for use in foreach loops ?
I’ve been trying to work the existing script into a loop after reading data from a csv, but this is a bit much for my limited experience. If the updated script is not expected soon, is there any quick + dirty way I can call the existing one when reading data from a csv ?
I’m able to make it work for the first entry in a csv, but after that it errors out.
Thanks again.
LikeLike
Hi,
Microsoft published a new module which you can use yourself for this, this is explained on the docs right here:
https://docs.microsoft.com/en-us/azure/active-directory/authentication/howto-mfa-userdevicesettings
Hope this helps you out!
Regards,
Pim
LikeLike
Guys, I want to upload MFA contact numbers through powershell
any help?
LikeLike
Hi Avik,
Please see my renewed blog (which is also referred to in this article) here:
That will definitely help with your question!
Regards,
Pim
LikeLike