Heading back from the MVP summit, and with that welcome to a new blog serie! This time it’s all about Entra Connect Cloud Sync. Many organizations, maybe like yours, are today using Entra Connect Sync for syncing their users, groups and devices to Entra ID. And although Entra Connect Cloud Sync has been around for years I still see organizations implementing and maintaining Entra Connect Sync while they should shift towards the modern solution and with that the future of a modern hybrid identity landscape.
Today the following core functionalities are supported by Entra Connect Cloud Sync:
- Synchronizing Users to Entra ID
- Synchronizing Password hashes to Entra ID
- Synchronizing Groups to Entra ID
- Password writeback functionality (for self-service password reset)
- Group writeback functionality (for empowering governance processes).
- Exchange Hybrid writeback functionality (to keep attribute values in sync).
- Synchronization based on object level, group or organizational unit (no attribute-based filters).
- Support for PHS with Seamless SSO (Pass Through Authentication is not supported).
A full list can be found here on the learn pages.
If your organization is not using more than the above-mentioned functionalities, I would strongly urge you to start exploring Entra Connect Cloud Sync. Its configuration is fully cloud based, agents can be recovered in a simple way, and it can be deployed fully redundant. With this blog and those which follow I will explain and guide you how this can easily be achieved because complexity and simplicity go hand in hand.
Now let’s first dive in and see how we can setup and configure Entra Connect Cloud Sync to enable the first core functionalities.
Step 1: Installing the Cloud Sync Agent
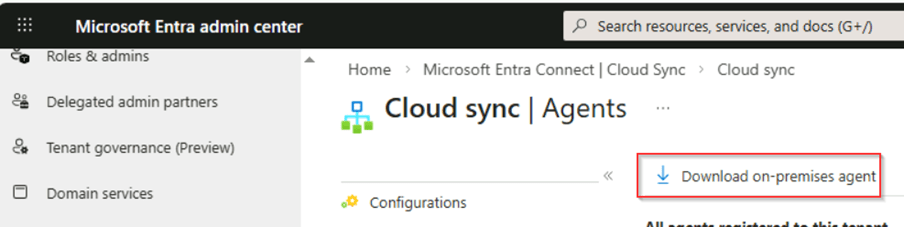
Our firs step is to go to the Entra Admin Center, go to ‘Entra Connect’ and select ‘Cloud Sync’. In here you can go to ‘Agents’ and hit ‘Download on-premises agent’.
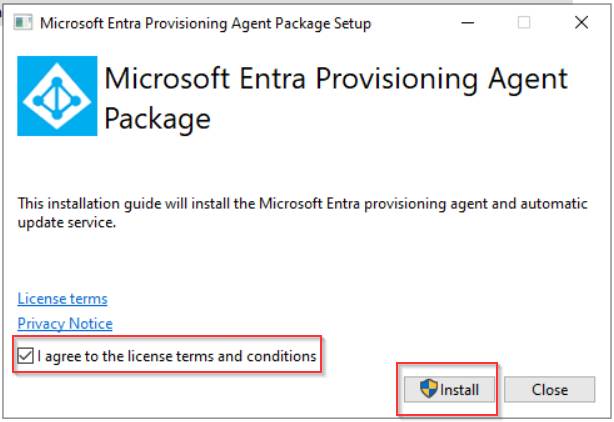
Once done start the installation on the server which you want to use as your sync engine. It is important to note here that the server you’re using should be considered the same as a ‘Domain Controller’ in your environment. Besides the preference is to have at least two sync servers for high availability and redundancy. Once you’re ready to install the agent on the server, double click the installation file we just downloaded, ‘accept the license terms’ and hit ‘Install’.
Once the installation is finished the wizard will automatically open. Keep that open as we’re first going to create the group managed service account used for running the service and reading and writing information to your on-premises Active Directory environment.
Step 2: Creating the GMSA account and configuring the permissions
As mentioned, let’s first create the ‘Group Managed Service Account’, this can be done automatically via the wizard of the provisioning agent, however I like to be in control of the permissions and security of this account. Therefore, on a server in your environment (e.g. a management server) where you’ve installed Active Directory PowerShell tools, run the following cmdlet:
New-ADServiceAccount -Name ‘gMSA_EIDCCS’ -DNSHostName gMSA_EIDCloudSync.domain.local -PrincipalsAllowedToRetrieveManagedPassword –{servername(s)}
NOTE: Replace ‘domain.local’ with your own local domain and ‘{servername(s)}’ with the servers where the Cloud Sync (provisioning agent) will run on, if you’re running on multiple servers, all servers should be mentioned in here as a comma separated value.

Once the ‘Group Managed Service Account’ is created, let’s make sure it has the right ‘permissions’ in Active Directory to read and write information. There are several cmdlets available but for now we don’t need all permissions and follow the principle of least privilege:
Import-Module "C:\Program Files\Microsoft Azure AD Connect Provisioning Agent\Microsoft.CloudSync.Powershell.dll"$credential = Get-CredentialSet-AADCloudSyncPermissions -PermissionType "BasicRead" -EACredential $credentialSet-AADCloudSyncPermissions -PermissionType "PasswordHashSync" -EACredential $credentialSet-AADCloudSyncPermissions -PermissionType "PasswordWriteBack" -EACredential $credentialSet-AADCloudSyncPermissions -PermissionType "HybridExchangePermissions" -EACredential $credential
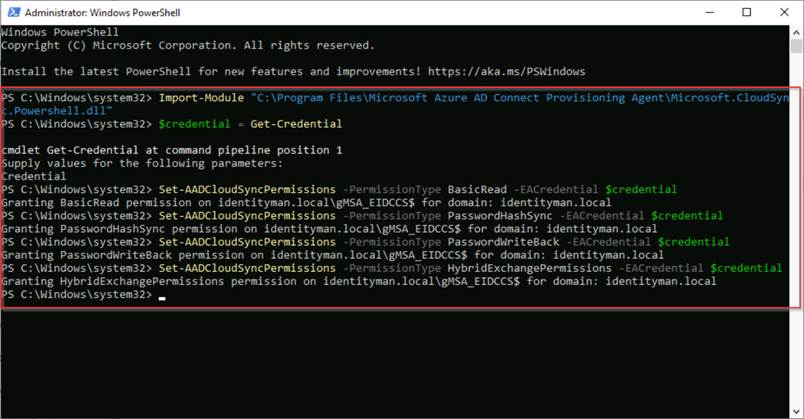
The above will configure the gMSA account with permissions to read object properties from your domain, is able to synchronize password hashes to Entra, is able to write back password changes via self-service password reset and is able to write-back Exchange Hybrid changes (like send as permissions) to the on-premises objects. For a detailed list of the actual permissions, you can visit this learn article.
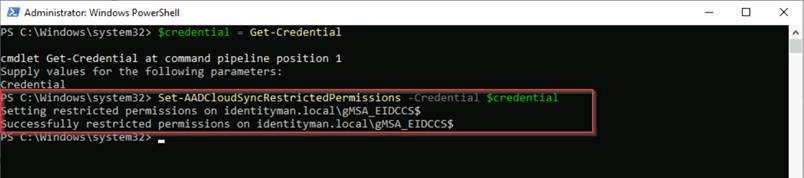
Now the permissions are set the last step before we should use it is to make sure that the ‘Group Managed Service Account’ can’t be misused by malicious actors and therefore is protected. This can be done with the cmdlet:
$credential = Get-CredentialSet-AADCloudSyncRestrictedPermissions -Credential $credential
Now the group managed service account has been created, has the right permissions and is protected, let’s move over to the configuration of the agent.
Step 3: Configuring the agent
To configure the agent, it’s important to know that port 80 and 443 need to be opened to the internet and TLS inspection needs to be turned off. So please make sure this is the case first before continuing.
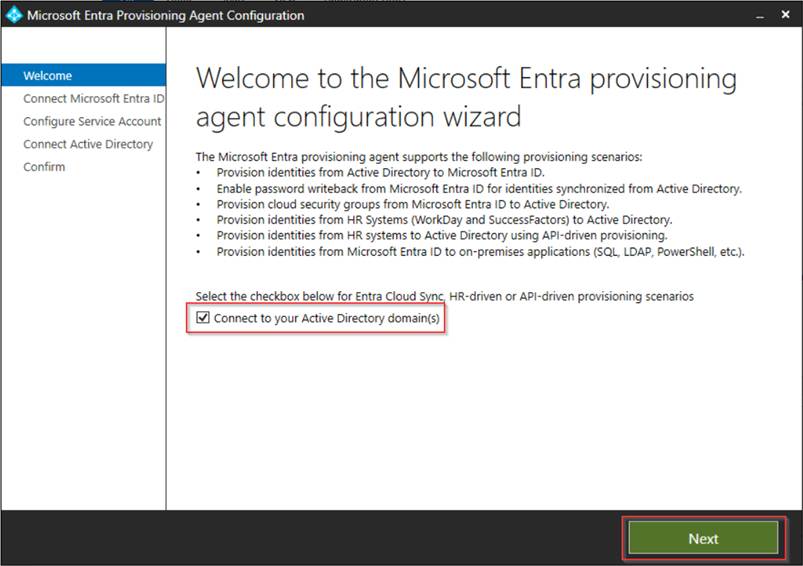
Once ready, the wizard can be continued, make sure the checkbox is checked so we are going to configure the provisioning agent for Entra Connect Cloud Sync. Leaving this box unchecked will configure the ECMA connector used for provisioning into apps in your on-premises environment which is relying on the same installation. Once you’ve checked ‘Connect to your on-premises domain(s)’ hit ‘Next’.
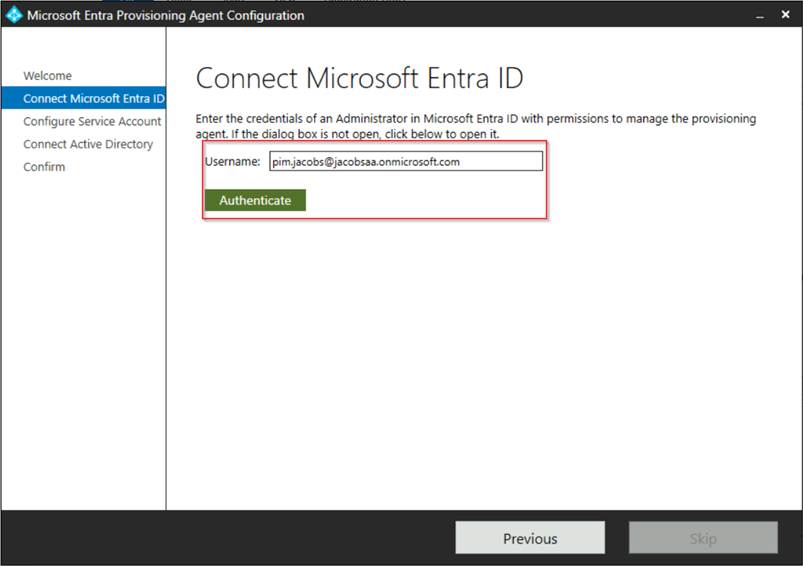
Now authenticate into your Microsoft Entra ID tenant with your admin account which has at least ‘Hybrid Identity Administrator’ permissions.
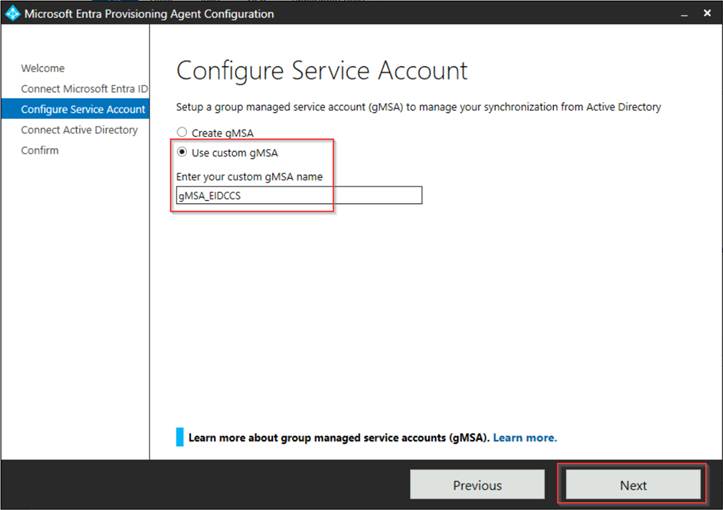
In the next step select ‘Use custom gMSA‘ and enter the custom gMSA account name we just created, in my example ‘gMSA_EIDCCS’. Once ready hit ‘Next’.
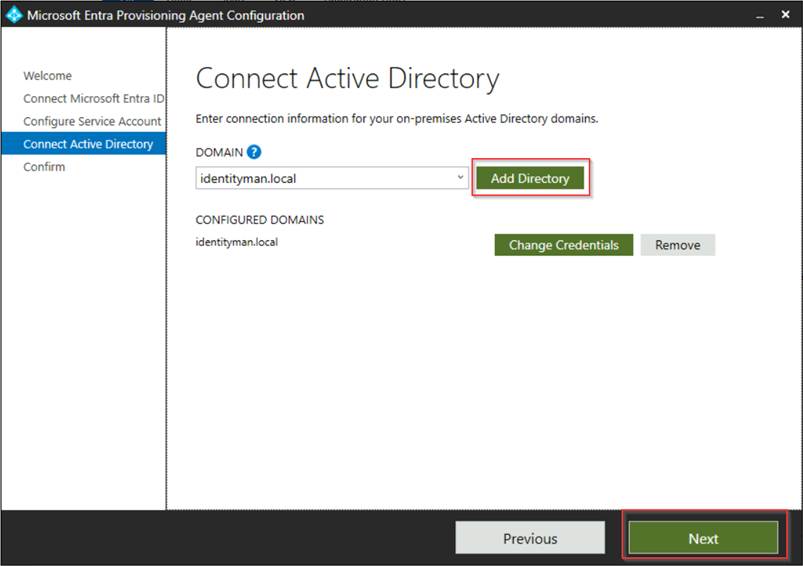
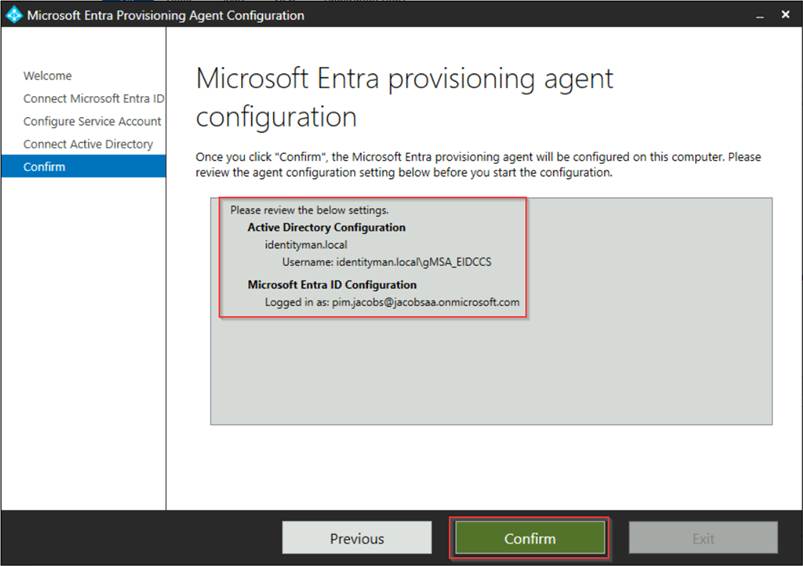
In the next screen we need to add our directory, so let’s hit ‘Add Directory’, you can safely use your own domain admin account to authenticate as it’s just for the wizard, these credentials are not stored or used for the service to run as that is tied to the group managed service account we created earlier.
Now verify the configuration and once you’re happy hit ‘Confirm’.
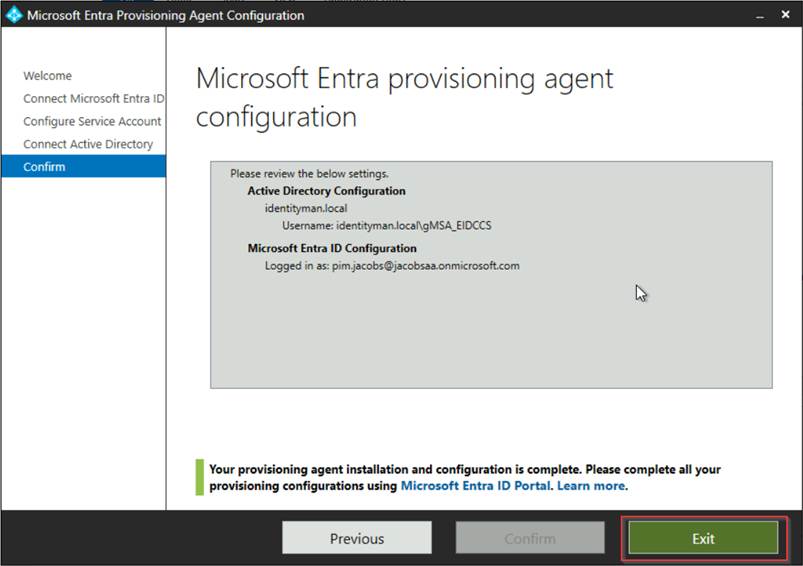
Now it’s time to wait for the installation to finish, once completed successfully hit ‘Exit’.
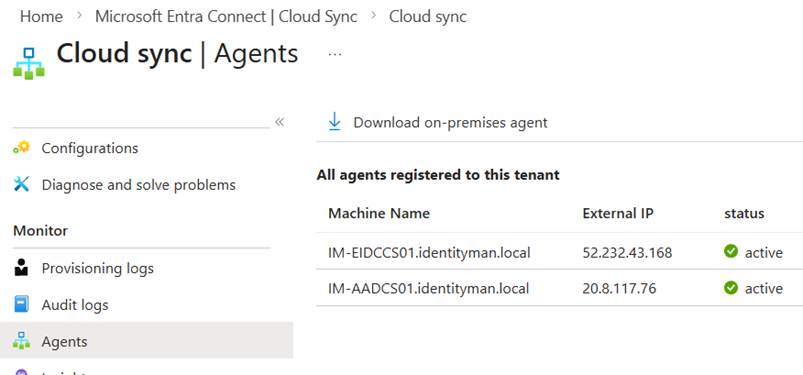
This finalizes the step for the agent configuration. If you have a second server, repeat the above steps (from step 3) on the secondary server. The result in the Entra Admin Center in case of multiple servers will look like the screenshot below.
Our next step is to configure the Entra Connect Cloud Sync configuration.
Step 4: Configuring Entra Connect Cloud Sync
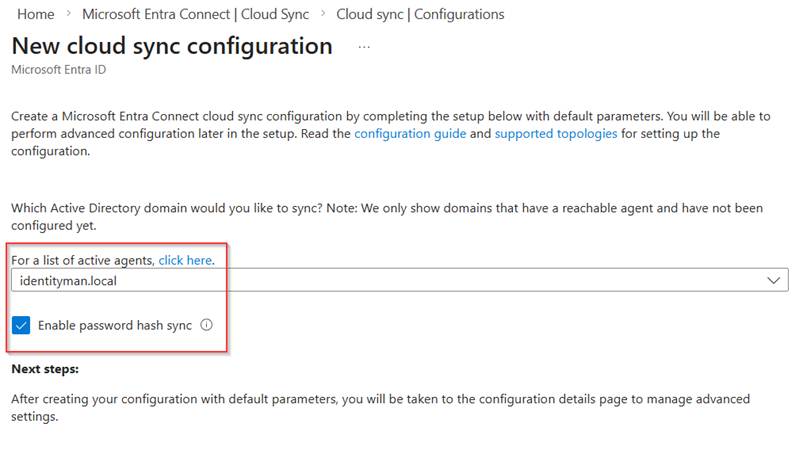
Now the agents are fully up and running, let’s configure a test organizational unit to be synchronized. For that go to the Entra Admin Portal, go to ‘Entra Connect’, hit ‘Cloud Sync’, select ‘Configurations’ and select ‘AD to Microsoft Entra ID Sync’ as we are going to sync from Active Directory to Entra.

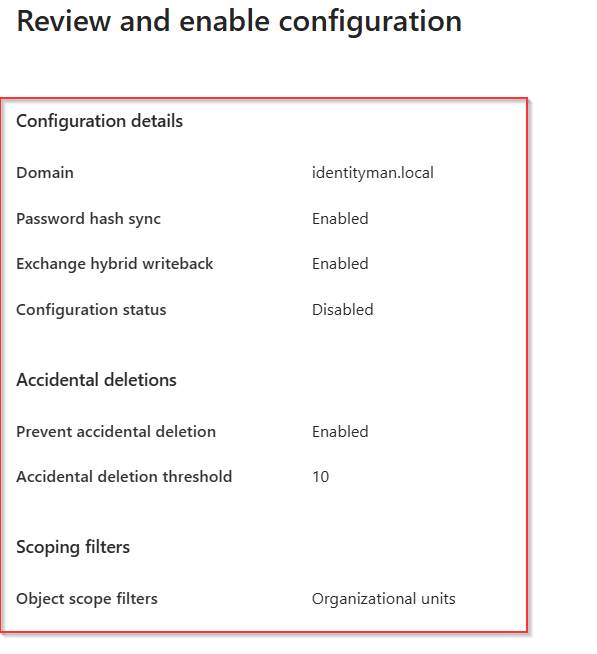
In the next window make sure that in the drop down the Active Directory Domain is selected, in my case ‘identityman.local’ and select the checkbox for ‘Enable password hash sync’ and hit ‘Create’.
Once the configuration has been created on the overview blade go to the ‘Properties’ tab and edit the ‘basics’.
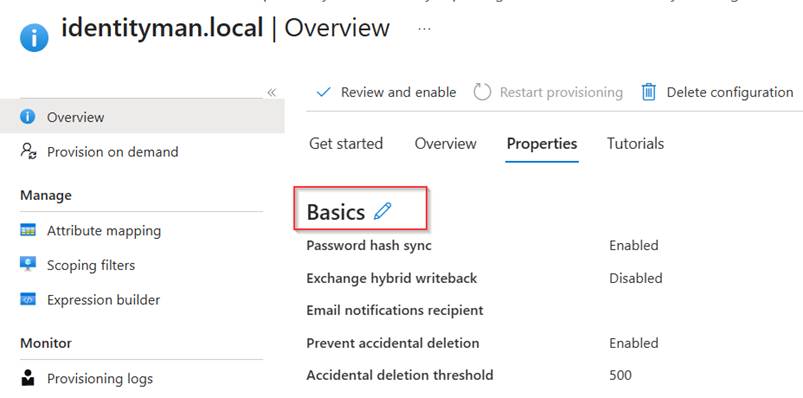
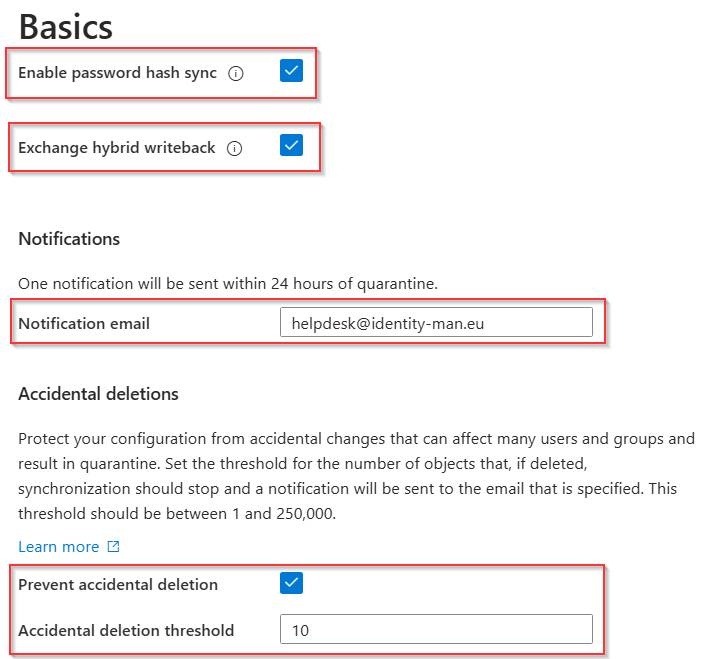
Now make sure that ‘Password Hash Sync’ and ‘Exchange Hybrid writeback’ are both enabled. Fill in a ‘notification address’ for quarantine emails (note: this email is not used for sync errors, only when the job goes into quarantine mode, in a next blog I will explain how you can easily receive sync errors in your jobs).
At last, make sure that ‘Accidential deletions’ is enabled and set the ‘threshold’ according to the size of your organization. As this is a test tenant and just a few identities and groups are synchronized, I’ve set it to 10. Once you are ready hit ‘Apply’.
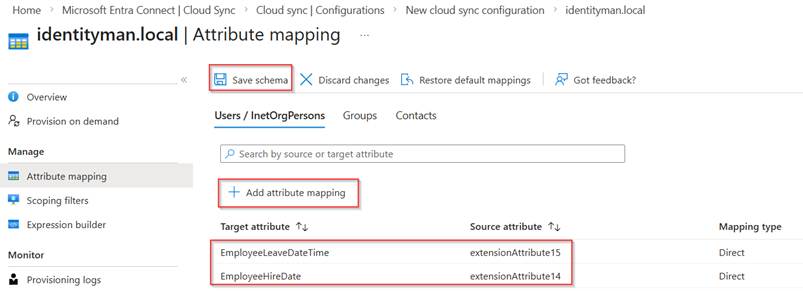
The next step to verify is the attribute mapping. Some customizations maybe are required or are made into the existing Entra Connect Sync setup which you want to be reflected here as well. In my example this is the case for ‘EmployeeLeaveDateTime’ and ‘EmployeHireDate’ as you can see. So, I’ve added two separate attribute mappings and hit ‘Save Schema’ for them to be synchronized once we enable the sync configuration.
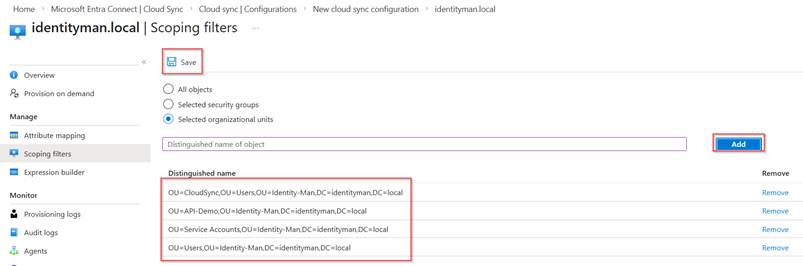
Next are the scoping filters, in here we add the Distinguished Name of the organizational units which we want to sync, in my example these are 4 test OU’s containing both users and groups. Important here is that you should not make an overlap here with objects being synced from Entra Connect Sync (if you’ve deployed Entra Connect Sync). In one of the next blogs, I will describe how you can move from Entra Connect Sync to Cloud Sync.
Once all is configured correctly, we go back to the overview page and hit ‘Review and Enable’.
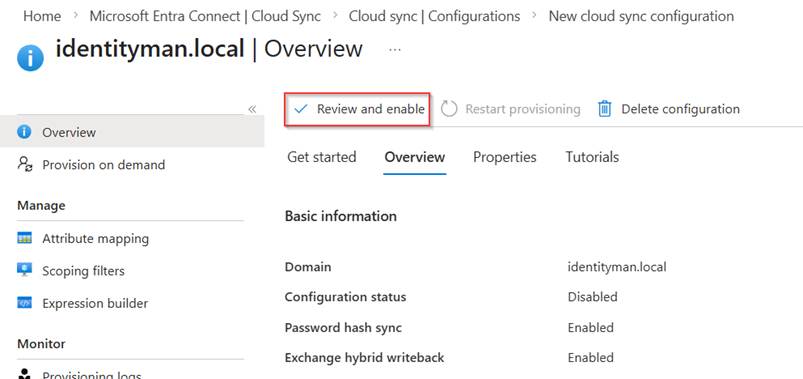
In the next screen verify that all configuration is being made as expected and hit ‘Enable Configuartion’ when you’re happy. This will start the synchronization jobs to be actively synchronizing users and groups into your tenant and will enable the write-back capabilities selected earlier.
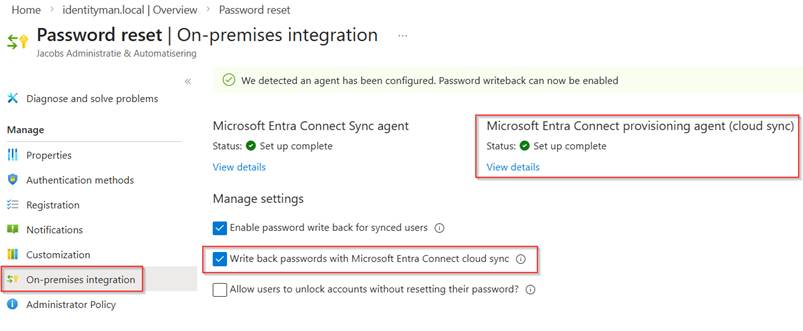
At this point forward the only setting which we need to enable separately resides within the self-service password reset capability. For that go to the Entra Admin Portal, select ‘Password Reset’ hit ‘On-premises integration’ and select ‘Write back passwords with Microsoft Entra Connect Cloud Sync’. As you can see the provisioning agent is detected with a solid configuration, and with that this checkbox also becomes available for us to use.
This concludes the Entra Connect Cloud Sync configuration from Active Directory to Entra ID (for now as more good things are actively being worked on! 😉). However, before heading over to the conclusion, let’s first check the dashboards, logs which are available and check whether we can use a test account for sign-in and password reset which is synchronized via Entra Connect Cloud Sync.
Step 5: Validating behaviour
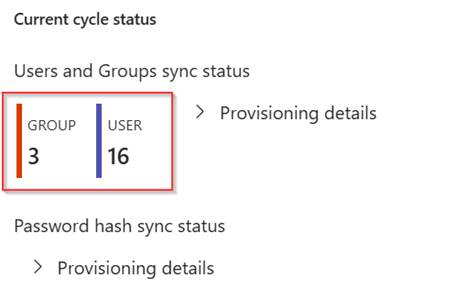
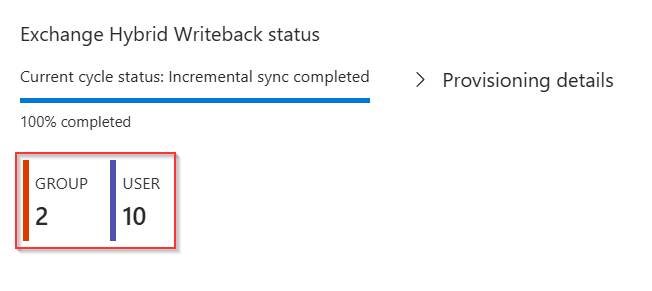
Now the sync is running we can see on the overview page of the Entra Connect Cloud Sync configuration that we’ve synchronized 3 groups and 16 test users.
For ‘Exchange Hybrid Writeback’ we can see that for 2 groups and 10 users information has been written back to Active Directory.
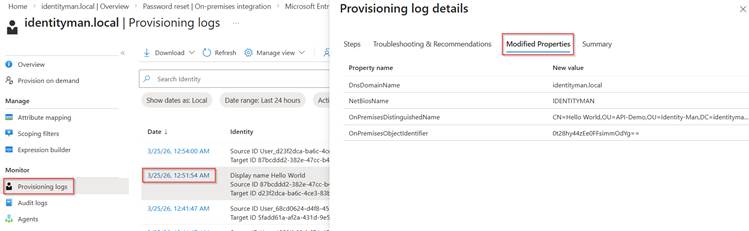
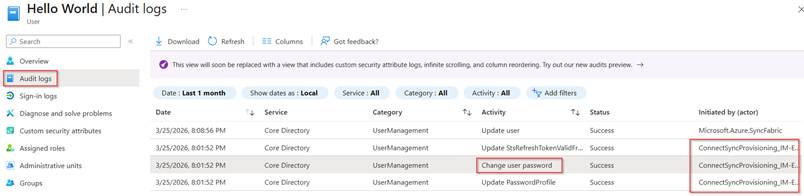
If we look in the ‘Provisioning Logs’ we can see that the account has been successfully created by Entra Connect Cloud Sync.
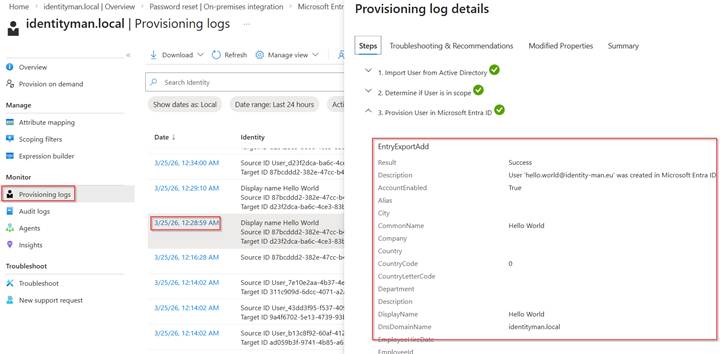
If you change attributes to this account later, these are visible under the ‘Modified Properties’ tab .
Once the account is synchronized, we see that it can be used to sign-in and register for phishing resistant MFA (or just MFA).
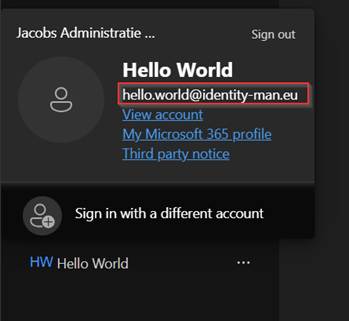
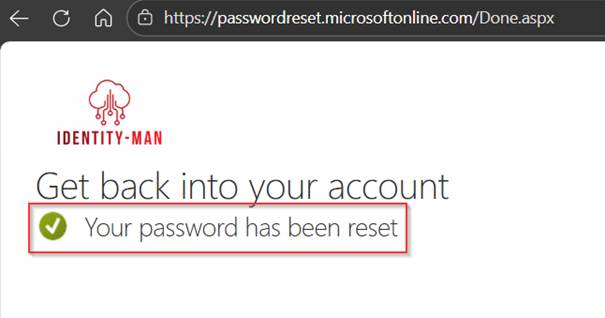
The user is also able to successfully reset their password via self-service password reset.
In the audit logs we can see that the service principal (created during the installation of Entra Connect Sync or Entra Connect Cloud Sync) is being used to trigger the write-back to Active Directory and with that the password is synchronized over to Entra again.
And with that we’ve synchronized our first accounts to Entra ID with Entra Connect Cloud Sync, yikes!
Conclusion
Now you know how to install and configure the first core functionalities of Entra Connect Cloud Sync and have actively deployed this in your (test) environment, and validated the behavior, ability to sign-in again and tried to see if password reset works we have proven a valid and healthy scenario which we can expand with additional features over the next blogs, and trust me good things are coming soon! 😉
Having said that, I’m convinced, Entra Connect Cloud Sync is and will be the way to go, and if not, it will be soon! New functionalities like group writeback landed only in Entra Connect Cloud Sync, combined with the Source of Authority conversion for groups, it’s extremely easy to convert the source of authority to Entra and use modernized groups in your traditional Active Directory. But more about that in my next blog post(s).
Next up, for now in this series are:
- Configuring alert rules for Entra Connect Cloud Sync failures
- Configuring Group write-back and use source of authority to change Entra to be the primary source.
- Migrating your configuration from Entra Connect Sync to Entra Connect Cloud Sync.
- Migrating the source of authority for Exchange Attributes to Entra and removing the last exchange server dependency.
- Other investments being made (sorry folks NDA).
