In this blog I will explain to you what a service principal is and how you can easily make use of them when running (automated) scripts.
Let’s first go over what a service principal exactly is. A service principal is the local representation, or application instance, of a global application object in a single tenant or directory. A service principal is an instance created from the application object and inherits certain properties from that application object. A service principal is created in each tenant where the application is used and references the globally unique app object.
In simple words this means a Service Principal can either be a reference to an application in another environment, or can refer to a (gateway-) application which is hosted in- and connected to your tenant. The service principal object defines what the application can actually do in your tenant, who can access the app, and what resources the app can access.
Each application you see in the Enterprise Applications overview in Azure AD can therefore be referred to as a service principal. If you use PowerShell to retrieve those the cmdlet is Get-AzureADServicePrincipal, this will display all Enterprise Applications within the Azure AD.

Now we do know that a lot of applications are already using Service Principals, but we can of course create one and consume it for our own needs. For example for tasks for which we are currently using service accounts This would then eliminate the use of service accounts, which is a big advantage as the service principal doesn’t exist of a username and password, and cannot be logged in with interactively from for example a portal page, it is therefore less likely to be impacted when it comes to brute force attacks! So by using service principals we can replace service accounts currently used and therefore improve the security posture of your environment!
More information about the difference between Service Principals and App Registrations can be found here.
Create a Service Principal
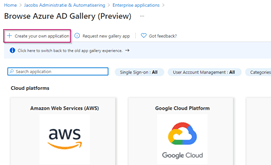
Now that we know what a Service Principal is, let’s create one. For that, go to the Azure Portal, open the Azure Active Directory blade and go to the Enterprise Applications section. In here make sure ‘All applications’ is selected and hit ‘+ New Application’.

Now hit ‘+ Create your own application’, as there is no app listed we can use for our own service principal.
On the right side of the screen make sure you give the application a friendly name, which you can easily refer to. This name is displayed as well in the logs so make sure it’s recognizable for others as well. Once the friendly name has been determined, please select ‘Intergrate any other application you don’t find in the gallery’ and hit ‘Create’.

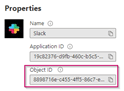
Once created, you will see that we have created an Enterprise Application within the Azure AD Portal and this can be referred to as a Service Principal, as explained earlier.
Important to know is that, in the background, an App Registration has been created as well for the service principal, whereby the application ID is matching and the Objectids are different. This as the App Registration is simply a different object in your Azure AD, however both objects belong to the same application in Azure AD as you can see.

Configure Service Principal Certificates & Secrets
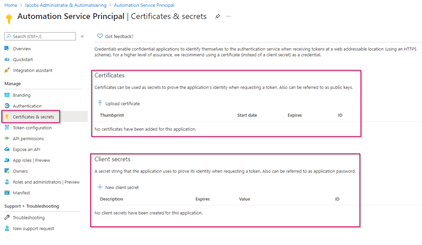
Now that the service principal is created in Azure AD, let’s make sure we can make use of it. To do that, go to the App Registration settings in Azure AD, make sure ‘All Applications’ is selected and select the service principal we just created. From here go to the ‘Certificates & Secrets’ section, as you can see no certificates and secrets have been added yet.
When using Service Principals there are two ways you can authenticate as that service principal:
Using a Certificate – This allows you to ‘link’ a certificate to the Service Principal which you can use for authentication. This can be a self-signed certificate. When authenticating using that certificate you will (likely) provide the thumbprint of the certificate to authenticate. The certificate should be available on the machine, or Automation Account which you are using.
Using a client secret – You can compare a client secret to a long & complex password which is generated for you. Although you can connect as the Service Principal by filling, for example a PowerShell credential with the AppID and client secret, you cannot simply go to https://portal.azure.com and provide the values to interactively log in as the Service Principal. Which, from a security point of view, is a good thing.
Pro-tip: When using Azure Automation, always remember to save your client secret as an encrypted value in your Automation account to make sure it cannot simply be copy/pasted out.
Now, depending on the module or application for which you want to use a service principal, first determine which methods are supported. Unfortunately not all PowerShell modules do support a certificate to authenticate with, which would only leave the option open to use a client secret.
If you would ask my honest opinion, a client secret is less secure compared to a certificate but safer than using a regular service account. Reason for that is that a certificate is something you need to know (Thumbprint) and something you need to have (the actual certificate) to run. While a client secret simply exists of something you know but doesn’t have a part of something you have.
Now let’s add both of the methods to see how you can make use of them. Let’s first start with the Client Secrets. Please hit ‘+ New client secret’, beneath the ‘Certificates & Secrets’ section of the App Registration belonging to the Service Principal.

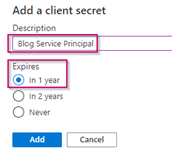
Create a friendly description for which this client secret will be used and set the expiration time. Please note that after this time this secret can’t be used anymore. And like with passwords I wouldn’t recommend to use the ‘Never’ value as this means the client secret (password) will never expire. Once done hit ‘Add’.
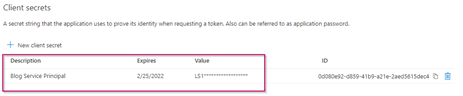
Now the client secret has been created, please save the client secret value immediately, this as it will only be shown once.

After a few minutes or when doing a refresh it will show the value below and will never show the full value anymore. You will see the first few characters to be able to recognize the value should you want to validate its validity later on.
This is all we need to do to prepare the connection with a client secret.
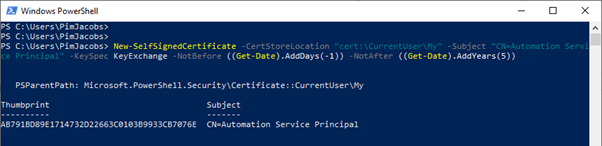
Now when looking at certificate it becomes a bit more complex. This as we first need to generate a certificate. This can be done by using the PowerShell command shown below:
New-SelfSignedCertificate -CertStoreLocation “cert:\CurrentUser\My” -Subject “CN=Automation Service Principal” -KeySpec KeyExchange -NotBefore ((Get-Date).AddDays(-1)) -NotAfter ((Get-Date).AddYears(5))
Recommendation: Please change the common name (subject) to match the name of the service principal and configure the NotAfter time in the above PowerShell to match the validity your require.
Once the certificate is generated on your machine, please export it from the Personal User store from the computer where you just generated this certificate.

During the export make sure that the format is set to ‘Base-64 encoded X.509 (.CER)’ and without the private key.

Now when we go back to the App Registration of the service principal we have created and again go to ‘Certificates & Secrets’ we can hit ‘Upload Certificate’.

In here select the certificate file we just created and exported and hit ‘Add’.
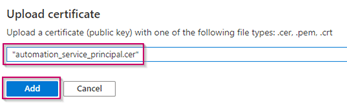
Once the certificate is selected we can see the Thumbprint of the certificate in the Azure Portal as well.
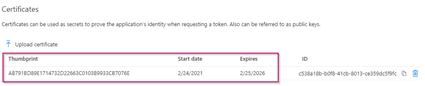
Certificate based authentication on this service principal has now been enabled. From this point forward we can use this service principal and are able to connect based on a certificate and client secret connection.
Keep in mind the actual certificate is required to be present on the device/account connecting with it.
Configure Service Principal Permissions
Before we are actually able to do something with this service principal, we need to provide it with the permissions we require. In this case you need to find out yourself what kind of permissions you need and, important as well, know to which API you are connecting to.
In this example we are going to connect to the Microsoft Graph API. If you are using older API’s I would strongly recommend you to move to the Microsoft Graph API where possible. This, as older API’s like the Azure Active Directory API won’t get the latest and greatest functionality of all that Azure Active Directory has to offer.
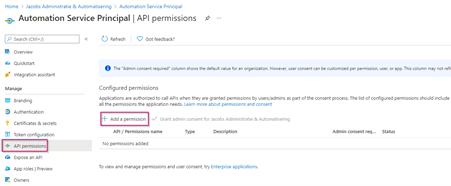
Now let’s say we want to manage some user accounts and authentication methods with this service principal. Let’s add the permissions for that on the Service Principal we created. Therefore go to the App Registrations in Azure Active Directory, select the application which the service principal is connected to and select ‘API Permissions’. In here hit ‘+ Add a permission’.
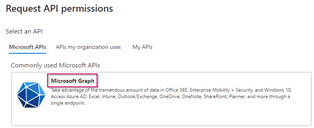
The Request API permissions screen on the right will open, in here we can select the ‘Microsoft Graph’ API.
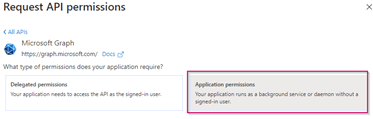
Once selected we can configure either Delegated or Application permissions, the difference between these two is quite simple. Delegated permissions are used when a user is connecting via this service principal. Meaning the service principal determines the permissions the process will get after a sign-in. Application permissions are used when the application itself is connecting, i.e. via the certificate or client secret which we have just created.
As a guideline: Using application permissions will allow the application to process actions completely independent, whereas delegated permissions require a user logon and will therefore provide the user the access based on the access configured on the Service Principal.
In this example we are going to use application permissions, therefore select ‘Application permissions’.
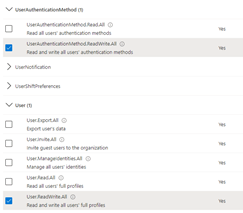
Once selected we can see all the permissions we are able to select, as you can see there are a lot, but in our example we will only use ‘UserAuthenticationMethod.ReadWrite.All’ and ‘User.ReadWrite.All’. Once done hit ‘Add Permissions’.
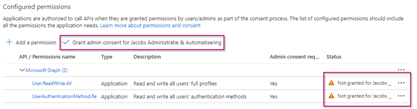
Once added we must grant an admin consent, this can be noted from the column ‘Admin consent required’ where both values are set to ‘Yes’. Therefore hit ‘Grant admin consent for …’.
Please hit ‘Yes’ to confirm the admin consent approval.

As you can see the status will be checked with a ‘green checkbox’ stating that the admin consent is granted.

We are now ready to use the service principal in PowerShell scripts based on the above permissions. Again as in this example application permissions are used we can only use it based on the certificate or client secret configured beneath the service principal.
Using the Service Principal we created
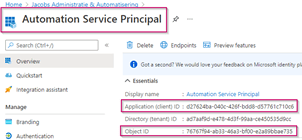
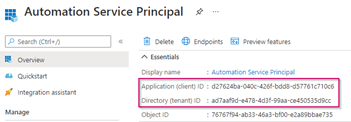
Let’s first gather the required crucial information from the service principal itself. Which is the Application ID and Tenant ID. Both values are required to connect with PowerShell to the service Principal. Note the difference between the Application ID and the Object ID. These are two fundamentally different things, always check which ID you need when it is being requested. In (almost) all cases this will be the Application ID.
Now let’s connect using the certificate. First, make sure that the user account which is running the PowerShell session has the certificate stored in the personal user certificate store. If that’s not the case the logon will fail.
Once you’ve made sure that the certificate is in the personal user store, lets connect to the Microsoft Graph with the following PowerShell cmdlets:
Import-module Microsoft.Graph
Connect-Graph -ClientId {applicationID} -TenantId {TenantID} -CertificateThumbprint {CertificateThumbprint}
Example:
Connect-Graph -ClientId d27624ba-040c-426f-bdd8-d57761c710c6 -TenantId ad7aaf9d-e478-4d3f-99aa-ce450535d9cc -CertificateThumbprint AB791BD89E1714732D22663C0103B9933CB7076E

Not sure about the certificate thumbprint? Use the command below to list all the available certificates on your machine:
Get-ChildItem -path cert:\LocalMachine\My
As you can see I’m successfully connected! And, to confirm the security measures in terms of API permissions, I’m not able to retrieve any groups from the Azure Active Directory.

Which is correct as I didn’t provide the permissions.
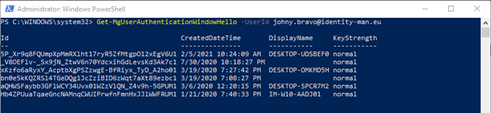
What we are able to do, however, is retrieve the users and check their authentication methods, i.e. the Windows Hello for Business authentication methods as you can see below via the command:
Get-MgUserAuthenticationWindowsHello -UserID johny.bravo@identity-man.eu
As I provided access to read and write authentication methods, I’m able to delete these as well as you can see with the command:
Remove-MgUserAuthenticationWindowHello -UserId johny.bravo@identity-man.eu -WindowsHelloForBusinessAuthenticationMethodId o8ylNeQ0a071RsrlyWdOn3zaDzOm4LyPNQ-DZgMMEcs1

As you can see I did some cleaning up on my test account! Once you or the script has finished, you can easily run the following command to disconnect from the Microsoft Graph API.
Disconnect-Graph
Important to note is that this sign-in is of course logged within the Azure AD under the sign-in logs beneath the ‘Service Principal Sign-ins’.

Now let’s try something different, let’s say you want to connect to a regular Azure resource, i.e. a log analytics workspace as well with the same service principal, and want to use a client secret (which I wouldn’t recommend though if it supports certificate auth).
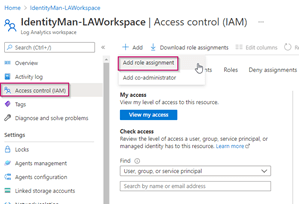
For that we first need to provide the service principal the right access permissions. This can be done on the Azure Resource, beneath the ‘Access control (IAM)’ settings by hitting ‘+ Add’ and selecting ‘Add role assignment’.
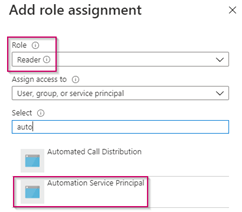
As in this case the service principal only needs to gather data we just give it ‘Read’ access and we select the service principal ‘Automation Service Principal’ and once done we hit ‘Save’.
We are now able to connect with PowerShell and the service principal to this log analytics workspace. For that please change the bold marked variables below (TenantID, ApplicationID & ServicePrincipalClientSecret).
$TenantId = “ad7aaf9d-e478-4d3f-99aa-ce450535d9cc“
$ApplicationId = “d27624ba-040c-426f-bdd8-d57761c710c6“
$ServicePrincipalClientSecret = ConvertTo-SecureString -String “Cw2DiqRvF67O_iz8p5h~Q3~hQ6hQb4K~Th” -AsPlainText -Force
$AzureADCred = New-Object System.Management.Automation.PSCredential($ApplicationId, $ServicePrincipalClientSecret)
As you can tell we are simply filling a “regular” credential-object to connect with, in which the username is the Application ID, and the password is the Client Secret.
Once done execute the below PowerShell code to connect to the Azure environment with the service principal.
Connect-AzAccount -ServicePrincipal -Credential $AzureADCred -TenantId $TenantId
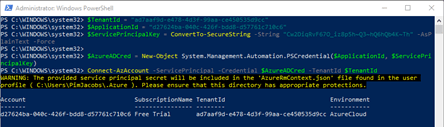
Once we have a look at the sign-in logs for the service principal, we again see that the service principal has connected successfully.

Now let’s say we want to retrieve some sign-in log data which is available within this log analytics workspace via this service principal. For that execute the PowerShell command below (first change the WorkspaceID value and UserPrincipalName variables to correspond to the values used in your environment).
#Define variables
[string]$WorkspaceID = ’69b37e8d-870c-457a-8c98-f9e993e42318′
$UserPrincipalName = ‘johny.bravo@identity-man.eu’
#Create the query for log analytics workspace for last sign in for user which goes back 180 days
$QuerySignInCount = ‘SigninLogs | where TimeGenerated > ago(180d) | where UserPrincipalName == “‘ + $UserPrincipalName + ‘” | summarize signInCount = count() by UserPrincipalName | sort by signInCount desc’
#Execute the query and summarize the count
$ResultsSignInCount = Invoke-AzOperationalInsightsQuery -WorkspaceId $WorkspaceID -Query $QuerySignInCount
$AADSigninCount = $ResultsSignInCount.Results.signInCount
#Write-ouput
Write-output “User $UserPrincipalName has $AADSigninCount sign-ins in Azure AD in the last 180 days!”

As you can see Johny Bravo has two sign-ins in the past 180 days. Whereby this data is retrieved via the service principal from the Log analytics workspace in Azure! Once you or the script has finished you can easily run the following command to disconnect the PowerShell session.
Disconnect-AzAccount
Conclusion
Now you know how you can create a service principal and use it for your scripts which for example run from Azure Automation. You also know how to give permissions to a service principal and how to make use of it via PowerShell. An important take away, as also mentioned before, is the advice to always prefer a certificate above a client secret as that’s more secure. I hope you’ve enjoyed reading this blog and stay tuned for more coming soon!

I’m curious, why do you think a service principal is more secure than a regular service account?
i see a lot of people parroting this line, but I have never seen any argument in favour of it…
LikeLike
Hi Lars,
The biggest difference between a service account and a service principal is that it can’t be used for regular web based sign-ins. A service account exists of a username and a password. While in the best scenario a service principal exist of an AppID, TenantID and Cert Thumbprint. Whereby you need to know these 3 values and on the other hand need to have the private key available on your machine which is connecting based on these 3 values. Even when I do know the 3 values (AppID, TenantID and Cert Thumbprint) and don’t have the actual certificate installed with it’s private key I won’t be able to connect.
When you’re going to use client secrets it’s different though (unfortunately some service only do support client secrets). It’s still better than a regular service account (can’t be used for web-based sign ins) but only exists of things you need to know, hence the reason to use cert based auth where possible.
Lastly when using a SA account, i.e. to configure some permissions I can’t limit it down to very specific permissions via MS Graph. Via the app registration I can specifically determine the permissions the service principal needs, instead of over commiting permissions to a service account.
Hope those are enough reasons for you to start exploring and using service principals in the future and replace your service accounts :-)!
LikeLike
Thanks for the time you spent sharing your knowledge. Really well written .
LikeLike
Thanks and you’re very welcome :-)!
LikeLike
why do we need full access to service principal
LikeLike
Not sure what you mean with ‘full access’? The rights on the service principal can be configured based on the API permission you can configure your self, which is Read or ReadWrite, and that specific to a part of the information (or all). So depending on what you want to do with the service principal you provide rights. Not sure if this answers your question, otherwise a bit more explanation is required.
LikeLike
I really appreciate the time that you took to explain this topic. This is one of the best articles that I could find that explains this so well and well written. Thanks a lot for sharing.
LikeLike
Nice blog thanks for possting
LikeLike