Welcome to a new blog, this time all about Entra Connect Cloud Sync alert rules. Many organizations are today already using cloud sync in their environment and use it in production, as described in my previous blog post. However, have you ever received an email about a single sync error? Probably not, this as the only email alerts which will be sent out by default is the quarantine email when the job is in quarantined state.
To provide a bit more detail, a job goes into the quarantined state when:
- More than 40% of the provisioning events failed
- Microsoft has detected an issue with your application
- Invalid credentials are used for provisioning from source to target
As you can see with a single sync error, by default, no alert is being sent out and with that there is a chance on user impact. Because what if the email address or username can’t be synchronized as it already exists within Entra ID?
For that reason, let’s dive in and make sure you get the alerting of cloud sync configured. For that we of course need to have Entra Connect Cloud Sync configured, so if you haven’t done so yet or want to validate if you’ve configured the core of Entra Connect Cloud Sync correctly, check-out my first blog in these series.
Now let’s head over to the configuration to get the alerting in place!
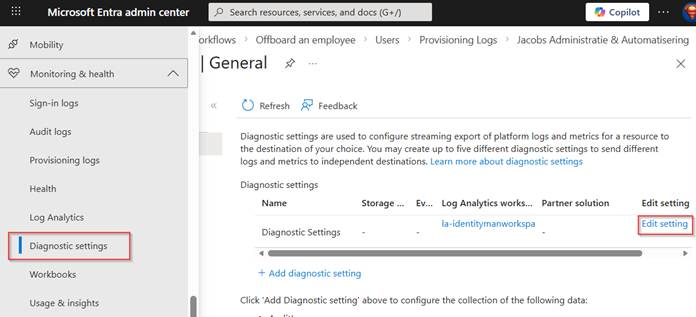
Step 1: Configure the Diagnostic Settings in Microsoft Entra
Our first step is to make sure the logging is available in a log analytics workspace. For that go to the Entra Admin Portal, go to ‘Monitoring & Health’, select ‘Diagnostic settings’ and either ‘add a diagnostic setting’ or hit ‘edit setting’ on a current active configuration.
NOTE: The log analytics workspace doesn’t need to have logs being retained for a long time as we want to use it for active issues and active alerting, meaning the data retention of logs in the log analytics workspace for this functionality can be set to the minimum of 30 days.
In the diagnostic setting, make sure that ‘Provisioning Logs’ are ‘Send to Log Analytics workspace’ and select the subscription and log analytics workspace you want to use. Once ready hit ‘Save’.
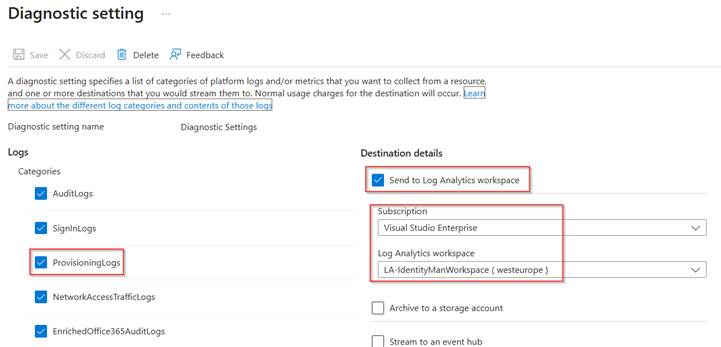
The diagnostic settings are now successfully configured, and logs are now streamed to the log analytics workspace for which we can create additional alerts via Azure Monitor.
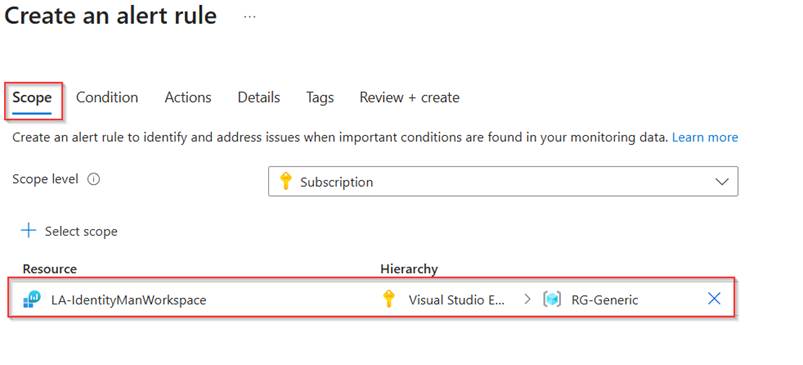
Step 2: Configure the alert rule in Azure Monitor
The next step is to configure an alert rule in Azure Monitor. For that go to the Azure admin portal and go to Azure Monitor. In here hit ‘Alerts’ and click ‘Create Alert rule’. In the pane which opens, make sure within the scope the same log analytics workspace is used for which we have configured the diagnostic settings. Once ready hit ‘Next’.
In the condition step, make sure that ‘Custom log search’ is selected as signal name and select ‘aggregated logs’. For the search query, the below query can be used whereby you need to replace the ‘JobID’ values with values from your tenant.
AADProvisioningLogs| where JobId contains "AD2AADProvisioning.ad7aaf9de4784d3f99aace450535d9cc.97be2b34-9f60-49e1-8bed-5d14cfb0ef1a" or JobId contains "AD2AADPasswordHash.ad7aaf9de4784d3f99aace450535d9cc.97be2b34-9f60-49e1-8bed-5d14cfb0ef1a" or JobId contains "AAD2ADExchangeHybridWriteback.ad7aaf9de4784d3f99aace450535d9cc.97be2b34-9f60-49e1-8bed-5d14cfb0ef1a"| where ResultType == "Failure" or ResultType == "Warning"| extend ProvisioningSteps = parse_json(ProvisioningSteps)| project TimeGenerated, ResultType, Action, tostring(ProvisioningSteps.[0].details.displayName), tostring(parse_json(StatusInfo).Reason)
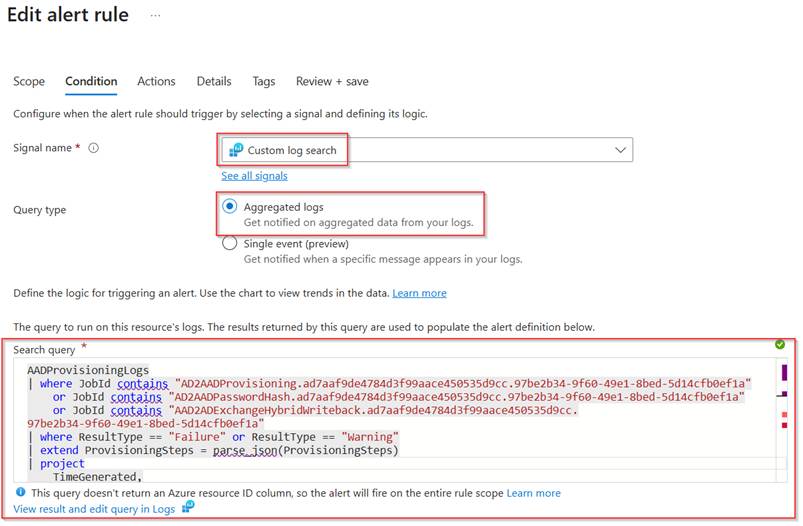
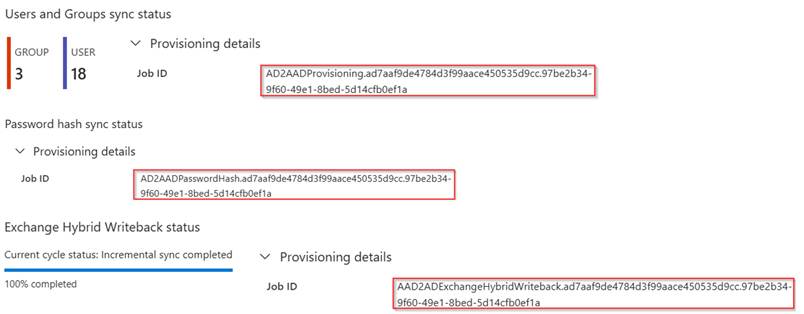
NOTE: These JobIds can be found within the provisioning configuration overview of Connect Sync. A few examples are shared below, please be sure that when new jobs are being added these are also added to the search query within the alert rule!
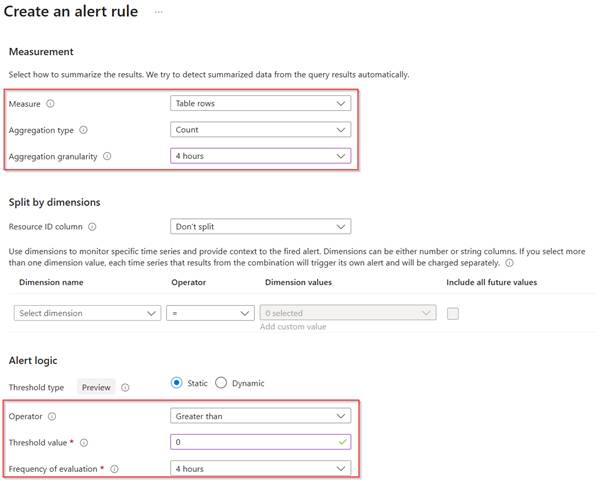
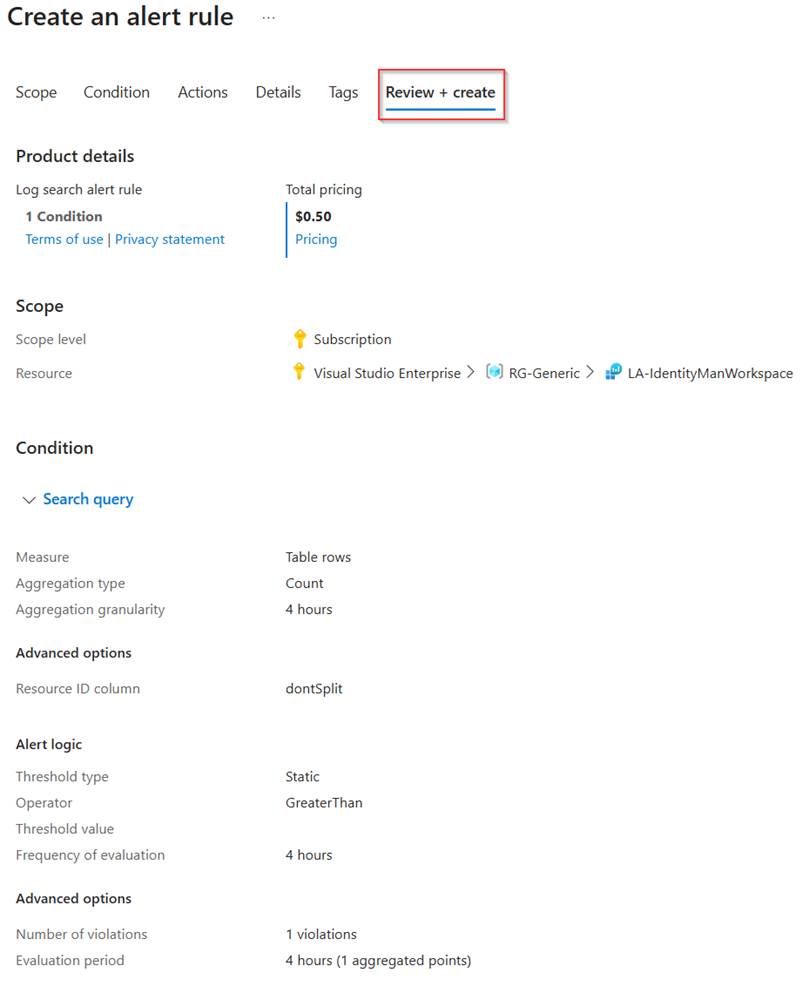
Once the query has been altered correctly, scroll down and make sure the ‘measurement settings’ are configured and configure the ‘alert logic’. The measurement is looking at a count value, and the alert logic is checking each 4 hours whether the count value is greater than 0 with the settings shown below. This means the rule will check each four hours if there is a result based on the log query in log analytics, if this is the case this alert rule is being triggered. Once ready hit ‘Next’.
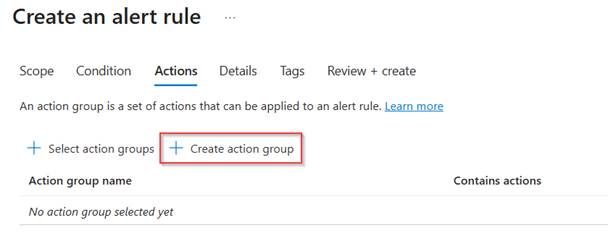
Now within the ‘Actions’ we configure what should be done when an alert is being triggered. If you already defined action groups here these can be re-used. For me this is not the case so let’s select ‘Create action group’.
Now choose in which region and which subscription this Alert rule needs to be created and give the action group a ‘Name’ and ‘Display Name’. Hit ‘Next’ when ready.

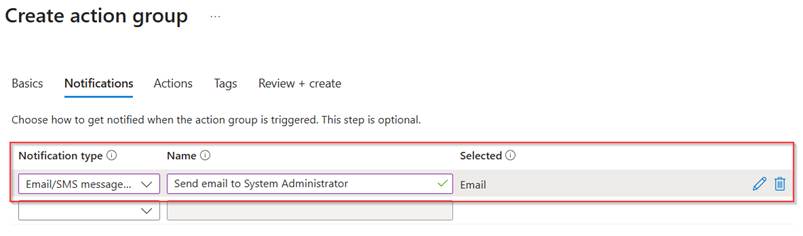
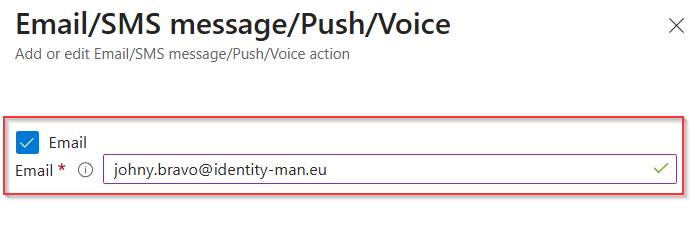
Within the notifications section select ‘Email/SMS Message/Push/Voice’ and give the notification a friendly name.
In the settings itself we can see that an email will be sent out to ‘Johny.Bravo@identity-man.eu’ in case the alert rule is triggered.
Once configured go to the ‘Review + Create’ step, review all settings and hit ‘Create’ once all is good.

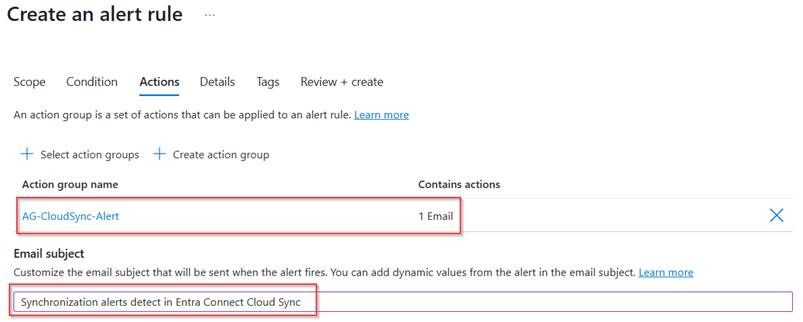
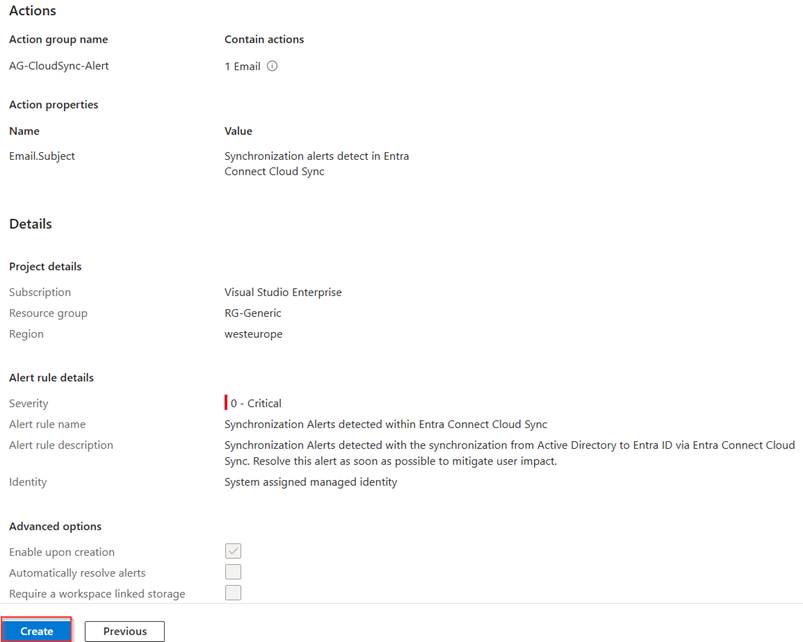
Now the action group is created and selected within the Alert Rule, we can provide a user friendly ‘Email subject’. For this I’ve used ‘Synchronization alert(s) detected in Entra Connect Cloud Sync’. Once you’re happy with the action group configuration, hit ‘Next’.
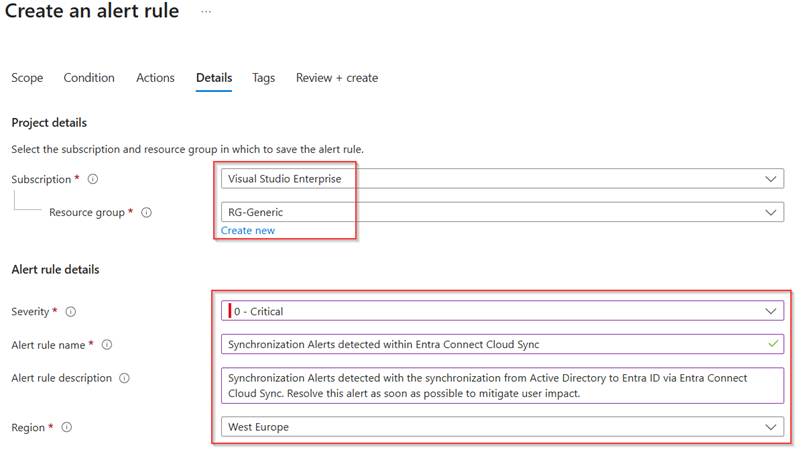
Now it’s time to configure the last part of the alert rule, which is the subscription and resource group in which the alert rule will be created and with that also the ‘Severity’, ‘Alert rule name’, ‘Alert rule description’ and ‘Region’.
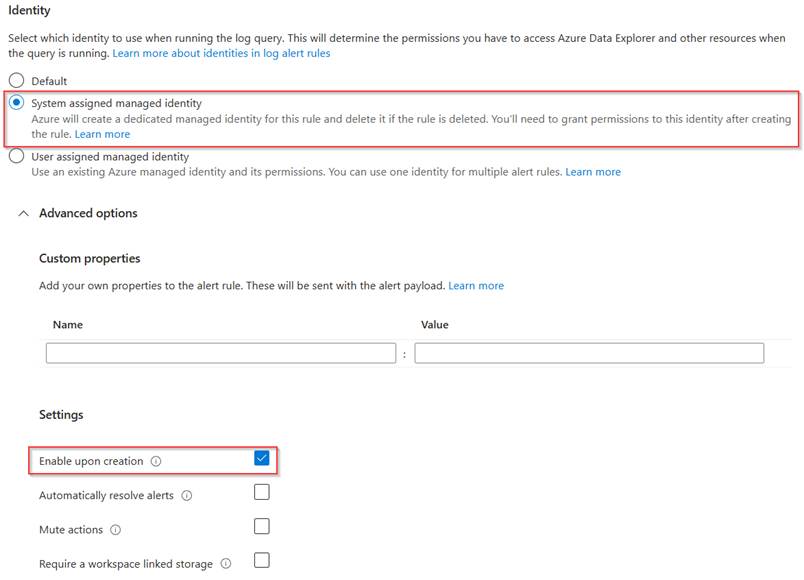
Once the alert rule details are configured, scroll down and make sure to select ‘system assigned managed identity’, this identity will be created and need to be provided permissions separately to run this alert rule to query log data in the log analytics workspace. This way we not only make sure to use the least privilege concept, but also from a housekeeping perspective this is a good solution when this alert rule is deleted, the permissions are being deleted as well.
Now verify the configuration of the alert rule and once you’re happy hit ‘Create’.
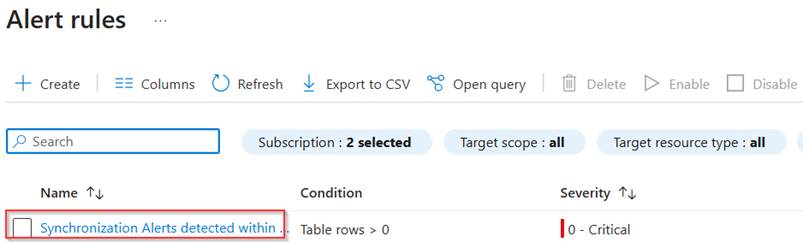
As you can see under ‘Alert rules’ the rule has now been created successfully.
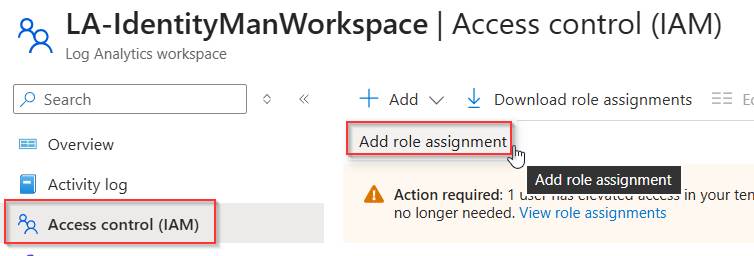
The final step we need to take is to provide permissions to the managed identity which has been created with the creation of this rule.
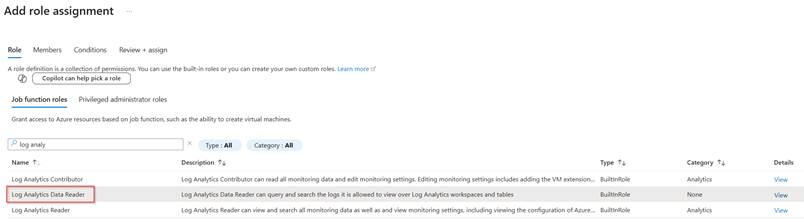
For that go to the log analytics workspace which is being used for this alert rule and go to ‘Access Control’, hit ‘+ Add’ and select ‘Add role assignment’.
Search for the ‘Log Analytics Data Reader’ role which is the default role with bare minimum permissions for the alert rule to function, once ready hit ‘Next’.
In the members section add the ‘Managed Identity’ of the ‘Alert rule’ which has been created during the creation of the alert rule. Once ready, go to the ‘Review + assign’ step and once you’re happy hit ‘Review + Assign’.
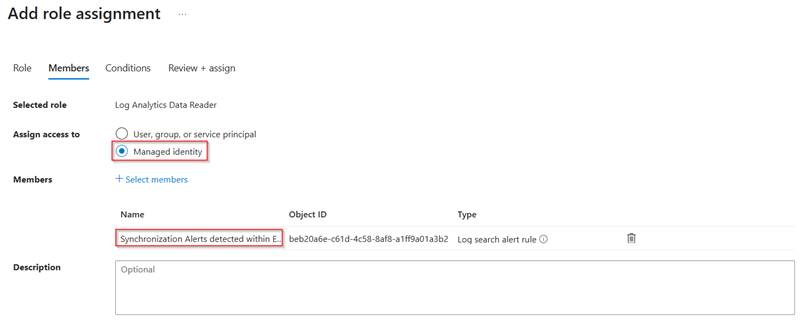
As you can see the managed identity has now been provided permission to the log analytics workspace to read log analytics data.

This concludes the configuration part of the alert rule and the permissions, so now it’s time to check the behaviour and see if alerts are being created and trigger the email which is configured in the action group.
Step 3: Behaviour validation of the alert rule
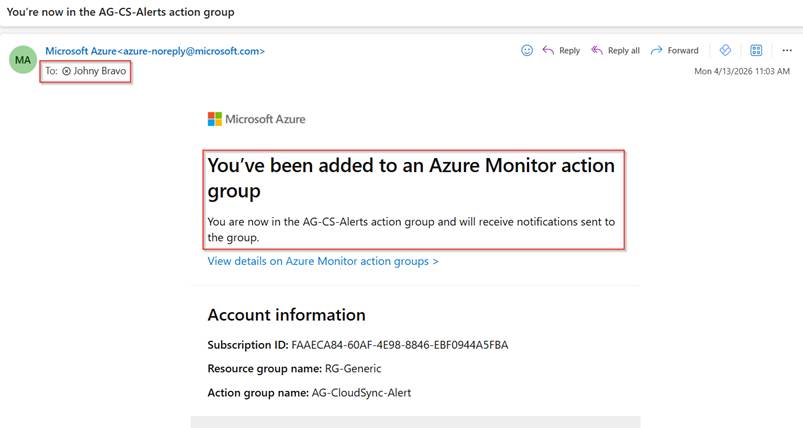
Now the alert rule has been created, let’s validate if the rule is working correctly. So first let’s sign in to the email of Johny Bravo. As we can see during the configuration of the action group an email has been sent out to Johny notifying him about the fact that he has been added to an Azure Monitor Action Group.
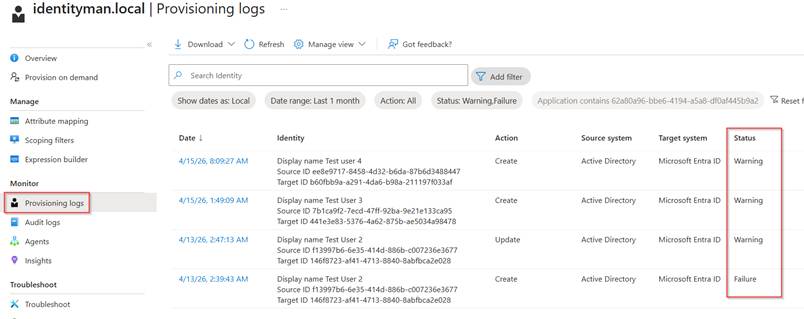
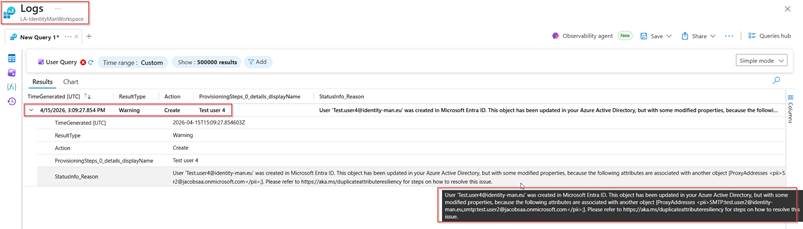
Of course, this is rather a notification than an alert, and as my configuration is healthy, let’s make it unhealthy by going to Active Directory User and Computers and adding a few new accounts with duplicate ProxyAddress values. After some time (in most cases minutes) the cloud sync agent will pick up these changes and tries to synchronize them to Entra ID. As expected, there are duplicate values which now triggers warnings and failures in the provisioning logs.
If you have copied over the exact Alert rule configuration it takes between 0-4 hours for Azure Monitor to detect these warnings and failures which will trigger the Alert rule, and as Johny is in the action group, Johny is notified, as you can see below, by email.
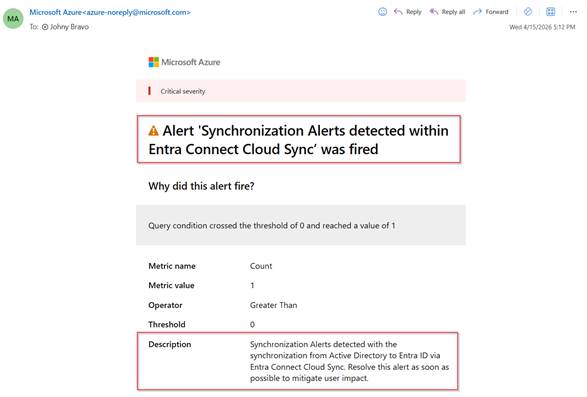
If you scroll a bit more down to the ‘Additional details’ in the email there is a button ‘View search results’, which will show exactly on which failures and warnings this alert rule has been triggered.
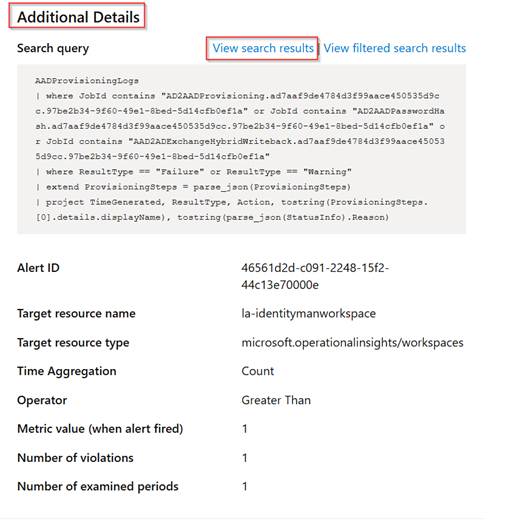
With that a browser will open and (if you have permissions) will show you the exact same error message as shown in the provisioning logs but now shown in log analytics. In this case we can see that the proxyaddress ‘test.user2@identity-man.eu’ is already being used and couldn’t be written to the object(s) in Entra ID.
Based on these notifications you can act on synchronization errors and make sure these are resolved as soon as possible to prevent bad user experiences or inconsistent behavior for end users and keep your Entra Connect Cloud Sync Identity Deployment rock solid!
Conclusion
Now we know that by default, Entra Connect Cloud Sync only notifies administrators when a job enters a quarantined state, leaving individual synchronization warnings and failures largely unnoticed. As you’ve seen throughout this blog, this can introduce real risks, such as inconsistent identity data or delayed impact on end users. By configuring diagnostic settings, streaming provisioning logs to a Log Analytics workspace, and creating a targeted Azure Monitor alert rule, you gain timely visibility into synchronization warnings and failures long before they escalate into larger issues.
So, if you have deployed Entra Connect Cloud Sync, implementing this alerting setup is a practical and effective way to strengthen the reliability of your identity synchronization and keep your Entra environment stable and predictable for both IT administrators and end users.
With that I hope you’ve learned something new about Entr Connect Cloud Sync and let’s continue the journey by configuring Group write-back next time and converting the Source of Authority for groups to by Entra.
Next up, for now in this series are:
- Configuring Group write-back and use source of authority to change Entra to be the primary source.
- Migrating your configuration from Entra Connect Sync to Entra Connect Cloud Sync.
- Migrating the source of authority for Exchange Attributes to Entra and removing the last exchange server dependency.
- Other investments being made (sorry folks NDA).
