The Microsoft Authenticator App is these days used a lot by organizations to secure environments with Azure Multi Factor Authentication, which is great and the most secure option to perform Multi Factor Authentication. Of course, there are other ways to perform Multi Factor Authentication, which are SMS & Voice Calls, these are in my opinion the least secure and least user-friendly options of all the MFA methods available today (due to for example potential SIM-hijacking). Besides that, they don’t fit in to a password less strategy! Alex Weinert has written a great blog about why, which you can find here.
So, a first call out (from me) to every organization who hasn’t don’t this already, is to encourage users to start using the Authenticator App to improve the security posture of their second factor sign-in. And even more important to make the Multi Factor prompts even more user friendly for your end users! This can easily be done by implementing ‘Nudge’ for the Authenticator App, more details on how to implement this in your environment can be found in this blog.
Having said that, what about improving the notifications within the Authenticator App to make things even more secure and recognizable for your end users? Well since a few months, three additional features became available in the public preview refresh which are:
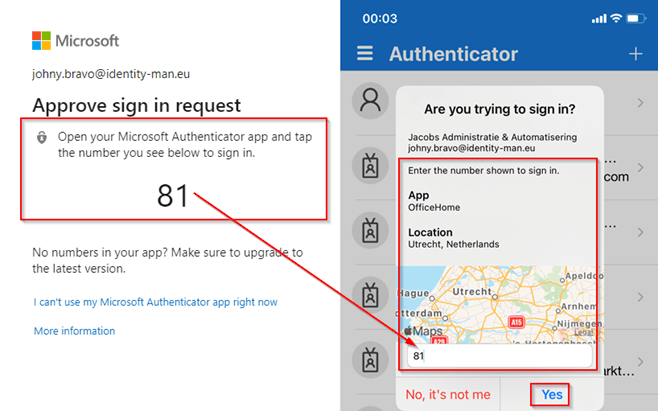
- Number matching – When a user responds to an MFA push notification using Microsoft Authenticator, they will be presented with a number which they need to type into the Authenticator app to complete the approval.

- Show application name in notifications – When a user receives a Passwordless phone sign-in or Multi Factor Authentication push notification in the Authenticator app, they’ll see the name of the application.
- Show geographic location in notifications – When a user receives a Passwordless phone sign-in or Multi Factor Authentication push notification in the Authenticator app, they’ll see the sign-in location (based on their IP).

All three options will highly increase the security posture of Multi Factor Authentication prompts within your organization. This as the first option called Number Matching will require the user to type in the number, shown during the sign-in process, into the Authenticator App. This first option limits the accidental approvals down to a minimum and besides prevents MFA fatigue (think of the Uber hack which all start with an accidental MFA approval)!
The second option, called show application name, will show the end user who is performing the Multi Factor Authentication request, which Application they are logging into. The third option, called show geographic location, will show the end user who is performing the Multi Factor Authentication request, what the location is of the sign-in request, based on their browse IP address. Especially the first & second, will let the users think twice before they approve their Multi Factor Authentication request (either with ‘Number Matching’ or the well-known ‘Approve / Deny’ option).
Now to use these new features there are three important things to keep in mind which are:
- If you are using the Azure MFA AD FS adapter functionality, please upgrade the AD FS adapter first to make use of the number matching feature, more information can be found here.
(Although I would strongly recommend to use Staged Migration to move of AD FS). - If you are using the Azure MFA NPS Extension please upgrade the NPS Extension first to make use of the number matching feature, more information can be found here.
- Number matching for admin roles during SSPR is pending and not available yet today.
Now that we know the above, let us have a look at the steps which you need to take from a technical perspective and how that looks from an end user perspective so you can drive the right adoption and inform your users correctly as well!
How to enable the ‘Number matching’ feature for the Authenticator App!
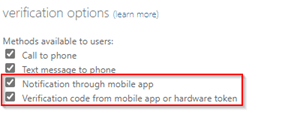
To make sure your users can use this new feature, called Number Matching, let’s make sure your Azure Active Directory is configured correctly. The first thing we need to check are the ‘old’ Multi Factor Authentication settings page. On this page, make sure that under the ‘Verification options’ the checkboxes for ‘Notification through mobile app’ & ‘Verification code from mobile app or hardware token’ are selected.
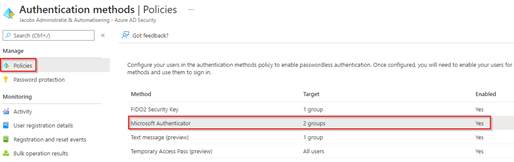
Once this is done let’s configure the ‘Microsoft Authenticator’ setting in Azure Active Directory. This can be found when going to the Azure-portal page, go to ‘Azure Active Directory’, click on ‘Security’ and hit ‘Authentication Methods’. Within this blade click on ‘Policies’ and select the ‘Microsoft Authenticator’ option.

In the basics settings make sure the setting Enable is set to ‘Yes’ and a test group is included, in my case ‘IdentityMan-Users’ (but preferably select ‘All Users’). When the group is selected (or you’ve put the setting to ‘All Users’), configure the ‘Authentication Method’. Make sure the ‘Authentication Mode’ setting is set to ‘Push’ (meaning Push notifications or TOTP) or ‘Any’ (meaning Push notifications, TOTP or Passwordless).

NOTE: You can also define ‘Passwordless’ which means a specific user group is only allowed to use ‘Passwordless’ within the authenticator app!
Now go to the Configure settings tab, here make sure to configure the ‘Require number matching’ feature as well. In here make sure the setting ‘Require number matching’ is therefore set to ‘Enabled’. And set the setting to ‘All users’ or include a specific group. important here to mention is that when you’re using an include group users will only be targeted for number matching if they are included in the basics settings, as configured earlier, as well.
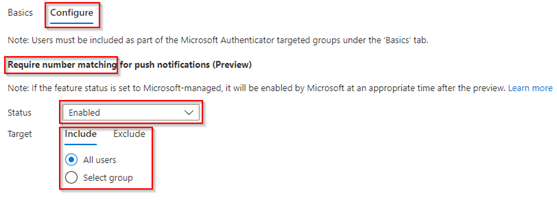
NOTE: Microsoft Managed in here means that the functionality will be enabled by default for all tenants a few months after general availability (GA) of the feature. So, if you want to prepare your users, start today by testing out the feature or disable the feature (not recommended though!) until you’re ready to roll-out globally in your organization!
Verify the settings and click on ‘Save’ when all settings are configured.

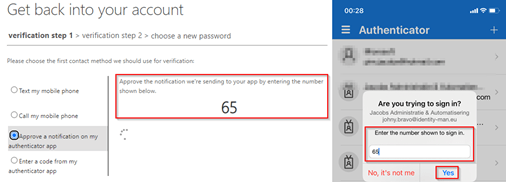
Now we have (re-)configured the Authenticator App experience within the Azure Portal, make sure your users are added to the group(s) you have added to the Microsoft Authenticator Policy above. With this last step the configuration in Azure Active Directory has been finished and your users can now use the ‘Number Matching’ feature, which we just enabled, while enrolling for Multi Factor Authentication, signing in and performing Multi Factor Authentication, as well as a Passwordless Sign-in. All three end user experiences with ‘Number Matching’ enabled are shown below.
1. Enrolling for Multi Factor Authentication Behavior

2. Signing in and performing Multi Factor Authentication behavior

3. Signing in with Passwordless behavior

Besides sign-ins this feature is supported as well during a self-service password reset, when you have enabled the ‘App Notification’ option as an administrator within the self-service password reset authentication methods. The behavior which your end users will see is shown below.
Now the ‘Number matching’ feature is enabled within your tenant your users can start using the feature and you have prevented users from ‘accidentally’ approving bad sign-ins. Now the security level of your tenant has been increased let us have a look at the other options of this blog, which is the ‘Application Name’ & ‘Geographic location’ features in notifications.
NOTE: If you are using the Azure MFA NPS Extension and want to make user of the number matching feature via the Azure MFA NPS extension please make the necessary registry configuration changes, more information can be found here.
Enable the ‘Application name & Geographic location’ in Authenticator App Notifications feature!
To make sure your users can use these new features, called Application Name & Geographic location in notifications, let’s make sure your Azure Active Directory is configured correctly. For this configure the ‘Microsoft Authenticator’ setting in Azure Active Directory. This can be found when going to the Azure-portal page, go to ‘Azure Active Directory’, click on ‘Security’ and hit ‘Authentication Methods’. Within this blade click on ‘Policies’ and select the ‘Microsoft Authenticator’ option.
In here go directly to the Configure settings and enable both features, either by including a specific user group or by selecting ‘All Users’. Again, important here to mention is that when you’re using an include group users will only be targeted for application name and geographic location if they are included in the basics settings, as configured earlier, as well.

NOTE 1: Microsoft Managed in here means that the functionality will be enabled by default for all tenants a few months after general availability (GA). So, if you want to prepare your users start today by testing out the feature or disable the feature until you’re ready to roll-out in your organization!
NOTE 2: In this example I’ve enabled both settings, you can choose yourself if you want to use just one of them or both (or none of them), personally I would always enable the Application Name in notifications, Geographic location in notification fully depends on your user base, this as in my example I’m signing in 80 miles from home which can be really confusing for end users.
Click on ‘Save’ when both settings have been configured.
Now we have (re-)configured the Authenticator App experience within the Azure Portal, make sure your users are added to the group(s) you have added to the Microsoft Authenticator Policy above. With this last step the configuration in Azure Active Directory has been finished and your users can now use the ‘Application name’ and / or ‘Geographic Location’ feature, which we just enabled, while signing in and performing Multi Factor Authentication as well as a Passwordless Sign-in. Both end user experiences are show below with both ‘Number Matching’, ‘Application name in notification’ and ‘Geographic Location in notification’ enabled.
1. Signing in and performing Multi Factor Authentication behavior
2. Signing in with Passwordless behavior

Compared to the ‘Number Matching’ feature, the ‘Application Name’ and ‘Geographic Location’ in notification features are unfortunately not available during a Multi Factor Authentication enrollment (which is explainable) and during the self-service password reset process (☹).

We now have configured and tested the ‘Number Matching’, ‘Application name in notification’ and ‘Geographic Location in notification’ features which improves the security posture of the tenant and informs your users about the approval requests they receive with enhanced information in the Microsoft Authenticator App.
Conclusion
By using the ‘Number Matching’, ‘Application name in notification’ and ‘Geographic Location in notification’ features with Nudge, the improved enrollment experience and using GPS Coordinates to approve or block access, the Microsoft Authenticator App is definitely the way to go to secure your Azure AD environment. Let’s say goodbye to methods like SMS & Voice calls and give the Microsoft Authenticator App a warm welcome within your environment if you haven’t already!
I hope you again enjoyed reading my blog about this feature and stay tuned for some more new great features of the authenticator app in the future!
Blogs in this series:
- Nudging your users to the Microsoft Authenticator App for MFA
- Improving the Authenticator App enrollment experience for your end users
- Using GPS Coordinates from the Authenticator app to approve or block access
- Improving the Microsoft Authenticator App Notifications
