A warm welcome to my next blog in the Identity Governance series which will focus on the identity Lifecycle management for your guests!
Each organization is dealing with guest users today in their Azure AD tenant. Some of the guest users are maybe invited just yet, some of them are maybe months old and some of them are years old. Whereby some guest users are still active, some of them are only using it twice a year and some of them have already left the company whereby the account of the user was removed in their home tenant, but never the guest user in your tenant.
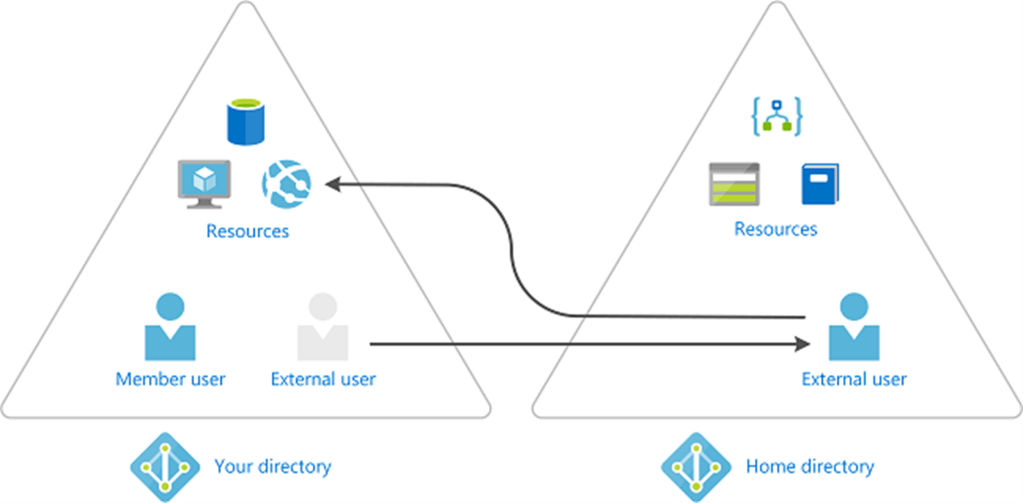
Whereby it’s super easy to get guest users in your tenant, as people can invite from MS Teams or share documents in OneDrive / SharePoint. It’s on the other hand quite hard to get them cleaned up correctly, there isn’t really an automated process for that in place, or is there?
Well to get an answer to that question I will show you in the upcoming three blogs in this series, of which this is the second one, the latter by applying identity lifecycle management around guests within your tenant. This whereby we are going to use the Azure AD Identity Governance features called Access Packages and Access Reviews and will use a PowerShell script as well within Azure Automation. This as there are several ways to achieve your goal(s) and depending on the use case(s) you have you need to determine what the right solution is for your environment.
I can hear you thinking, “What are those three options in short?”, therefore I’ve summarized them in short for you below:
- Let the lifecycle of guest accounts be managed via Identity Governance – Whereby an access package will manage the provisioning and deprovisioning process of the guest users.
- Use Azure Automation and scripting logic to clean-up guest accounts – Whereby a global access review will be used for your guest users and a script will be placed within Azure Automation which will disable and eventually clean-up ‘inactive’ guest users from your tenant.
- Use Access Reviews to clean-up Guest Accounts – Whereby an access review is created for guest users which can and eventually will disable and clean-up ‘inactive’ guest accounts from your tenant.
NOTE: If you’ve Azure AD Premium P2 available in your tenant and already have guests in your tenant, I highly suggest to at least use the last option as that is using native Azure AD functionality.
Now you know the three options we have available, let’s have a look at the second option ‘Use Azure Automation and scripting logic to clean-up guest accounts’ in this blog in more detail and how to get this configured and get you up and running!
Option 2: Use Azure Automation and scripting logic to cleanup guest accounts
Now we know how we can manage the lifecycle of guests using the identity governance access package process we can implement a process around this for new guest accounts. But what about the scenario’s where you want to offer flexibility to your end users so they can invite guests in teams within MS Teams their selves or the scenarios which you can’t cover yet via an access package like sharing a file in SharePoint Online whereby a guest account is provisioned in the Azure AD via this process?
These scenarios aren’t covered by an access package so the Identity Lifecycle management which we applied earlier doesn’t work here. To get Identity Lifecycle management applied here we first will make sure these guest users don’t have any group memberships applied on the account which are related to a MS Teams environment. This as we don’t want guest users to lose access while they are only working occasionally as a guest in your environment. Secondly, once that is configured, we are going to use a PowerShell script, which we can target via Azure Automation (as an example) which will cleanup these guest accounts who aren’t active and don’t have any group memberships applied.
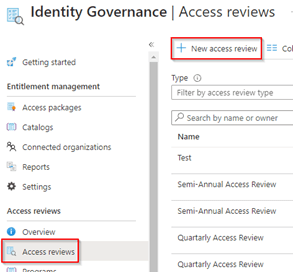
Now to get this configured, let’s start with Step 1, which is creating an Access Review within Identity Governance (to cleanup group membership), therefore go to the Azure Active Directory, hit Identity Governance, go to the ‘Access Reviews’ and hit ‘+ New access review’.
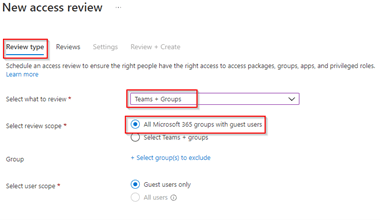
Within the ‘Review Type’ when creating this new access review, make sure to select ‘Teams + Groups’, select ‘All Microsoft 365 Groups with guest users’ and then hit ‘Next’.
Within the ‘Reviews’ settings make sure a reviewer is selected, in my example I’ve selected ‘Users review their own access’, so we leave the decision with the Guest user if he or she still needs access to this resource. Within the recurrence I’ve selected that the review runs each quarter, it starts on the first of November this year and it will never stop. Further the access review has a duration of 30 days, meaning the review will start on the 1st of November, the guest users will be informed by email and have 30 days to respond. This process will repeat itself each quarter so the next access review round would be the 1st of February in this case. Once done hit ‘Next’.
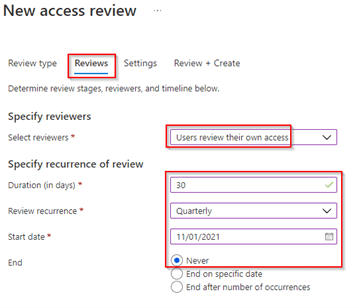
NOTE: You can also select to let ‘Group Owners’ review the access of guests which is better from a security perspective as the risk here is that someone can decide on their own if they still need access which is a relation build on trust.
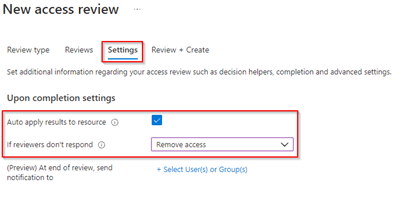
Within the ‘Settings’ of the access review let’s make sure the ‘auto apply results to resource’ is checked and configure what happens to reviewers who don’t respond. In my case I’ve selected ‘Remove Access’ this so when the reviewers don’t respond access will be removed. Eventually select a user who should receive notifications at the end of the review.
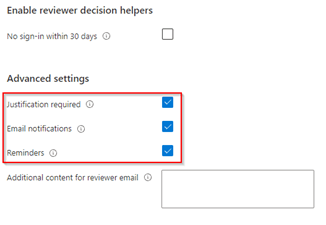
The next step is to configure the advanced settings as required, I’ve enabled that guest users require to fill in a justification, they will be informed by email and if they didn’t respond to the access review yet at the midpoint of the access review, they will receive a reminder.
At the ‘Review + Create’ settings pane please make sure to provide a review name (this is what end users will also see within the email being send out, so please make sure to provide a correct name here which is familiar to your guest users). And once ready hit ‘Create’.

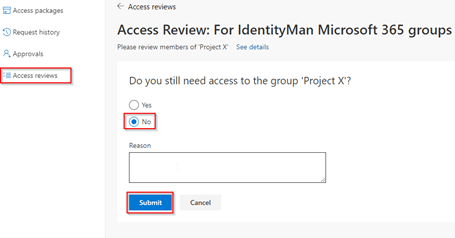
Once the review has started the user receives an email and can act based on it to review their permissions by hitting ‘Start review’. If the user ignores this message or has left the company the user will be removed automatically as a member of the group at the end of the review.

If the user decides to hit ‘Start Review’, he or she can extend access by selecting ‘Yes’ or can decide to select ‘No’ to remove their membership. When required a reason can be filled in by the guest user and once ready he or she can hit ‘Submit’.
Now the access review is configured, and guest users (or group owners) are being challenged and because of that the access lifecycle for those accounts is challenged, let’s start with Step 2, by having a closer look at the identity lifecycle management for guests. As described above the second step after creating the above access review is implementing a PowerShell Script in Azure Automation which is using the Graph API to disable and eventually delete those ‘unused / inactive’ guest accounts. These guest accounts don’t have a group membership anymore (which is most likely the outcome of the access review). To get this working we first need to create a service principal, don’t know how you need to create one? Don’t worry, I’ve written another blog which explains this in a step-by-step scenario which you can find here.
The only difference compared to that blog is that we do need to configure the service principal with different permissions, these are AuditLog.Read.All and User.ReadWrite.All, both based on the Application type, based on the Microsoft Graph API and need to be consented (as can all be seen below).

Furthermore, by using this example, the Service Principal has to make use of a client secret, therefore make sure a client secret is created and you’ve noted down the value of the client secret and besides have your TenantID and ApplicationID (of the created service principal) noted down as well.

Now go to Azure portal and open the Automation Accounts and select an Automation Account (or create one if you haven’t done so already).
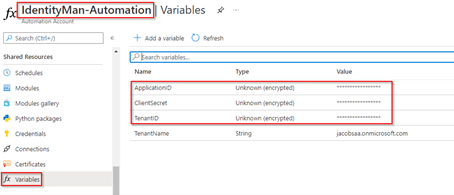
Within the Automation Account you created, go to ‘Variables’ and in here make sure to add the variables:
- ApplicationID – with the Application ID of the service principal;
- ClientSecret – with the ClientSecret configured on the service principal;
- TenantID – with the TenantID of your tenant (where the service principal lives in).
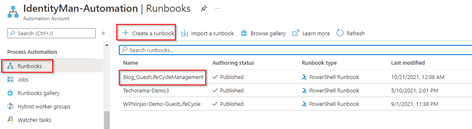
Once configured within the Automation Account, go to ‘Runbooks’, hit ‘+ Create a runbook’, give the Runbook a name and make sure to select ‘PowerShell’ as the runbook type and hit ‘Create’. As you can see below, I’ve named my runbook ‘Blog_GuestLifeCycleManagement’.
Now select the runbook ‘Blog_GuestLifeCycleManagement’ and hit ‘Edit’. In here copy the content of my example script on GitHub which you can find here. Once all content is copied, make sure the tenant variables section within the runbook is configured correctly and referring to the same automation variables as we created earlier.

You can now safely hit ‘Save’ to make sure the above settings are committed. Now before Publishing and using the script let me first explain shortly in steps what the script does:
- The script first connect to the Graph API to retrieve an access token.
- Once connected to scripts is retrieving all guest users from the tenant.
- It will then check for each of the users if they belong to a non-dynamic group, if this is the case the script will stop as we first wait for the access review to remove the rights.
- If the user has no memberships or is only a member of dynamic group(s) the script will continue and check the lastSignInDateTime of the user (which updates each time the user does an interactive sign-in). Once this is done there are three scenarios defined:
- The guest user hasn’t accepted their invitation and the invitation is already 30 days old. In this case we delete the guest user from the tenant as it’s either not required anymore or it can be a typo in the invite.
- The guest user did accepted the invite, but was already inactive for more than 150 days but less than 179. In this case we disable the guest user account as it seems like the user doesn’t need his guest account anymore.
- The guest user did accepted the invite, but was already inactive for more than 180 days. In this case we delete the guest user account as the user was already blocked and therefore can safely be removed from the Azure Active Directory.
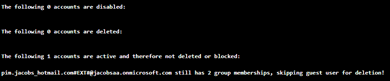
- Once all actions have been take these will be summarize in the output as shown below.
NOTE: This script has been tested and verified in production environments and will start disabling or deleting accounts with the above configured. If you just want to make sure it’s going to report first, either comment lines 70,89,99 or provide the service principal with only User.Read.all permissions instead of User.ReadWrite.all!!
If you are happy with the above situation and configuration (especially the scenario’s whereby days are involved), you are good to go and you can publish the script. If you still want to enhance and change the script or eventually add some more advanced steps this is the time to go nuts on PowerShell ;-).
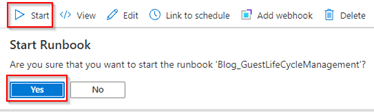
Once you have determined the settings within the script are okay, ‘Publish’ the script and the hit ‘Start’.
When the script runs okay, you can schedule the script to run each week or each month with a recurring schedule. This can be configured on the Runbook by going to ‘Schedules’,
Now this is all implemented we made sure guest accounts are challenged with a review on all Microsoft 365 groups they are a member of. Once the guest user has ‘lost’ its group memberships the script will check the user for account ‘inactivity’ and will take either action to disable the account and eventually even remove the account. As an extra cleanup we even added a cleanup for user who are invited and didn’t accept it for a specific number of days (30 in my example).
The above will make sure that you have applied Identity Lifecycle management around your guests and will improve the security posture of your accounts! 😊
Conclusion
After you’ve followed the above steps and / or steps from my previous blog you have implemented a lifecycle management solution for guest accounts within your tenant. This either via the use of access packages or access reviews in combination with an Azure Automation script. You know what both options can offer you and you can eventually when required customize the script to your own needs and requirements. This will, besides executing a good cleanup, improve the security posture within your tenant as well around guest accounts!
I hoped you enjoyed reading this new blog within the Azure AD Identity Governance series! Stay tuned for Part 3 of the blog ‘Implementing Identity Lifecycle management for guest’ in the upcoming weeks :-).
- An Introduction to Azure AD Identity Governance
- Identity Governance 1 of 10: Implementing a Strong Identity Foundation
- Identity Governance 2 of 10: Implementing Identity Lifecycle management for guest users – part 1
- Identity Governance 2 of 10: Implementing Identity Lifecycle management for guest users – part 2
- Identity Governance 2 of 10: Implementing Identity Lifecycle management for guest users – part 3
- Identity Governance 3 of 10: Configuring Provisioning in 3rd party apps for (guest) users
- Identity Governance 4 of 10: Implementing LifeCycle Workflows – Configure the basics
- Identity Governance 4 of 10: Implementing LifeCycle Workflows – Configure onboarding workflows
- Identity Governance 4 of 10: Implementing LifeCycle Workflows – Configure offboarding workflows
- Identity Governance 5 of 10: Using the hidden gems in Azure AD access packages, all you need to know! – Part 1
- Identity Governance 5 of 10: Using the hidden gems in Azure AD access packages, all you need to know! – Part 2
- Identity Governance 5 of 10: Using the hidden gems in Azure AD access packages, all you need to know! – Part 3
- Identity Governance 5 of 10: Using the hidden gems in Azure AD access packages, all you need to know! – Part 4
- Identity Governance 6 of 10: Using the brand new Entra Inbound Provisioning API for Identity Lifecycle Management!
- Identity Governance 7 of 10: Recertify access by using Microsoft Entra Access Reviews! – Part 1
- Identity Governance 7 of 10: Recertify access by using Microsoft Entra Access Reviews! – Part 2
- Identity Governance 8 of 10: Implementing Privileged Identity Management
- Identity Governance 9 of 10: Implementing a Terms of use
- Identity Governance 10 of 10: Review by Monitoring and reporting
