A warm welcome to my next blog in the Identity Governance series in which I will explain all about Azure AD access packages and to be more specific the ‘hidden gems’ within Access Packages. But before we get to that, let’s first dive into what Access Packages are and why it’s important to use them.
Access Package are part of the Entitlement Management feature within Azure AD Identity Governance and part of the Azure AD Premium P2 license. Each Access Package can provide access to one or more resources like Azure AD Groups, Enterprise Applications, SharePoint Online sites or can trigger a custom extension for your custom demands.
With this we can offer access via these packages to our end users and guests, which the user or guest is able to request. The packages can contain restrictions which determine who is able to request the package, (multi-staged) approval flows, Access Review / Expiration Settings and more! So, with this functionality we can empower the business and with that your end users & guests to handle the full process themselves without interference of IT after the package has been created. So, it’s simply self-service for the win! And it gets better, if you want, you can even delegate some of the management, to experience IT users, in the business to create their own access packages for their own resources.
After the users gets access, we can make sure access is automatically expired or we can configure an Access Review, this to make sure access either expires or is required to be reviewed. This whole process helps preventing dormant access and besides it supports the ‘mover’ process within an organization, where an employee switches jobs within the same company but does require different access permissions.
To help you get started with some ideas where you can use Access Packages for, let me help you with the following examples (some of them will come pass by in the next blogs):
- Let users request access to a package of resources for their department (Pro tip: by using group writeback (as explained in this blog), you can use access packages for on-premises resources as well!).
- Let users request access to use the Insider Preview builds of Windows 11 and Microsoft 365 Apps.
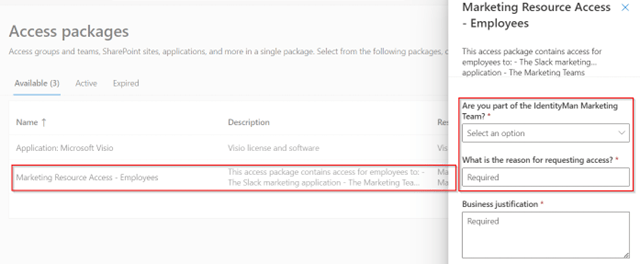
- Let users request access to additional licensed software, like Visio or Project, but also think of Applications like Slack which you can connect to your Azure AD to handle provisioning.
- Let users request access to a temporary access pass if you’re at the start of a Multi-factor authentication roll-out.
- Let users request access to use a USB stick for just one single day (still BitLocker encrypted).
- Let users request admin access to one of the roles in the Azure AD Portal.
- Let guest users request access to your data in SharePoint Online or Microsoft Teams but enrich their account with additional information.
- And much more…
Now we know what Azure AD Access Packages are, what we can control and which functionality it can offer, where to start? As you perhaps noticed already, you can go nuts on access packages, so having said that I will write four blogs to walk with you through some of the hidden gems with great examples:
- First, we will look at the hidden gems of the Access package catalogs – In which I will show you some great features which you need to enable from your catalog to make use of them within your Access Package.
- Secondly, we will look at hidden gems of assignments in Access Packages – In which I will show you how you can dynamically assign an Access Package to end users matching specific criteria. And more important how this co-operates together with separation of duties.
- As a follow up, we will look at the hidden gem of using a custom extension in Access Packages – In which I will create a single access package which, after approval of the manager, will send the user a temporary access pass to enroll for Multi-Factor Authentication or Password less methods.
- At last, we will look at the power of delegation and reporting for Access Packages – In which I will end the story around Access Packages with the options you have to delegate some management within the business to more experience IT users.
Within this blog we will go straight to the first topic around the hidden gems of the Access Package Catalogs, so let’s dive in and let’s learn and enhance the way we create Access Packages.
The hidden gems of Access Package Catalogs
Step 1: Creating the catalog
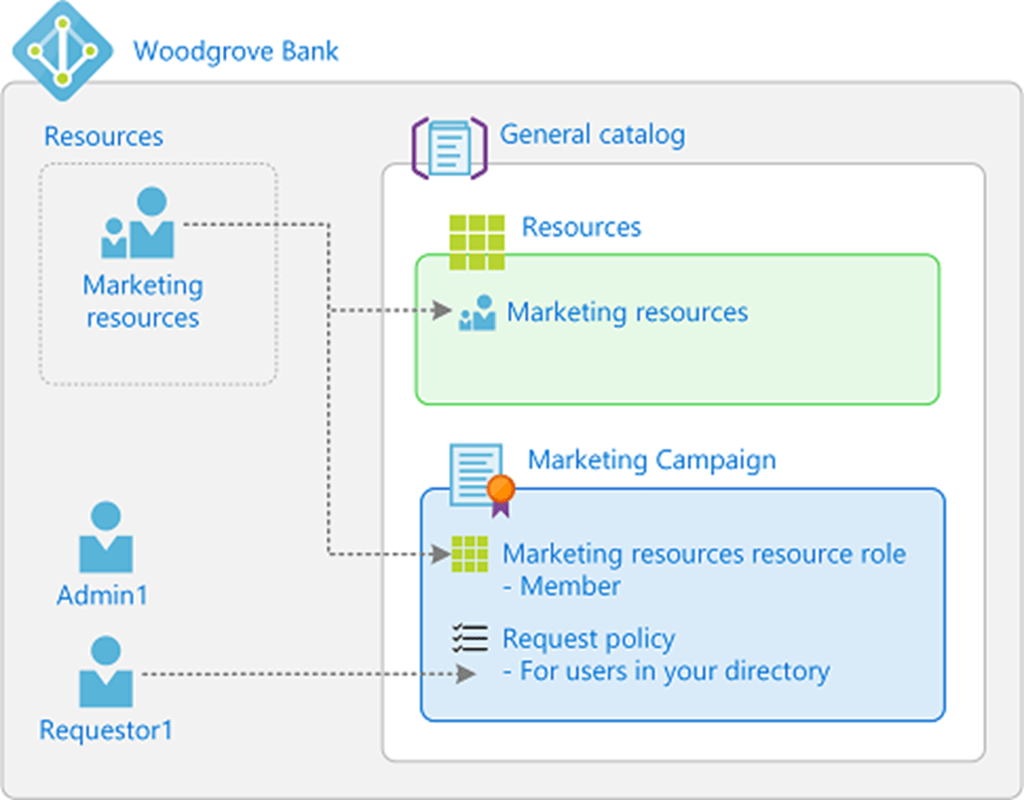
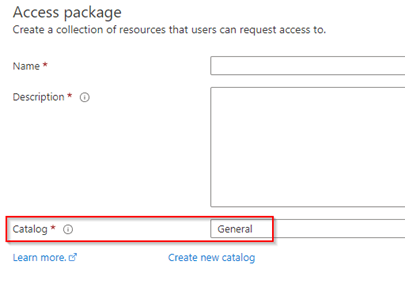
When we talk about Access Package in the Azure AD portal, we can find them by going to Identity Governance blade under Entitlement Management. And when you’re in the creation wizard of an Access Package you’re always required to select a catalog.
While a catalog defines what resources you can add (by default) to your access package, it has more features in it then meets the eye. It can for example require end users to provide more details for their user account. This is especially helpful for guest users as a lot of information is missing by default for these accounts. On the other hand, we can create custom extensions within catalogs to be used within Access Packages, which offers a broad range of functionalities.
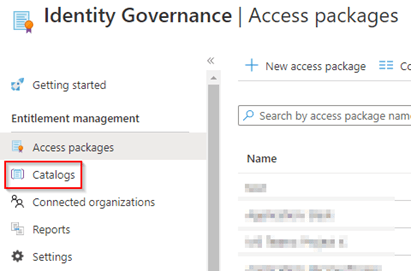
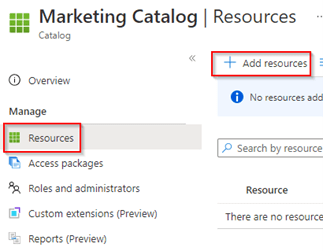
To help you see and use these hidden gems, let’s start with creating a catalog, for that go to the Microsoft Entra Portal, hit Identity Governance and beneath Entitlement Management hit ‘Catalogs’.
In here let’s create a new catalog by hitting ‘New Catalog’. Within the New Catalog wizard, you are required to provide a name and description, but as you can see other settings are configurable as well.
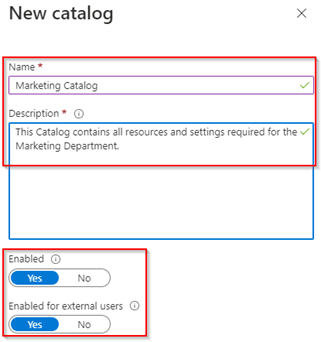
The first setting ‘Enabled’ determines if the access packages within the catalog are enabled for requests by end users. With that you can easily turn off new requests for all Access Packages within a catalog.
The second setting ‘Enabled for external users’ determines if guest users are allowed as well to see and request access packages, which are enabled for guest users, within the catalog. E.g. if an access package is enabled for external users, but the catalog isn’t the guest user wouldn’t be able to request access via the access package.
In my example I’ve enabled both settings, provide a name and description and once ready, hit ‘create’. As you can see, we now created the Catalog for Marketing and we can manage the content and settings within the catalog.

The first thing we are going to do is add several resources related to the Marketing department. For that go to ‘Resources’ and hit ‘+ Add resources’.
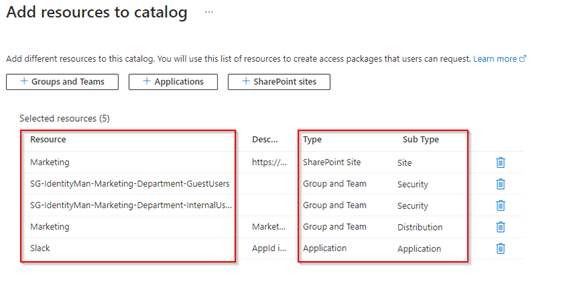
Add the resources to the catalog, in my example I’ve added a SharePoint Site, the Slack Application, Microsoft Teams team and two Security Groups. Once ready hit ‘Add’.
All five resources have now been added to the catalog. And via the catalog we again get more options, this as we can now customize per resource which attributes are required. For that select the resource and hit ‘Require attributes’.
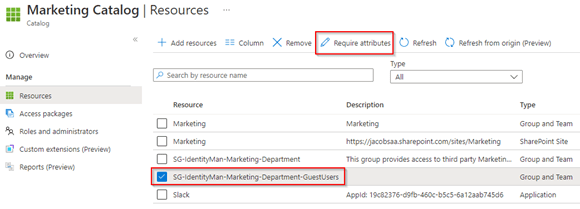
As you can see you can suddenly go nuts and make sure during the access package request attribute information is required as well and will even be stored or overwritten, if needed, within Azure AD! Epic, I can now have guest users requesting access whereby they provide their attribute values which will be stored in Azure AD before the user get access to the application!
Even more brilliant, you can use built-in attributes, but you got an option as well to use schema extensions. Unfortunately, something we can’t do today is ‘link objects’ e.g., provide a manager value and make sure that each guest user requesting access will also get their manager configured correctly. In my example I’ve configured three attributes which we will go and request, these are ‘GivenName’, ‘Surname’ and ‘JobTitle’, all with short text, editable values and values will stay permanently on the account.
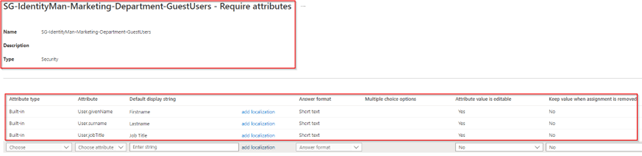
NOTE 1: As you can see, I’m using the answer format short text, but there are other options as well like long text and even multiple choice.
NOTE 2: Each line has two extra switches, called ‘Attribute value is editable’ and ‘Keep value when assignment is removed’. The first ‘Attribute value is editable’ makes sure that users can type in a value during the access package request. The second ‘Keep value when assignment is removed’ will make sure that once people lose access to the resource the attribute won’t be removed from the account
NOTE 3: Be aware that require extra attributes for an application will count for all users who are requesting access so not only guest users but regular member users as well.
Once you’re ready hit ‘Save’. With that we have created the catalog with its settings, and we made sure that on one specific group we require extra attributes if access is being requested.
Step 2: Creating access packages in the catalog
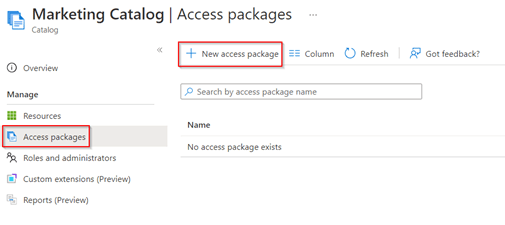
Now the Resources are defined let’s create some Access Packages, we can do this as well from the same catalog. Important to know is that, at the time of writing, you can’t switch access packages between catalogs once created, so choose wisely. Once ready hit ‘+ New access package’.
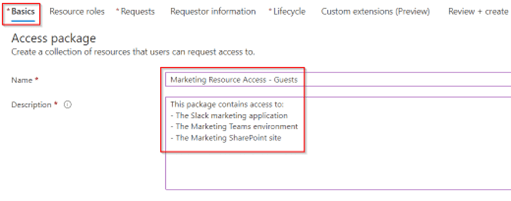
In the ‘Basics’ screen, give the Access Package a name and description, both are shown to the end user on the ‘My Access’ page so it’s important that the name and description are making sense to end users :-).
In the next screen, called ‘Resource roles’ we can easily add resources. As you can see, we can add ‘Groups and Teams’, ‘Applications’ and ‘SharePoint sites’ and by default we only see resources which are added to the catalog in which we are creating the access package. We can although hit the checkbox ‘See all Group and Team(s) not in the ‘Marketing Catalog’. You must have the correct permissions to add them in this access package’, to see all resources within your tenant which you’re able to add.

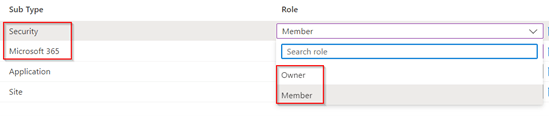
As you can see, I’ve added two Groups and Teams, one Application and one SharePoint Site, in here there is one important step left, which is determining the ‘role’ within the group, application or SharePoint Site.

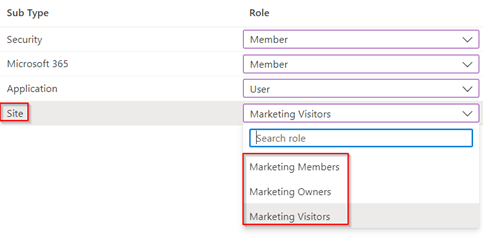
For Security or Microsoft 365 groups you can choose between ‘Owner and Member’.
For an application you can choose between the roles defined in the application, in this case ‘Owner’, ‘User’ or ‘msiam_access’. But you can of course have way more defined yourself within the application which would then pop-up here.
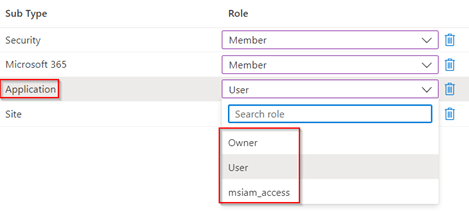
And for a SharePoint Site you can choose between the pre-defined roles within the SharePoint site, which are ‘SharePoint Member’, ‘SharePoint Owner’ and ‘SharePoint Visitor’.
Once you’re ready and have chosen the role for each resource, go to the ‘Requests’ tab. Here we determine which users can request this access package, which could either be ‘users already in your directory’ (which can be existing guests and members), ‘users not in your directory’ (which can be existing as well as non-existing guest users in your tenant) and ‘None’ (whereby you can assign the access package manually as a package administrator). In my example I’ve chosen for ‘Users not in your directory’ and selected ‘All Users (All connected organizations + any new external users)’.
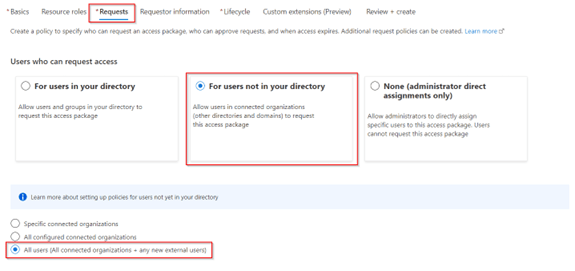
NOTE: As you can see you can choose for ‘connected organizations’ when choosing for users not in your directory. This is extremely helpful if you want to restrict which organizations can request access or want to make use of the ‘Internal or External Sponsor’ functionality for approval flows. Configuring one is straight forward and explained here on the learn pages.
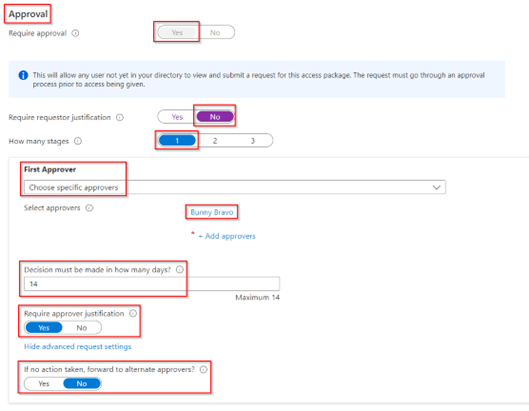
Further down on this page we can choose the ‘Approval’ settings, as we have chosen for ‘All Users’ an approval is required by default. We can however configure the requestor justification, and the amount of stages for approvals, who should approve, fallback approver settings and approver justification settings. In my example I’ve kept it simple and didn’t made the ‘requestor justification’ required, I’ve chosen for a single stage and select a fixed approver without a fallback or alternate approvers. And at last I’ve made sure that the approver needs to fill in a justification for approval.
At the bottom of this page, we can decide if the package can be requested by hitting the toggle switch to ‘Yes’ at ‘Enable new requests’. In my example I’ve made sure that once the package is created it can be request immediately.

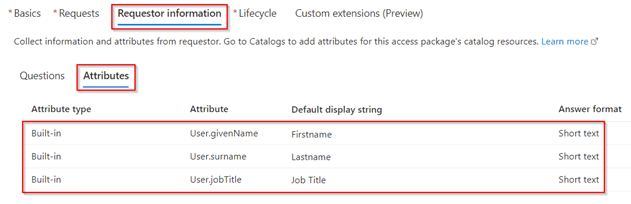
In the next screen ‘Requestor Information’ I’ve made sure that the user needs to answer a few ‘Questions’. For me this is important as I’ve turned off the requirement for the ‘requestor justification’ in the previous screen. Here we can create ‘to the point questions’, with localization support, we can choose between different answer formats (Short text, Long text and Multiple choice) and we can make sure the user is required to answer (all) the questions.

Looking at the ‘Attributes’ tab we can see that the user is required to answer 3 additional questions, which are attribute values, which will be populated, once approved, on the account in Azure AD. We see this as there is a group added to this access package which has configured these attribute requirements.

NOTE: As you can see these values can’t be changed in here and should be changed on the resource within the catalog as explained earlier in this blog.
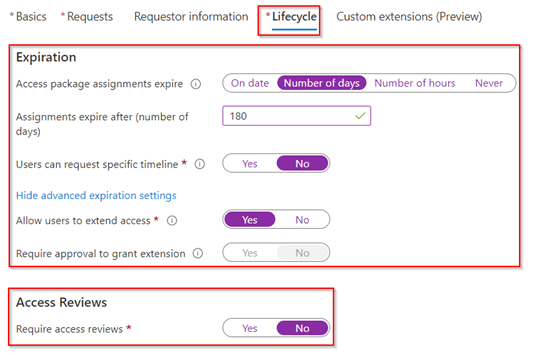
When you’re ready with the ‘Requestor Information’ let’s continue with the ‘Lifecycle’ settings. In here you can configure ‘Expiration’ and ‘Access Review’ settings. My advice would be to configure only one of the settings and not both together. In my example, as you can see, I’ve chosen to use ‘Expiration’ settings so that again an approval is required from the approver to renew the Access Package after 180 days.
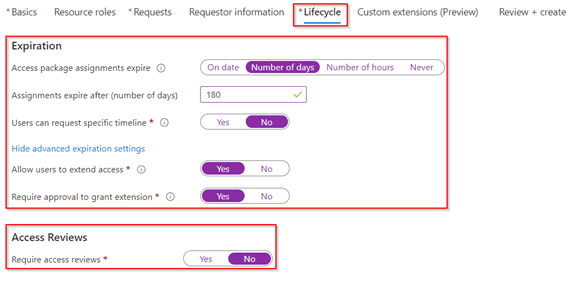
Once the ‘Lifecycle’ settings are configured we can also make use of ‘Custom extension’, as we will cover this in a separate blog, we leave the settings here not configured.

We are now ready to ‘Review’ what we just configured as settings. If you’re happy let’s hit ‘Create’ to create the Access Package.
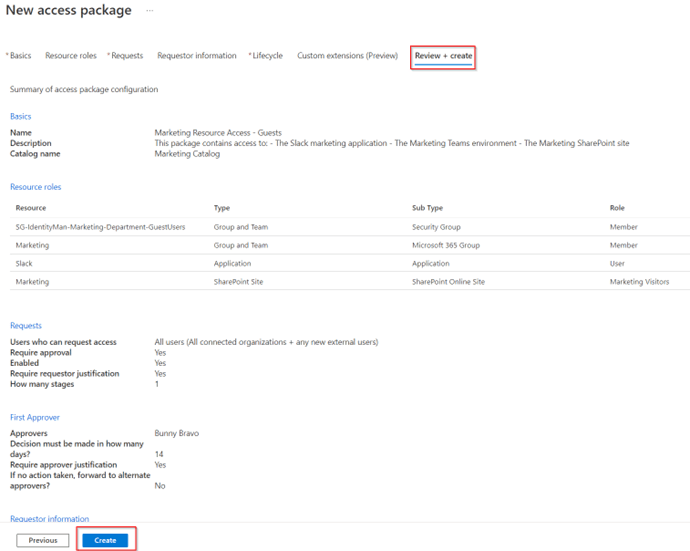
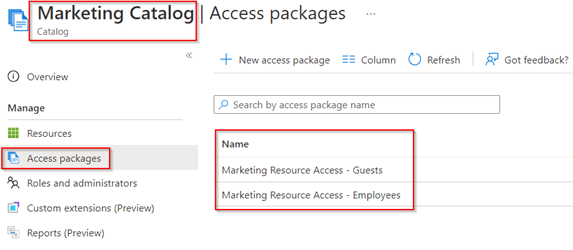
Once the package is created you will see that it’s created within the catalog (as shown below) and in the overall ‘Access packages’ overview.
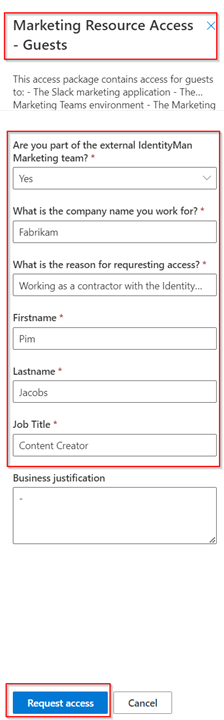
If we go to the access package in ‘My Access’ with an external account via the URL https://myaccess.microsoft.com/{tenantname}.onmicrosoft.com we can request it without the need of already having an actual guest account, in the resource tenant, by simply hitting ‘Request’.

As you can see, I’m now required to answer the questions we configured, but more important I’m now also able to provision the attributes we configured to ‘enrich’ the guest account of the end user. So, let’s fill in the values and hit ‘Request Access’ and see what happens.
As we can see the configured approver will get an approval email with the basic information about the access package request.
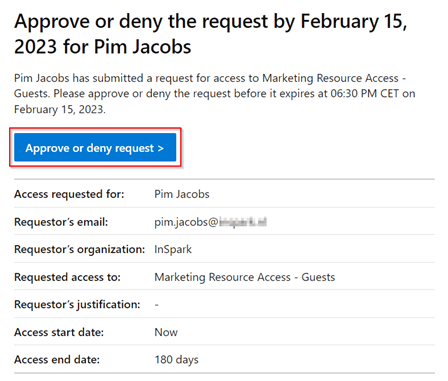
Once the approver clicks on the link, he or she can see the request details, which contains the answers on the questions and the manager is able to ‘Approve’ or ‘Deny’ the request and as configured is required to ‘provide a reason’ for Deny or Approval.

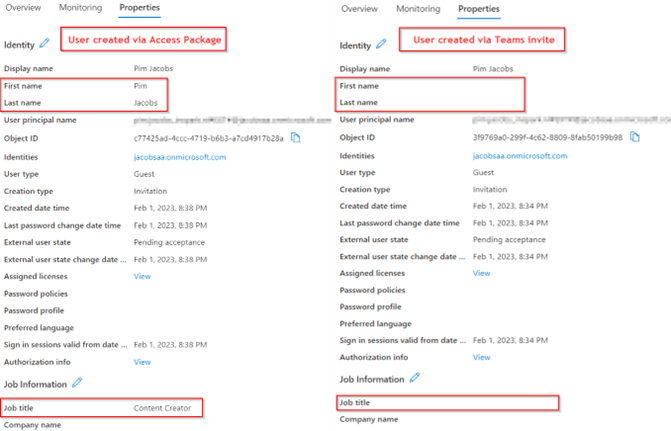
In this example we ‘Approve’ the request, once approved the guest user will be provisioned within the resource tenant and we can see that the field ‘First name’, ‘Last name’ and ‘Job Title’ are now populated with the input given during the access package request. In the screen below we can see as well that if I would have invited the user via a regular teams invite these attributes aren’t populated. So, if you’re looking to ‘enrich’ guest user details access packages are really helpful.
NOTE 1: Important to know is that if there were any values populated earlier these attribute values will be overwritten with the values provided in the access package request.
NOTE 2: Also, important to know is that once a user is created with an Access Package request and loses his last assignment, the user is automatically disabled and deleted later. If you want to know more about this feature check-out my other blog here.
Now as you may have noticed earlier, I’ve also created an access package for the regular Employees with some different settings, but more important with a different resource, in this example I’ve not included the group ‘SG-IdentityMan-Marketing-Department-GuestUsers’ but ‘SG-IdentityMan-Marketing-Department-InternalUsers’. The group has the same permissions but doesn’t have the attribute requirement configured. As you can see below that also results in a different ‘Request’ screen for regular employees, this as there is no attribute requirement configured for the resources within this Access Package.
Now we have created the Access Package, let’s see if there are more advanced hidden gem controls within the Access Packages!
Step 3: Creating an additional policy in an access package
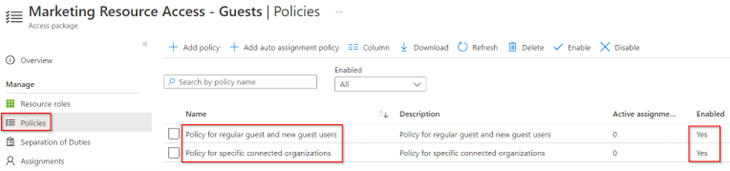
Now we have configured and requested one access package, let’s see what we can do more. If we look at the access package settings, we can see on the left we can select ‘Policies’. In here we can rename the name from ‘Initial Policy’ (which is the default) to ‘Policy for regular guest and new guest users’. Besides we can enable or disable a policy, which can be helpful if you want to deprecate packages or want to move to a different policy which you have built.

Talking about different policies, we can have more than one request policy beneath an Access Package with different settings. This is really helpful if you want to have one access package with different request settings, e.g. differences between employees vs guests or between guests vs guests. Besides it limits down the amount of access packages you need to maintain. So, let’s try it out by hitting ‘+ Add policy’.
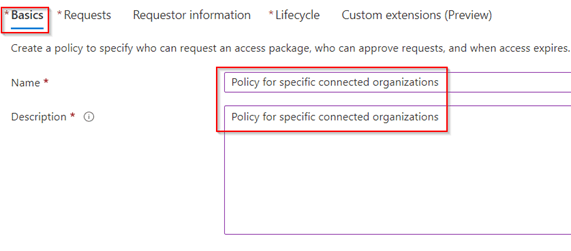
In the ‘Basics’ settings, provide a name and description for the new policy, as you can see, we are now going to create a policy specific for a connected organization.
In the ‘Requests’ settings I again selected ‘For users not in your directory’.
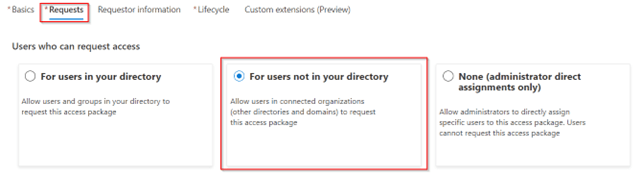
Compared to earlier, I’m now selecting ‘Specific connected organizations’ and selected one of the connected organizations which has the state ‘Configured’. As I trust this organization, I will allow users to request without an approval and enabled the policy to be active immediately after creation.
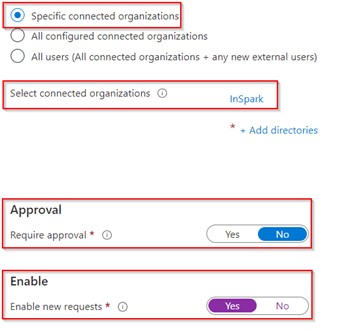
Within the ‘Requestor Information’ I didn’t put in any additional questions, as there is no approval flow configured.

Users are however still required to put in information to populate the correct attribute values on their accounts as you can see below.
And again, for the ‘Lifecycle’ settings we have chosen the same property values and settings, apart from the ‘Require approval’ setting, as there isn’t any approval configured within this policy. Once ready hit ‘Create’.
Once created, we can see the new policy within the overview, and we see both are enabled.
Now let’s see what happens if I use an account from the connected organization to request this Access Package via https://myaccess.microsoft.com/{tenantname}.onmicrosoft.com. As you can see, I’m now only required to fill in the attribute values and I’m able to request access without an approval flow being triggered.

This means that the most specific policy of an access package will apply, which gives you the flexibility to be strict for ‘untrusted’ sources and be less strict for ‘trusted’ sources.
So, if you’re going to create an Access Package, first write down which request flows you want or need to have. Based on the request flows, create one or multiple policies for the same set of access with different request settings. That will for sure help you to prevent lots of Access Packages to manage!
Step 4: Reviewing additional ‘generic’ Access Package options
Now we created catalogs with hidden gems, created multiple Access Packages, some with multiple policies, let’s see what other things we have as general settings on Access Packages.
The first one is the ‘Hidden’ setting which we have for each Access Package. In simple words we can toggle the switch here to ‘Yes’. Yes, in this example means the Access Package is not shown in the overall Access Package list but can still be requested when using the direct URL of the Access Package as marked in the screen shown below. This is helpful if you are only communicating the specific Access Package URL to some users and don’t want other users to start requesting access to the Access Package via the Access Packages overview.

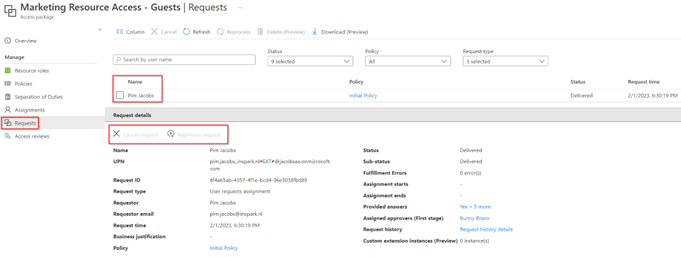
The second thing which I want to highlight is that we can see who has requested an Access Package in the ‘Requests’ tab within an Access Package. In here we can’t approve a pending request, but we are able to cancel it or to reprocess the request. Furthermore, we can see the answers provided, who the approver is for the first (and only stage in my example). This is very helpful to see what the state of an actual request is.
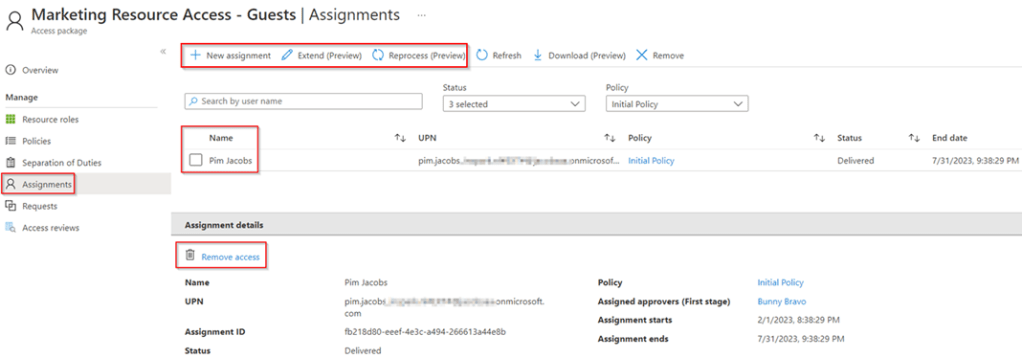
And at last, the assignments, in this pane we can remove an existing assignment, but as you can see, we can also ‘Reprocess’ the assignment, which would add the user again to the resources within the Access Package and we are also able to add a ‘new assignment’.
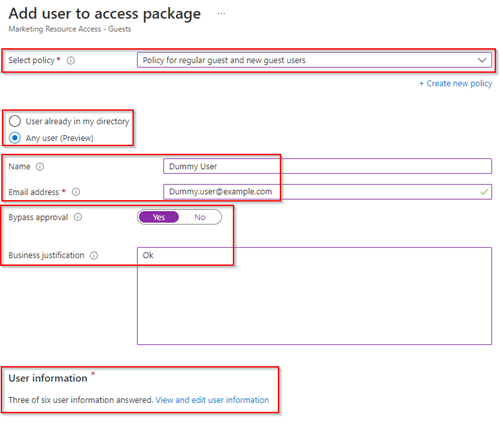
Creating a new assignment will allow you to select one of the policies you created, you can choose to add a brand-new Guest account or choose from a user account already present in your directory. And more important, you have the option to bypass the approval, which does require a business justification and are required to put in the user information (questions and attributes), which are in my case the three questions and three attribute as explained earlier in this blog. Once you hit ‘Add’, the user as shown below is added to your directory and assigned to the Access Package and will get access to the resources within the access package.
So besides handing over some control to the business, this will still give you full control as an IT admin over the requests and assignments within an Access Package and are able to make changes where and if needed.
Conclusion
Now we’ve walked through the above four steps, you know what the hidden gems are of the catalog feature for Access Packages and with that you’re now able to enrich your B2B guest accounts with additional attribute properties. Furthermore, you have seen how we can create multiple policies within a single access package to reduce the amount of Access Package and are aware of the other generic settings and options we can configure and use with Access Packages.
Configuring the settings correctly within Access Package settings is, as you’ve seen, key to get into control and delegating access approvals and requests to the business. So, with that first start with making an inventory of resources which you can put into a (combined) Access Package and decided if you need more than one policy for an Access Package. Put resources in catalogs to organize the structure, so you can later delegate control and therefore are prepared for the future. At last, make sure the adoption for your end user in place from day one. I’ve seen organizations linking to the Access Package overview from support tools like TOPdesk or ServiceNow. This is extremely helpful to bring users to the right place for requesting access instead of them creating an incident for it.
I hoped you enjoyed reading this new blog within the Azure AD Identity Governance series! Stay tuned for my next blog which will be all about the hidden gems of Access Package Assignments, which will include the auto assignment of Access Packages and Separation of duties and how to two co-operate together :-).
- An Introduction to Azure AD Identity Governance
- Identity Governance 1 of 10: Implementing a Strong Identity Foundation
- Identity Governance 2 of 10: Implementing Identity Lifecycle management for guest users – part 1
- Identity Governance 2 of 10: Implementing Identity Lifecycle management for guest users – part 2
- Identity Governance 2 of 10: Implementing Identity Lifecycle management for guest users – part 3
- Identity Governance 3 of 10: Configuring Provisioning in 3rd party apps for (guest) users
- Identity Governance 4 of 10: Implementing LifeCycle Workflows – Configure the basics
- Identity Governance 4 of 10: Implementing LifeCycle Workflows – Configure onboarding workflows
- Identity Governance 4 of 10: Implementing LifeCycle Workflows – Configure offboarding workflows
- Identity Governance 5 of 10: Using the hidden gems in Azure AD access packages, all you need to know! – Part 1
- Identity Governance 5 of 10: Using the hidden gems in Azure AD access packages, all you need to know! – Part 2
- Identity Governance 5 of 10: Using the hidden gems in Azure AD access packages, all you need to know! – Part 3
- Identity Governance 5 of 10: Using the hidden gems in Azure AD access packages, all you need to know! – Part 4
- Identity Governance 6 of 10: Using the brand new Entra Inbound Provisioning API for Identity Lifecycle Management!
- Identity Governance 7 of 10: Recertify access by using Microsoft Entra Access Reviews! – Part 1
- Identity Governance 7 of 10: Recertify access by using Microsoft Entra Access Reviews! – Part 2
- Identity Governance 8 of 10: Implementing Privileged Identity Management
- Identity Governance 9 of 10: Implementing a Terms of use
- Identity Governance 10 of 10: Review by Monitoring and reporting

Thank you, this is a fantastic write up. It’s an amazing feature but falls short in that Exchange Online resources cannot natively be included as resources in an access package 😦
LikeLike
Hi,
Thanks, and yes fully agreed that today Exchange Online resources are missing from this list. Eventually you could decide to create a logic app to add the user to the missing resources once access is granted, but I fully agree this should be natively available within the product.
LikeLike
you need a seperate license for identitity governance features, its not included in p2 anymore. very sad…
https://learn.microsoft.com/en-us/azure/active-directory/governance/licensing-fundamentals
https://learn.microsoft.com/en-us/azure/active-directory/governance/identity-governance-overview#governance-capabilities-in-other-microsoft-entra-features
LikeLike
Hi Martin, not for all features of Identity Governance, just the ones which went Generally available this summer.
LikeLike
Thanks, very interesting reading! We started using access packages on a small scale and find this very useful. Especially because it enables the possibility to delegate the proces of giving access to resources to the actual resources owners by using the approval process and access reviews.
However, I got the the question from one of the resource owners if it is also possible to revoke access in between access reviews, but I could not find this functionality. Do you know if this is possible? So currently this has to be done by an admin. Thanks!
LikeLike
Hi Kees,
Eventually yes that’s possible but that does mean you need to delegate access to the resource owner as an access package manager of catalog which would contain their access packages. My next blog (which is pending) will be covering this topic. In short the answer is yes, but the question is also, is the resource owner experienced enough to use the Microsoft Entra ID Governance portal?
LikeLike