A warm welcome to my next blog in the Identity Governance series which will again focus on the new feature called Azure AD Lifecycle Workflows.

In my previous blog post we talked about ‘Configuring the basics’ to implement and run Lifecyle Workflows in your Azure AD tenant. If you haven’t read my first blog, I recommend you doing that first and take action where needed in your environment.
Once you’ve configured the basics, we can start implementing actual workflows, but where to start and what tasks should be in your onboarding flow and in which order? For that I’m writing two blogs to walk with you through the deployment steps with ‘real-life’ examples, these are:
- Configure onboarding workflows – In which we will build on the basics and will use onboarding workflow examples which you can use in your environment.
- Configure offboarding workflows – In which we will build on the basics and will use offboarding workflow examples which you can use in your environment.
Within this blog we will have a look at the onboarding workflows in five simple steps, so let’s dive in and make sure your onboarding workflows are configured correctly and can run successfully!
Configure your onboarding workflows
Step 1 – Define your onboarding process
Configuring your onboarding workflows always starts with thinking about the onboarding process; What are you doing right now to get a user onboarded in your IT environment? I hope the answer isn’t ‘copying another user account with their permissions’ as that’s far from a best practice these days and only causes a permission creep.
To kick-start your onboarding flows it’s extremely helpful to make a logic flow in Microsoft Visio (or another product) to get ‘all cards on the table’ and design your onboarding workflows. An example of an onboarding flow can be found below.

Once the flow is clear and you’ve determined which steps you need to take in your onboarding workflows, you may notice that some kind of on-premises integration is required, e.g. for enabling or disabling the account. These tasks are by default only available for cloud accounts, for other integrations we are today depending on Logic Apps which we can run with ‘Custom Task Extension’ from Lifecycle workflows.
Step 2 – Prepare for custom extensions
So, first let’s make sure we have these already defined as a custom extension before configuring the workflows. For that go to the Azure AD and go to Identity Governance, click on ‘Lifecycle Workflows’ hit ‘Custom extensions’ and hit ‘+ Add a custom extension’.

Within the ‘Add a custom extension’ screen configure the ‘basics’ which exists of a Name and Description.

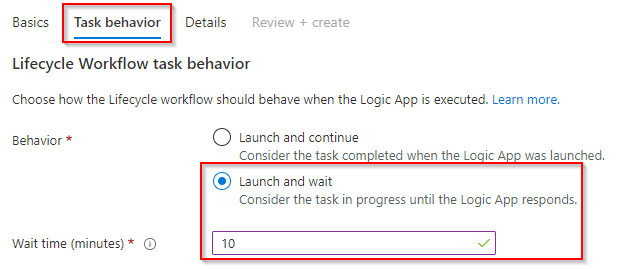
Next to configure is the ‘Task behavior’ whereby you can choose for two options:
- Launch and continue – Which launches the logic app and doesn’t wait if the logic app succeeds.
- Launch and wait – Which launches the logic app and waits if the logic app succeeds, the wait time can be configured separately.
In my example I’ve configured ‘launch and wait’ as I want to make sure the logic app run was successful with a wait time of 10 minutes.
In the ‘Details’ screen we can either connect to an existing logic app or create a new one. I would strongly recommend creating a new Logic App via the custom extension as that will put the required details already in the logic apps as step(s). Therefore, make sure ‘Yes’ is selected at ‘Create a logic app’ and configure the ‘Subscription’, ‘Resource Group’ and give the ‘Logic app a name’ (Pro tip: use the same name in the logic app as the one you’ve used in the name of the actual workflow). Once ready hit ‘Create a logic app’.

Wait until the Logic App is created, if successful go to the next screen and hit ‘Create’ to create the custom task extension.

As you can see, we got a custom task extension with the name ‘Enable account & Remote mailbox in on-prem Active Directory’.

Step 3 – Create your Lifecycle Workflows in Azure AD
Once we have configured the ‘Custom task extension’ we can start building these onboarding workflows, for that we go to the Azure AD and go to Identity Governance, click on ‘Lifecycle Workflows’ hit ‘Workflows’ and hit ‘Create Workflow’.

Within the ‘Choose a template’ setting we have 6 pre-defined workflow templates, for the onboarding scenario’s there are two templates which you can select and use, in my example I’ve used the following templates:
- Workflow 100 – Onboard pre-hire employee template
- Workflow 101 – Onboard pre-hire employee template
- Workflow 200 – Onboard new hire employee template

The next step allows you to configure the ‘basics’ of the workflow template like Name, Description and Trigger details. In my example I’ve configured the following settings:
- Workflow 100
- Name: 100 – Onboard pre-hire employee
- Description: Configure pre-hire tasks for onboarding employees 2 days before their start date.
- Trigger Details:
- Days from event: 2
- Event timing: Before
- Event user attribute: EmployeeHireDate
- Workflow 101
- Name: 101 – Onboard pre-hire employee
- Description: Configure pre-hire tasks for onboarding employees 1 day before their start date.
- Trigger Details:
- Days from event: 1
- Event timing: Before
- Event user attribute: EmployeeHireDate
- Workflow 200
- Name: 200 – Onboard new hire employee
- Description: Configure new hire tasks for onboarding employees on their start date
- Trigger Details:
- Days from event: 0
- Event timing: On
- Event user attribute: EmployeeHireDate

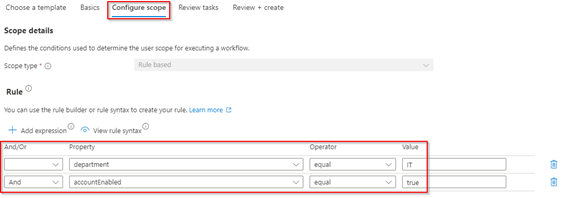
Within the next screen ‘Configure Scope’ we are able to restrict the workflow to only run for specific user accounts, e.g. only the users from IT. In my examples I’ve scoped my workflows to only run for the users which have the department set to ‘IT’ and made sure that previous workflows have been executed first to create a ‘fail safe’. This is important as we for example need to make sure the user has an Exchange Online license plan assigned with Exchange Online enabled before we can sent out an email to the user his mailbox and generate the Temporary Access Pass.
- Workflow 100 – Onboard pre-hire employee
- Rule syntax: (department eq ‘IT’)

- Workflow 101 – Onboard pre-hire employee
- Rule syntax: (department eq ‘IT’) and (accountEnabled eq true)
- Workflow 200 – Onboard new hire employee
- Rule syntax: (department eq ‘IT’) and (assignedPlans/any(a:a/servicePlanId eq efb87545-963c-4e0d-99df-69c6916d9eb0))

NOTE: In the above example the ServicePlanId is referring to the Exchange Online Plan 2 product.
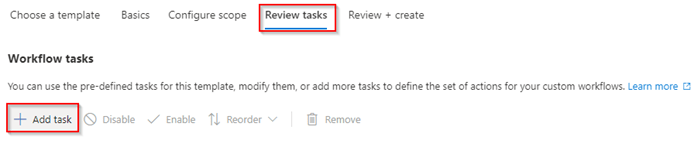
The next screen is all about ‘Review Tasks’, which are simply the tasks which are executed by the workflow once it’s triggered. By default, workflow templates contain pre-created task(s), so my first step is always to delete those and hit ‘Add Task’ to add the tasks which are required to have in there.
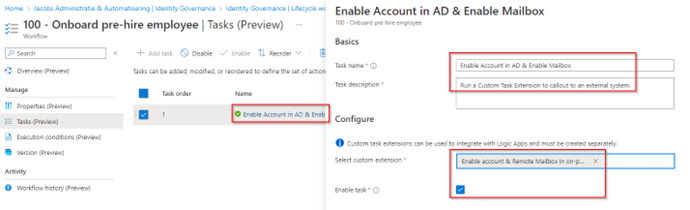
In my first workflow, I’ve configured the following tasks for the workflow ‘100 – Onboard pre-hire employee’:
- Task Name: Enable Account in AD & Enable Mailbox
- Task Details: Run Custom Task extension ‘Enable account & Remote Mailbox in on-prem Active Directory
In my second workflow, I’ve configured the following tasks for the workflow ‘101 – Onboard pre-hire employee’:
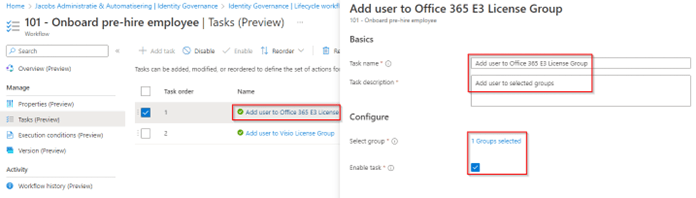
- Task Name 1: Add user to Office 365 E3 License Group
- Task Details 1: Add user to Office 365 E3 License Group ‘SG-IdentityMan-Office365E3-License’, which assigns an Office 365 E3 License to the user account.
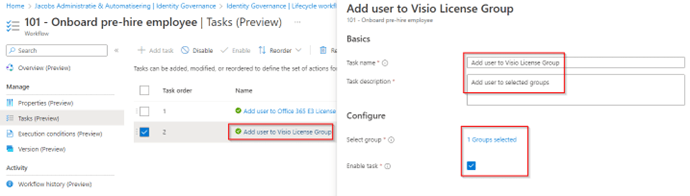
- Task Name 2: Add user to Visio License Group
- Task Details 2: Add user to Visio License Group ‘SG-IdentityMan-Visio-License’, which assigns a Visio Plan 2 license to the user account.
And in my last workflow, I’ve configured the following tasks for the workflow ‘200 – Onboard new hire employee’:
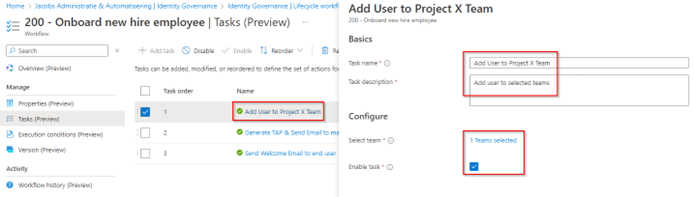
- Task Name 1: Add User to Project X Team
- Task Details 1: Add user to the Project X Team in Microsoft Teams, which makes the user a member of the ‘Project X’ team.
- Task Name 2: Generate TAP & Send Email to manager
- Task Settings 2:
- Activation duration: 20 hours
- One-time use: No
- Task Details 2: This will generate the Temporary Access Pass of the end user at the time the user starts at the organization (the start time of the Temporary Access Pass is always based on the EmployeeHireDate), as we are talking about new joiners they can’t use a one-time Temporary Access Pass as they need it multiple times during the onboarding process, as described in my other blog.

NOTE: It’s important to know that the settings which you’ve configured in the Temporary Access Pass step, need to comply with your Temporary Access Pass tenant settings as well. This means that if you want to issue a Temporary Access Pass which is valid for 20 hours the first day (keep in mind that these are probably generated overnight (1AM), the tenant settings must allow a Temporary Access Pass of 20 hours to be issued. If you don’t know where these can be configured, please checkout my other blog about the Temporary Access Pass.
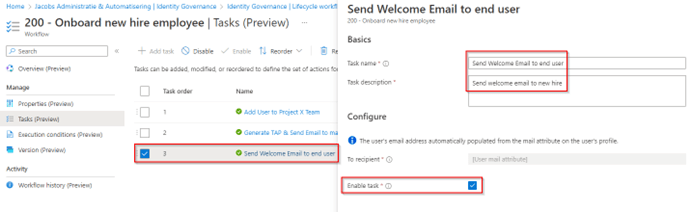
- Task Name 3: Send Welcome Email to end user
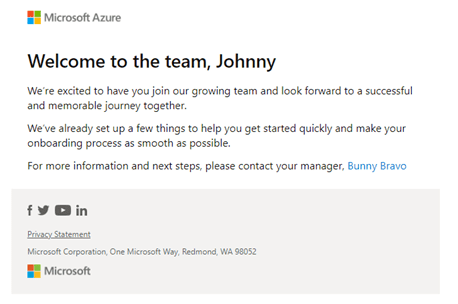
- Task Details 3: This will send a standard email to the end user his mailbox.
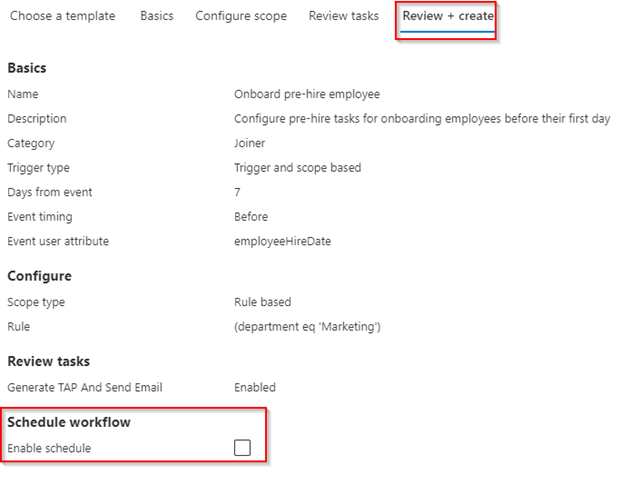
Once you walked through the configuration of one of the three workflows described above and landed on the ‘Review & Create’ screen make sure to for now leave the ‘Enable Schedule’ disabled (unchecked) this as we are going to run test first before actively scheduling the workflow in your environment.
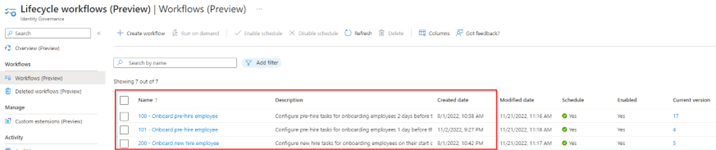
Once ready hit ‘Save’, now if you exactly copied my steps you should have created three onboarding flows as shown below.
I can hear you thinking ‘Are we there yet already?’. Well almost, as we still need to configure the custom extension we created earlier (Logic App and Workbook), so let’s dive into the last step before we can go testing!
Step 4 – Configure your custom extensions
Configuring your custom extensions, e.g. Logic Apps and attached services like runbooks in Azure Automation, is not that complex. To use them however, it’s important that you’ve followed ‘Step 4 – Prepare Lifecycle Workflows tasks for hybrid support’ in my first blog post which you can find here.
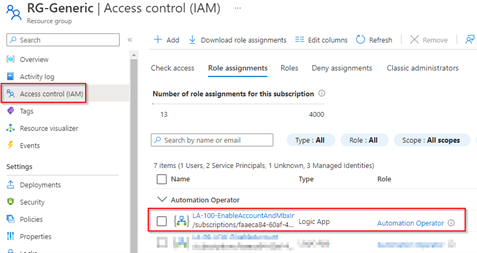
Once you’re ready and prepared your environment with a hybrid worker, let’s start with making sure that the Managed Identity which has been created during the creation of the Custom Extension has the right permissions on the resource group containing the automation account. This is required so the Logic App can start the runbook and get retrieve the job status.
For that go the Resource Group in the Azure Portal and hit ‘Access control (IAM)’. In here make sure that the ‘Managed Identity’ of the Logic App is added as an ‘Automation Operator’ at the Resource Group level.
Once you’ve done this let’s make sure there is a runbook within the Automation Account with the correct steps. For this go to the ‘Automation Account’ hit ‘Runbooks’ and hit ‘+ Create a runbook’.
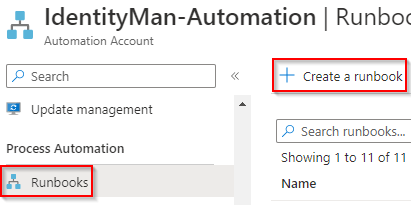
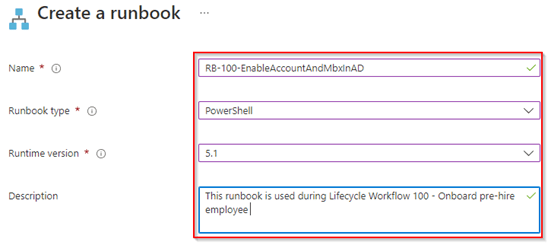
Make sure to provide a corresponding ‘Name’, choose ‘PowerShell’ as the runbook type, pick ‘5.1’ as the runtime version and define a ‘Description’. Once ready hit ‘Create’.
Once created please make sure the correct steps are available within the runbook as PowerShell code, in here you can go totally nuts :-). I’ve build my own example PowerShell script which you can find here. In the runbook there is one important step, which is the ‘parameter called UserPrincipalName’. This is what we are going to push as a variable from the Logic App to the Runbook so we can execute the correct actions on the correct user account. Once ready hit ‘Publish’ to publish the Runbook and make it usable from the Logic App (hitting save will only save the runbook but won’t make it usable for the Logic App).
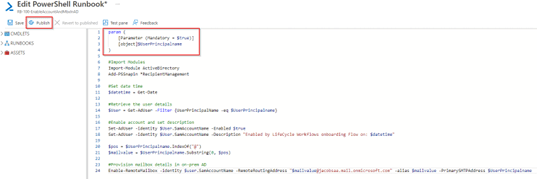
NOTE: As you can see, I’m using some remote mailbox cmdlets via the ‘Add-PSSnapIn’, I’m doing this to stay in a supported state with my synced identities. If you want to use this ‘light weight SnapIn’ as well and want to know how, you can find more details here on the docs.
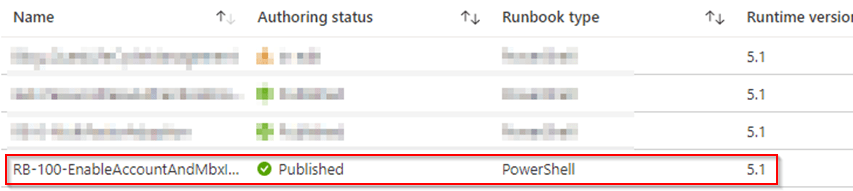
Once the runbook is published it should show you a green checkbox saying it’s ‘Published’.
Once this is ready, we can continue to the last step which is configuring the Logic App. The Logic App was already pre-created during Step 2 where we created the Custom Extension in Lifecycle Workflows. Therefore, in the Azure Portal search for ‘Logic Apps’, click on the ‘Logic App’ and hit ‘Edit’.

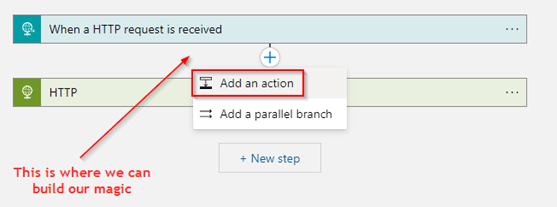
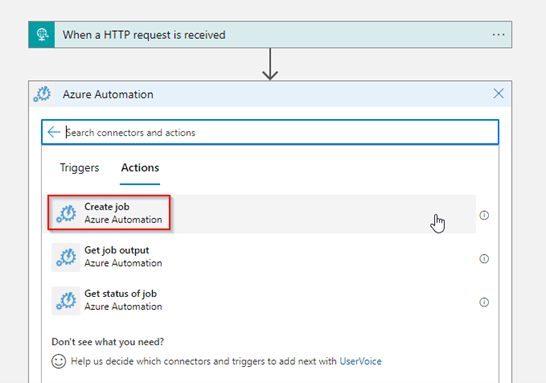
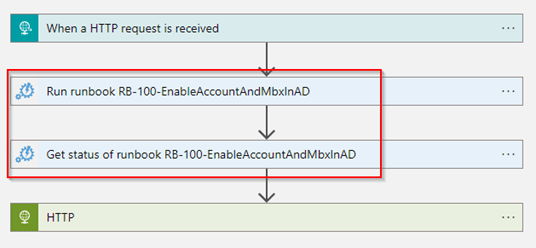
As you can see during the deployment of the ‘Custom Extension’ pre-defined steps are configured in the Logic App. Please DO NOT remove these steps as this is crucial for the Logic App to function correctly, only add steps between the two actions. This can be done by hitting the ‘+’ sign and selecting ‘Add an action’.
In here search for ‘Azure Automation’ and select ‘Create Job’.
Next up is making sure the ‘Subscription’, ‘Resource Group’, ‘Automation Account’, ‘Hybrid Automation Worker Group’, ‘Runbook Name’, ‘Wait for Job’ and the ‘Runbook Parameter UserPrincipalName’ settings are correctly configured.
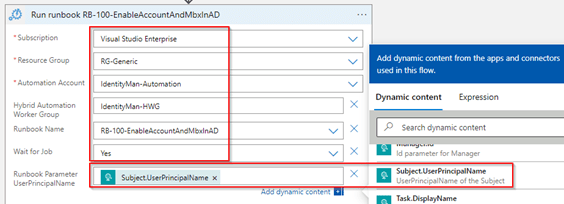
NOTE: If you can’t select information via drop downs this means the managed identity of the Logic App doesn’t have the right permissions on the ‘Resource Group’, only the ‘Hybrid Automation Worker Group’ is something you need to type in manually.
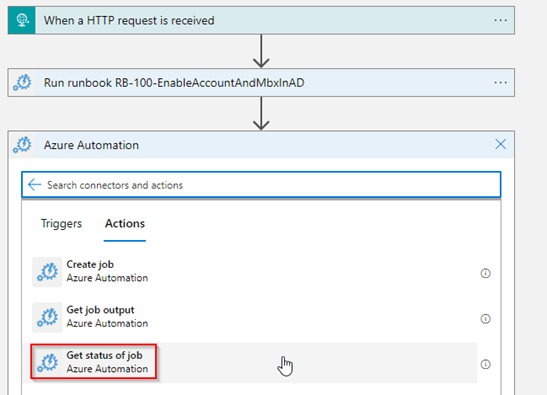
Below the ‘Create Job’ action, let’s add another action from ‘Azure Automation’ called ‘Get status of Job’. This is because we want to know if the runbook was completed successfully.
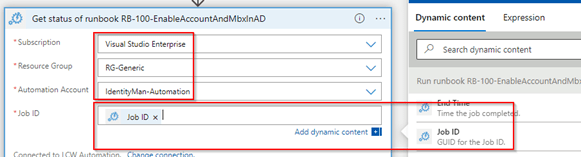
In here make sure the ‘Subscription’, ‘Resource Group’, ‘Automation Account’ and ‘Job ID’ settings are correctly configured.
Eventually rename the steps you’ve added with a friendly name and verify they are configured between the pre-defined steps.
NOTE: Of course, you can do much and much more with Logic Apps. So if you feel comfortable, feel free to go nuts and add other steps whereby you integrate with other APIs if required :-). My fellow MVP Jan Bakker has created a fabulous blog about what we’ve demo-ed during ExpertsLive NL on the 30th of September 2022. Whereby you can issue a Temporary Access Pass and send it over by SMS to the end user (instead of the manager by email).
Once you are ready and finalized the configuration within the Logic App hit ‘Save’.

We have now made sure all configuration items are in place as we did configure:
- One custom extension.
- Three onboarding workflows.
- Permissions of the Managed Identity on the resource group.
- One runbook within Azure Automation.
- The logic app which is connected to the custom extension.
That brings us to the last step which is testing your workflows and finalizing them for use in production :-)!
Step 5 – Test your workflows and roll-out to production
For the last step we of course first need a test account, so let’s create a disabled user account without any kind of permissions, settings or mailbox.
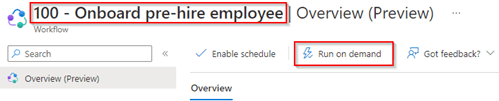
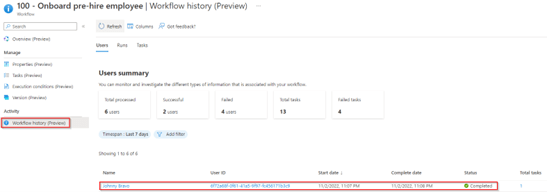
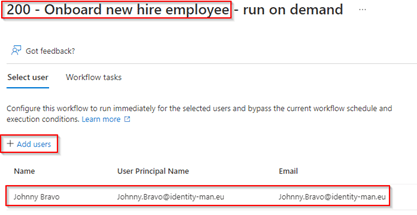
Once the user is created and is synchronized to the Azure AD, let’s go to the first workflow called ‘100 – Onboard pre-hire employee’ and hit ‘Run on demand’.
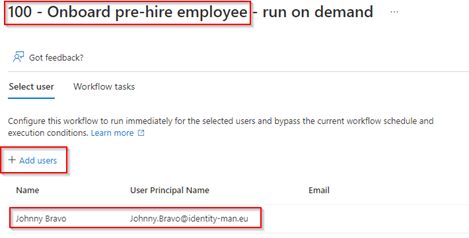
In here select the user we just created as disabled in the on-premises Active Directory, in my case that is ‘Johnny.bravo@identity-man.eu’, once selected hit ‘Run Workflow’.
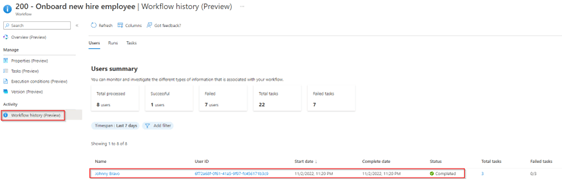
The workflow kicks off and, in this case, will trigger the Logic App we customized, and the Logic App will trigger the Runbook in Azure Automation. If this is all successful, the status of this onboarding flow will report ‘Completed’.
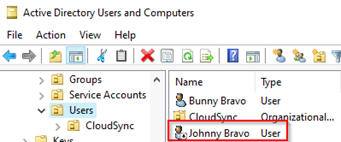
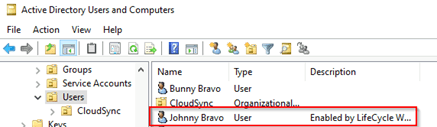
We can also verify in Active Directory this was successful, as you can see the account is now enabled.
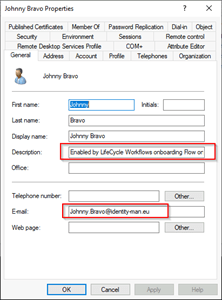
And if we open the account, we can see the description is configured as well and a mailbox has been provisioned for the account.
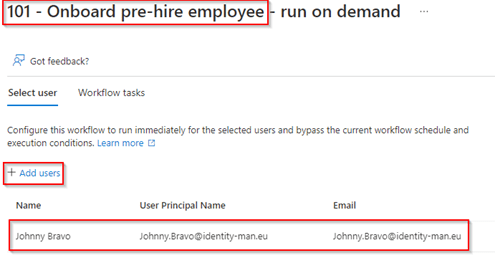
Once the user is enabled and these settings are again synchronized to the Azure AD, let’s go to the second workflow called ‘101 – Onboard pre-hire employee’ and hit ‘Run on demand’.

In here again select the user we just configured with the first Lifecycle workflow, in my case that is ‘Johnny.bravo@identity-man.eu’, once selected hit ‘Run Workflow’.
The workflow kicks off and, in this case, will add the user to two Azure AD groups for license assignment (Office 365 E3 & Visio Plan 2). If this is all successful, the status of this onboarding flow will report ‘Completed’.

NOTE: It maybe sounds a bit silly to run this as a separate step, the reason behind this is that for sending out a Temporary Access Pass to the manager and sending out the welcome email the user both need a mailbox first (otherwise both steps will fail).
We can also verify in Azure Active Directory this was successful, as you can see the user is now added to the two groups which are taking care of the license assignment.

Once the user is now configured, enabled and has an active license with a mailbox we can run the last workflow called ‘200 – Onboard new hire employee’ and hit ‘Run on demand’.

In here again select the user we just configured with the first and second Lifecycle workflow, in my case that is ‘Johnny.bravo@identity-man.eu’, once selected hit ‘Run Workflow’.
The workflow kicks off and, in this case, will add the user to the Microsoft Teams team ‘Project X’, will send the Temporary Access Pass to the Manager of the user and at last will send a welcome email to the end user. If this is all successful, the status of this onboarding flow will report ‘Completed’.
NOTE: If the account has prior sign-ins the ‘Generate TAP & Send Email to Manager’ step fails, this is by design. If you want to work around this, you must build a Custom Extension which executes the same steps but doesn’t check for prior sign-ins.

We can also verify this by checking the mailbox of the manager of Johnny Bravo, which happens to be me :-). As you can see, I’ve received an email with the Temporary Access Pass of Johnny Bravo which I can present to the end user when he comes into the office for his first day.
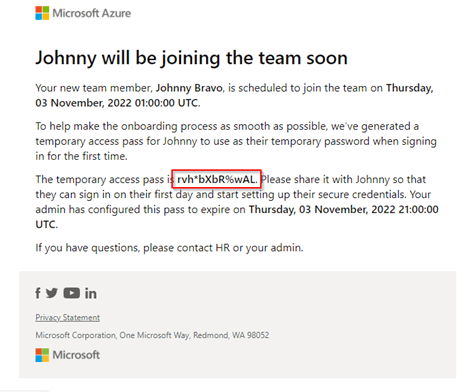
NOTE: If you look closely, you can see that the Temporary Access Pass is valid from the moment the user joins the organization (meaning it is using the delayed start feature of a Temporary Access Pass if necessary).
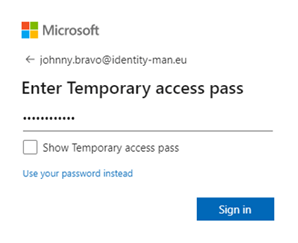
Now, from an end user perspective the user is now able to use his Temporary Access Pass from day one and is able to manage the following on his first workday with this:
- Enroll his device with the Temporary Access Pass.
- Enroll for MFA with the Temporary Access Pass.
- Reset his password with the Temporary Access Pass.
NOTE: Check-out my other blog for the different ways of bootstrapping your devices and multi-factor authentication with a Temporary Access Pass.
And when the user eventually accesses his email the user will find his welcome email in his mailbox which has been sent out by Lifecycle workflows as well as a last step.
NOTE: Important to remember is that when using the ‘Run on demand’ feature scoping filters don’t apply. So, the workflow is run anyway, even if your users isn’t matching the ‘scoping’ criteria.
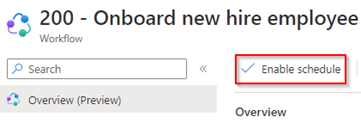
Once you’re happy with all the results, it’s time to enable the scheduling, for that you can simply hit the ‘Enable Schedule’ button on each workflow we created, resulting in an automated onboarding setup which is future proof and can easily be tweaked :-).
Conclusion
After you’ve followed the above five steps you have configured your onboarding flows and (I hope) tweaked the onboarding flows to fit your scenario. We walked through the setup of Custom Extensions, pre-hire onboarding workflows, new-hire onboarding workflows, configured Logic Apps and Runbooks in Azure Automation. This means you can now finally automate and schedule your onboarding workflows with the use of Lifecycle workflows, important next is to look at offboarding workflows as well.
In my next blog we will therefore go into creating offboarding workflow tasks and we will have a look at how Lifecycle workflows can work in hybrid environments with the use of Logic Apps for offboarding scenarios as well.
I hoped you enjoyed reading this new blog within the Azure AD Identity Governance series! Stay tuned for my next Azure AD Identity Governance blog soon :-).
- An Introduction to Azure AD Identity Governance
- Identity Governance 1 of 10: Implementing a Strong Identity Foundation
- Identity Governance 2 of 10: Implementing Identity Lifecycle management for guest users – part 1
- Identity Governance 2 of 10: Implementing Identity Lifecycle management for guest users – part 2
- Identity Governance 2 of 10: Implementing Identity Lifecycle management for guest users – part 3
- Identity Governance 3 of 10: Configuring Provisioning in 3rd party apps for (guest) users
- Identity Governance 4 of 10: Implementing LifeCycle Workflows – Configure the basics
- Identity Governance 4 of 10: Implementing LifeCycle Workflows – Configure onboarding workflows
- Identity Governance 4 of 10: Implementing LifeCycle Workflows – Configure offboarding workflows
- Identity Governance 5 of 10: Using the hidden gems in Azure AD access packages, all you need to know! – Part 1
- Identity Governance 5 of 10: Using the hidden gems in Azure AD access packages, all you need to know! – Part 2
- Identity Governance 5 of 10: Using the hidden gems in Azure AD access packages, all you need to know! – Part 3
- Identity Governance 5 of 10: Using the hidden gems in Azure AD access packages, all you need to know! – Part 4
- Identity Governance 6 of 10: Using the brand new Entra Inbound Provisioning API for Identity Lifecycle Management!
- Identity Governance 7 of 10: Recertify access by using Microsoft Entra Access Reviews! – Part 1
- Identity Governance 7 of 10: Recertify access by using Microsoft Entra Access Reviews! – Part 2
- Identity Governance 8 of 10: Implementing Privileged Identity Management
- Identity Governance 9 of 10: Implementing a Terms of use
- Identity Governance 10 of 10: Review by Monitoring and reporting

Thaks for this. I am implementing at the moment, where do I get the icons you used for the visio diagram, I would like to replicate. It would be great if you have an example I could clone.
LikeLike
Hi Rob, I’m using the SVG extension in MS edge. That plugin does work when using the old portal (portal.azure.com). Hopefully someday that plugin will be working as well on MS Entra.
LikeLike