A warm welcome to my next blog in the Identity Governance series, which is the second one about the ‘Hidden gems’ in Azure AD access packages. In the first blog we already covered what an Access Package is, how to create one, why it’s important to use them and we looked at the ‘hidden gems’ of access package catalogs.

This second part of the ‘hidden gems’ in Azure AD Access Packages will show you how you can dynamically assign an Access Package to end users via the ‘Auto assignment policy’ feature and how this can support the ‘mover’ phase where a user is for example switching between departments in the same organization. This can be helpful as Lifecycle Workflows today doesn’t support the mover scenario but only supports the joiner and leaver as described here on my earlier blog(s). Secondly, within this blog we will look at how the ‘Separation of Duties’ functionality works and how it co-operates together with auto assignment functionality.
As you may know now already, you can go nuts on access packages, so having said that I will write 4 blogs to walk with you through the hidden gems in access packages with great examples:
- In the first blog we looked at the hidden gems of the Access package catalogs – In which I will show you some great features which you need to enable from your catalog to make use of them within your Access Package.
- As explained already, in this blog we look at hidden gems of assignments in Access Packages – In which I will show you how you can dynamically assign an Access Package to end users matching specific criteria. And more important how this co-operates together with separation of duties.
- In the third blog, we will look at the hidden gem of using a custom extension in Access Packages – In which I will create a single access package which, after approval of the manager, will send the user a temporary access pass to enroll for Multi-Factor Authentication or Password less methods.
- At last, we will look at the power of delegation and reporting for Access Packages – In which I will end the story around Access Packages with the options you have to delegate some management within the business to more experience IT users.
Now, time to dive into the ‘Auto assignment policy’ and ‘Separation of Duties’ functionalities!
The hidden gems of assignments in Access Packages
Step 1: Using the ‘Auto assignment policy’ within an access package
As already explained earlier an ‘Auto assignment policy’ can dynamically assign and remove end users from Access Package assignments. This can be helpful in various scenarios but especially the ‘mover’ scenario which we today can’t manage in Lifecycle Workflows. E.g., if a user switches from department ‘Engineering’ to ‘Project Services’ the users loses his permissions on the engineering side but gains access to project services resources.
At the first glance this perhaps looks like a feature which we rather would use dynamic groups for, however with access packages we can manage things more centralized compared to dynamic groups:
This as we for example can create an access package with:
- A first policy whereby a regular employee can request access.
- A second policy whereby a guest user can request access.
- A third policy whereby users, who have set the department to ‘Project Services’, are automatically added to the access package.
By doing this we make sure users don’t need to go to an approval process and we prevent a lot of groups being created for the same kind of access, instead the access is managed via access packages. Besides we are able to great a group containing a ‘dynamic’ and ‘assigned membership by simply using two access packages policies.
Now let’s look at a simple example whereby you can easily apply the ‘Auto assignment policy’ feature. In each organization there is a small group of users who want to test out ‘Windows Insider’ builds to either provide feedback, test features, or test the impact on the business. So, for that I’ve created three access packages which all offer access to a different group in Azure Active Directory. These groups are assigned to their corresponding ‘Update rings’ policies in Intune which provides them access to the specific ‘Windows Insider’ preview channel.

The most common and most safe channel is the ‘Windows Insider – Release Preview Channel’ and as (in this example) we want everyone within the ‘IT’ department to be a member of this ‘Windows Insider’ build select the access package and go to ‘Policies’.

Within the ‘Policies’ tab hit ‘+ Add auto assignment policy’.

In the first step ‘Create auto assignment policy’ within the wizard hit ‘Edit’ to define which users within your tenant should be included.

Build your ‘Dynamic membership rule’, in my case (user.department -eq “IT”), and once ready, hit ‘Save’.

Once saved verify the ‘Rule Syntax’ within the ‘Create auto assignment policy’ step and hit ‘Next’.

The next step within this wizard allows you to add ‘Custom Extensions’, compared to a regular policy there are less steps available as there won’t be ‘requests’ or ‘approvers’, access is simply either ‘granted’ or ‘removed’. In this example we will hit ‘Next’ and with that skip this step (as we will look at it in more detail in the next blog).

Now within the ‘Review’ pane provide the policy a ‘Name’ and ‘Description’ and verify the settings and once ready hit ‘Create’.

Within the overview we can now see this access package contains a ‘normal’ request policy for existing non-guest users and an ‘Auto assignment Policy’ for all users with the ‘Department’ set to ‘IT’.

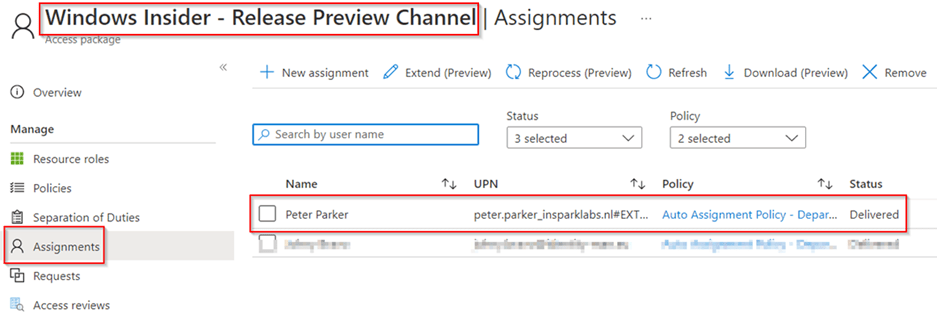
After the rules have been processed, which can take some time, you will see that the ‘Assignments’ will automatically update to include the users matching the dynamic query.

This process, today, creates a ‘Dynamic Azure AD group’ under the hood which is also visible within the Azure AD portal.

NOTE 1: The name of the group is predefined and should not be changed! If you delete the group, the group will be repaired (which can take some time), but in the meantime changes won’t be processed and you won’t be able to apply changes (instead you will receive a warning message like shown below).

NOTE 2: Important to note is that the dynamic group query can be edited from the group in Azure Active Directory. In theory ‘Group Administrators’ can therefore manage access to resources within this access package. Changes on the dynamic group query won’t be shown within policy beneath the Access Package itself, but the membership changes will apply on the Access Package. For that reason, it’s crucial that if you start working with ‘Auto assignment policies’ your delegation of control is in place.
Once the user is added to the access package via the ‘Auto assignment policy’, the user can see their membership in the ‘My Access’ portal beneath ‘Active Access Packages’.

NOTE: As the Access Package is dynamically assigned the user can’t ‘Remove Access’ on the Access Package assignment itself (this today results in a loop).
Now we know how the auto assignment feature works, let’s look at the ‘Separation of Duties’ feature.
Step 2: Using the ‘Separation of Duties’ feature within an access package
In the previous step we used an access package to determine in which Windows update channel the user belongs. Especially in this case, when you can request more than one Access Package related to the same functionality (Windows Update channel), it’s important the user can only request one of these Access Packages. This will prevent conflicts, in my example applying configuration within Intune as a random example.
If you go to the ‘Separation of Duties’ tab beneath the ‘Access Package’ you can see that we can add an ‘Access Package’ or ‘Group’ which is incompatible, meaning if you are a member of the group or access package you add here you won’t be able to get or request access to this Access Package.
Let’s configure the examples:
- For the ‘Windows Insider – Dev Channel’, make sure that the ‘Windows Insider – Release Preview Channel’ & ‘Windows Insider – Beta channel’ access packages are configured as ‘incompatible’.

- For the ‘Windows Insider – Beta channel’, make sure that the ‘Windows Insider – Dev Channel’ & ‘Windows Insider – Release Preview Channel’ access packages are configured as ‘incompatible’.

- For the ‘Windows Insider – Release Preview Channel’, make sure that the ‘Windows Insider – Dev Channel’ & ‘Windows Insider – Beta channel’ access packages are configured as ‘incompatible’.

Important to know is that ‘Incompatible With’ tab shows an overview of Access Packages where the Access Package, you’re looking at on the portal, is configured as ‘Incompatible’. E.g., in the example below the Access Package ‘Windows Insider – Dev Channel’ is configured as ‘Incompatible’ on the Access Packages ‘Windows Insider – Release Preview Channel’ & ‘Windows Insider – Beta Channel’.

In most scenarios you will see that on both ends the conflicting access packages are listed, but that of course totally depends on the scenario you want to prevent :-).
If we now look at the user experience by going to the ‘My Access’ page and try to request access to one page while I’m already a member of the ‘Windows Insider – Release Preview Channel’ access package, you will see that for bot the ‘Windows Insider – Dev Channel’ and the ‘Windows Insider – Beta Channel’ I’m receiving a message ‘You cannot request access as you currently have incompatible group memberships and/or access package assignment(s)’.

If we however pick account who isn’t a member of one of the three access packages (meaning the user isn’t in one of the Windows Insider packages) the user is simply able to request access to opt-in.

From the moment the user has ‘requested access’ the user isn’t able anymore to request access to another ‘Windows Insider’ access package. So ‘Separation of Duties’ does not apply only on assignment it already applies from the moment the user requested access. Only if the approval request expires or the approver denies the request the user is again able to submit a new request for one of the other two access packages.

Now we have configured both ‘Separation of Duties’ and the ‘Auto assignment policies’ let’s see how these two features work together.
Step 3: Combining ‘Separation of Duties’ with ‘Auto assignment policies’
With ‘Auto assignment Policies’ and separation of duties there are two starting points which does make it complex.
In the first scenario you already have an account with existing properties and during the creation of the ‘Auto assignment policy’ the account is matched and added one by one into the access packages. If there is a ‘Separation of Duty’ applied the user will get a member of the first access package being assigned and the second one will apply based on the ‘Separation of duty’ policy.
Well so for so great and exactly what you would expect right? Well, the truth here is there is one scenario which does give another view on things here. If you have already built your ‘Auto assignment policies’ and you’re either creating users or changing attributes whereby the user matches multiple ‘Auto assignment Policies’ and these policies apply to access package with each other configured within ‘Separation of Duties’ the ‘Separation of duty’ won’t apply.
In my assumption this has to do with a timing aspect, the user is created / changed and therefore mapped to all dynamic groups in ‘one go’. The time in between won’t be enough for the separation of duty to kick in and therefore the user will be a member of both access packages, although these access packages are configured as ‘Separation of Duty’ from each other. This is shown in the two pictures below.

So, if you’re planning to create two access packages with each other configured within ‘Separation of Duties’ and both have an auto assignment policy be sure that there isn’t an overlap in the dynamic query in the ‘Auto assignment Policies’. This implies ‘Separation of Duties’ shouldn’t be used as ‘exclusion rule’ from an ‘Auto assignment policy’.
Conclusion
Now we’ve walked through the above three steps, you know what the hidden gems are of the ‘Auto Assignment policies’ and ‘Separation of Duties’ within Access Packages. You’re now able to automatically assign access packages to end users providing access to multiple resources in one go. Furthermore, you know how you can configure a ‘Separation of Duty’ between access packages which ‘conflicting’ resources.
By using two policies on an access package, you can now have a group in Azure Active Directory which contains dynamic and assigned users. The dynamic users are added with the ‘Auto Assignment Policy’ and the ‘regular policy’ will contain users based on request.
Furthermore, by using separation of duties on an access package we can prevent users from requesting ‘conflicting’ resources and make sure ‘invalid’ requests and assignments are prevented from happening.
At last, we have seen that ‘Separation of Duties’ is a great feature but should be carefully combined with ‘Auto Assignment policies’ to prevent users from being added to two packages which are configured within ‘Separation of Duties’ from each other.
Both features are extremely helpful to organize your ‘access structure’ and are supportive to the ‘mover process’ where a user is for example moving ‘between departments’ in the same company. With that the user automatically get’s access to the right resources from day one, but more important ‘looses’ access to the resources the user shouldn’t have access to anymore.
I hoped you enjoyed reading this new blog within the Azure AD Identity Governance series! Stay tuned for my next blog which will be all about the hidden gems of Custom Extension in Access Packages, which will for example include the request of a ‘Temporary Access Pass’ to safely onboard users into Azure Multi Factor Authentication :-).
- An Introduction to Azure AD Identity Governance
- Identity Governance 1 of 10: Implementing a Strong Identity Foundation
- Identity Governance 2 of 10: Implementing Identity Lifecycle management for guest users – part 1
- Identity Governance 2 of 10: Implementing Identity Lifecycle management for guest users – part 2
- Identity Governance 2 of 10: Implementing Identity Lifecycle management for guest users – part 3
- Identity Governance 3 of 10: Configuring Provisioning in 3rd party apps for (guest) users
- Identity Governance 4 of 10: Implementing LifeCycle Workflows – Configure the basics
- Identity Governance 4 of 10: Implementing LifeCycle Workflows – Configure onboarding workflows
- Identity Governance 4 of 10: Implementing LifeCycle Workflows – Configure offboarding workflows
- Identity Governance 5 of 10: Using the hidden gems in Azure AD access packages, all you need to know! – Part 1
- Identity Governance 5 of 10: Using the hidden gems in Azure AD access packages, all you need to know! – Part 2
- Identity Governance 5 of 10: Using the hidden gems in Azure AD access packages, all you need to know! – Part 3
- Identity Governance 5 of 10: Using the hidden gems in Azure AD access packages, all you need to know! – Part 4
- Identity Governance 6 of 10: Using the brand new Entra Inbound Provisioning API for Identity Lifecycle Management!
- Identity Governance 7 of 10: Recertify access by using Microsoft Entra Access Reviews! – Part 1
- Identity Governance 7 of 10: Recertify access by using Microsoft Entra Access Reviews! – Part 2
- Identity Governance 8 of 10: Implementing Privileged Identity Management
- Identity Governance 9 of 10: Implementing a Terms of use
- Identity Governance 10 of 10: Review by Monitoring and reporting

Hello – we are testing if it’s possible to add a b2b / guest account as a access package assignment manager. We found it’s possible to add them, but we get a policy failure if that user then tries to add an assignment using the “any user” preview function to add another b2b user. Do you know if this is an unsupported scenario? Thanks,
Chet
LikeLike
Hi Chetan,
First of all, it’s good to mention that this functionality is (afaik) bound to the new Entra ID Governance SKU, see:
https://learn.microsoft.com/en-us/entra/id-governance/licensing-fundamentals
As you can see ‘Entitlement management – Invite + Assign Any’ is part of the Entra ID Governance license.
Furthermore, it’s important to check if the Access Package is set to ‘ All users (All connected organizations + any external user)’ within the policy, without that the invite will fail any way (even if you are using an email from a connected organization). Can you please check this is configured correctly?
LikeLike