A warm welcome to my next blog in the Identity Governance series which will focus on the new feature called Azure AD Lifecycle Workflows, which has been released at the start of September 2022 and is available for users in your tenant who have / will get an Azure AD Premium P2 license assigned.
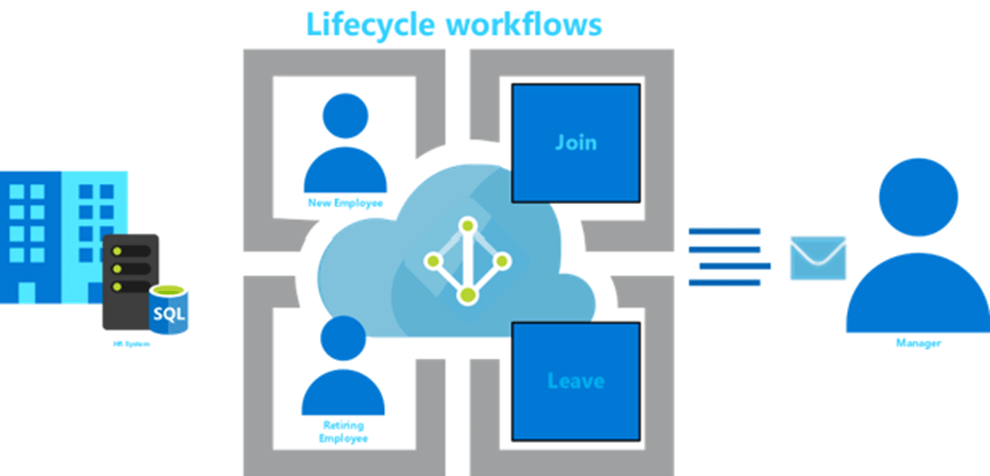
Now before telling you how excited I am about this feature :-), let’s have a look into what problem(s) Azure AD Lifecycle Workflows can solve for you. And with that we start simple as the feature is currently simply ‘tied’ to your joiner and leaver process, whereby workflows can run around the time when an employee starts at your organization or around the time when an employee leaves your organization. So important to know is that this feature won’t manage the creation of an account, which is a separate process and can’t be managed with Lifecycle Workflows. A Lifecycle Workflow can therefore only trigger once there is a ‘new’ account (joiner) who is starting at your company or an ‘existing’ account (leaver) who is leaving your company.
When we look at a Lifecycle Workflow, we can divide it in three simple objects which are:
- General Information – The name and description of a workflow.
- Tasks – The tasks which the workflow will execute.
- Execution Conditions – The conditions on which the workflow will trigger and the scope wherefore it will run the trigger (e.g. When the user starts working for your company and for a specific department).

When we take a closer look into Lifecycle Workflows we will see that there are predefined tasks in Lifecycle workflows which you are able to run out of the box, for the more complex and custom scenarios we can use Logic Apps. The triggers on the other hand can be scheduled and can run on-demand as well, whereby users can be included dynamically or manually for both scenarios. This offers a broad range of scenarios which you can apply during the onboarding of your user and offboarding as well.
Now we know what the feature does, let’s have a look at some of the functionalities in more detail:
- A Lifecycle Workflow runs by default (if it’s scheduled) each 3 hours.
- This can be customized on tenant level between 1-24 hours, which enables organizations to run each workflow each hour (but do remember this applies to all workflows).
- Per tenant you can have up to 50 workflows today.
- Per workflow you’re able to configure 25 tasks today.
- As explained earlier there is native Azure AD integration by default, if you want more custom scenarios don’t hesitate and use logic apps (this is very helpful for hybrid scenarios).
- With the default tasks available we can send emails, the language of these mails is based on the preferredlanguage value set on the user account in Azure AD. If not set, the preferredLanguage set on the tenant level will be used.
- The scheduled triggers for onboarding and offboarding are based on the EmployeeHireDate and EmployeeLeaveDateTime values on the user account.
- When using email templates it’s mandatory for the user to already have a mailbox and the manager field of the user needs to be configured correctly (remember that the manager needs a mailbox as well).
- At last timing is important for workflows, when a user joins your organization set the EmployeeHireDate at the beginning of the day, for EmployeeLeaveDateTime set the value to the end of the day.
Now we know what Lifecycle Workflows is about, what the components are and which functionality it offers, where to start? For that I’m writing three blogs to walk with you through the deployment steps with examples, these are:
- Configure the basics – In which I will make sure that hybrid identities can be used in this flow, identities are configured correctly, and tenant settings are verified.
- Configure onboarding workflows – In which I will build on the basics and will use onboarding workflow examples which you would be able to use in your environment.
- Configure offboarding workflows – In which I will build on the basics and will use offboarding workflow examples which you would be able to use in your environment.
Within this blog we will have a look at the basics, so let’s dive in and make sure your configuration is fully ready to use Lifecycle Workflows!
Configure the basics
Step 1 – Configure your global tenant settings
Let’s first start with some global tenant settings, starting with the schedule interval in which Lifecycle Workflows run. By default, this is set to 3 hours as you can see from the UI when going to Azure Active Directory –> Identity Governance –> Lifecycle Workflows.

As you can see there is no way to change this within the UI, within the Microsoft Graph however we are able to change this schedule to run between 1-24 hours. Important to know is that this is a tenant setting which applies to each workflow you’re going to create, so choose wisely.
Now to change this value, you can go the Microsoft Graph Explorer and login with an account which has LifecycleWorkflows.ReadWrite.All permissions. Below you can see how to add these rights to your account.

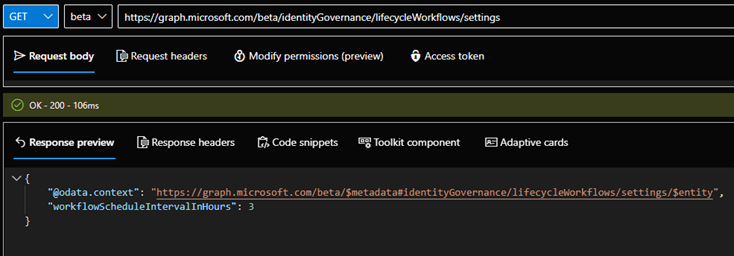
Once these access rights are configured, we can run the following API call:
GET https://graph.microsoft.com/beta/identityGovernance/lifecycleWorkflows/settings
This again will show us that the current WorkflowScheduleIntervalInHours is set to 3.
By running the API call below, we can update this value to e.g. 1 hour:
PATCH https://graph.microsoft.com/beta/identityGovernance/lifecycleWorkflows/settings
{
   "workflowScheduleIntervalInHours": 1
}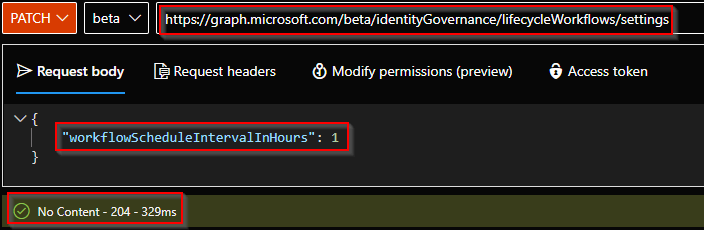
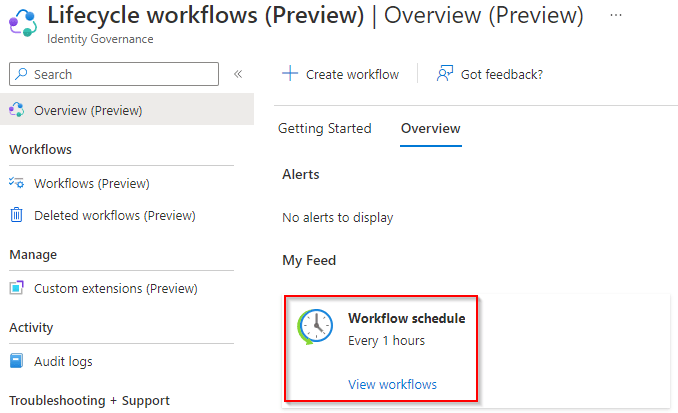
You should receive a callback which says ‘No Content – 204’ which means the change has been executed successfully. Going back to the UI of Lifecycle Workflows it will show us as well that this value has been changed.
The second setting which is important on tenant level is the preferredLanguage setting, this is because there are a few built-in tasks within Lifecycle workflows which can send emails to end users and therefore can depend on this setting. The language of the emails is determined in the following order:
- PreferredLanguage set on user account (described in step 3).
- PreferredLanguage set on the tenant level (what we are looking at in this step).
- If the configured PreferredLanguage isn’t available or can’t be determined the language in emails will by default be in English.
The local languages which Lifecycle workflows does support are listed here on the docs.
Now to configure this setting on the tenant level go to Azure Active Directory –> Properties. In here make sure the ‘Notification Language’ is set to the value which you want to have as a tenant setting, in my example below I’ve chosen for English.
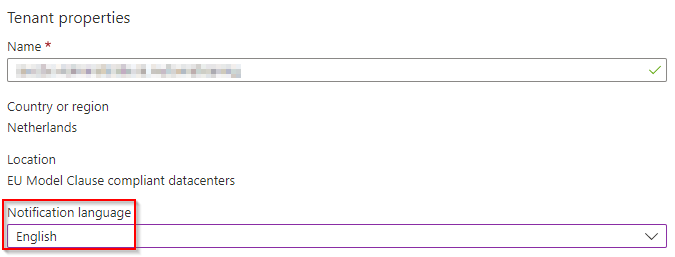
NOTE: As you may notice the choice here is limited to the country value which you used to create your tenant and English. So, this means you can’t switch this value from e.g. Dutch to Italian.
Now we have finished let’s continue to step 2 which is making sure your hybrid identity infrastructure is supporting the use of Lifecycle workflows as well! If you don’t have hybrid identity infrastructure in place you can continue to step 3.
Step 2 – Configure Azure AD Connect and/or Cloud Sync
As most of us are still working hybrid this means or Source of Authority (SOA) is managed within the on-premises Active Directory for our Hybrid Identities. That requires us to populate the EmployeeHireDate & EmployeeLeaveDateTime value on an on-premises object to make sure the value is synced and set on the user object within the Azure AD. These values are important as the workflows within the Lifecycle Workflows feature are triggered based on the data (actually dates) within these values!
This today can be done for both the EmployeeHireDate and EmployeeLeaveDateTime by using Cloud Sync AND Azure AD Connect.
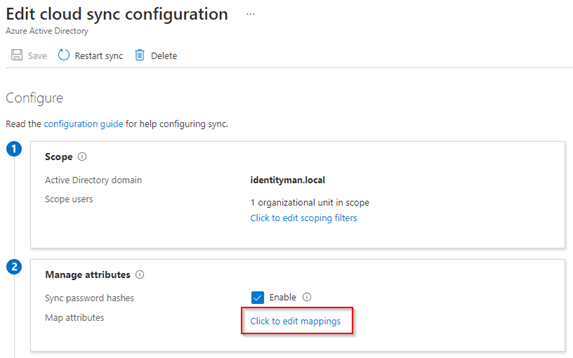
If you’re using Cloud Sync to synchronize your identities and want to configure the EmployeeHireDate & EmployeeLeaveDateTime, go to Azure Active Directory –> Azure AD Connect –> Manage Azure AD Cloud Sync and select the configuration for your Active Directory.
From here hit ‘Click to edit mappings’.
And next hit ‘Add Attribute Mapping’.

In the edit screen, make sure that the following is selected:
- Mapping type: Direct
- Source attribute: {the source attribute which you are going to use in AD for the EmployeeHireDate, e.g. extensionAttribute15}
- Default value: leave empty
- Target attribute: EmployeeHireDate
- Apply this mapping: Always

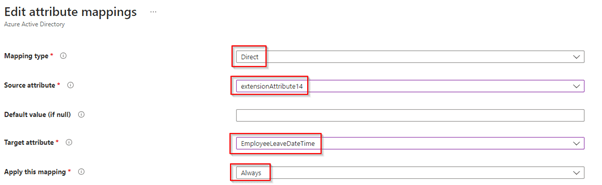
Hit ‘Apply’ and next hit ‘Add Attribute Mapping’ to add the EmployeeLeaveDateTime mapping.
In the edit screen, make sure that the following is selected:
- Mapping type: Direct
- Source attribute: {the source attribute which you are going to use in AD for the EmployeeLeaveDateTime, e.g. extensionAttribute14}
- Default value: leave empty
- Target attribute: EmployeeLeaveDateTime
- Apply this mapping: Always
Again hit ‘Apply’ and don’t forget to hit ‘Save schema’, you have now made sure that the EmployeeHireDate & EmployeeLeaveDateTime is populated to Azure AD via Cloud Sync.
If you’re using Azure AD Connect login to the Azure AD Connect Server, update to the latest version for EmployeeLeaveDateTime support (2.1.20.0 at the time of writing)and then stop the sync cycle with the following PowerShell cmdlet:
Set-ADSyncScheduler -SyncCycleEnabled $false
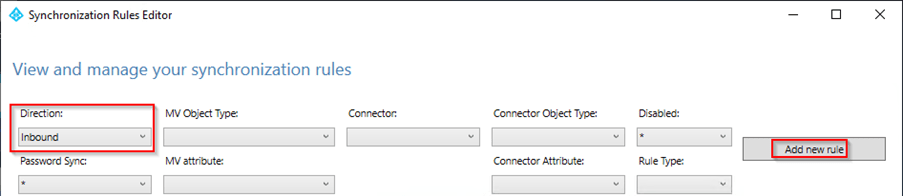
Once the sync is stopped let’s make sure the EmployeeHireDate value can be synchronized.
Next open the ‘Synchronization Rules Editor’ and ensure that the direction at the top is set to ‘Inbound’ and hit ‘Add new rule’.
In the wizard at the description step enter the following details and hit ‘Next’:
- Name: In from AD – EmployeeHireDate
- Connected System: yourdomain.local
- Connected System Object Type: user
- Metaverse Object Type: person
- Precedence: 200
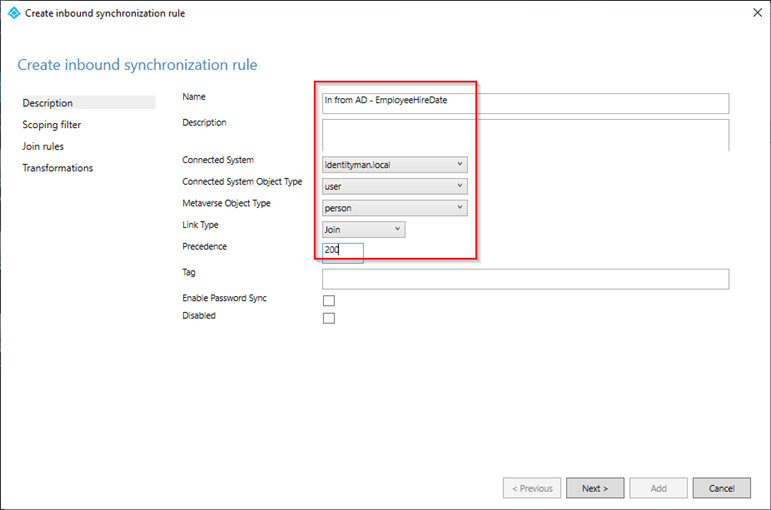
The scoping filter & join rules can be left unconfigured, so we can continue straight to ‘Transformations’. Within the Tranformations step hit ‘Add transformation’ and use the following transformation settings:
- FlowType: Direct
- Target Attribute: employeeHireDate
- Source: {the source attribute which you are going to use in AD for the EmployeeHireDate, e.g. extensionAttribute15 or msDS-CloudExtensionAttribute1}
- Merge Type: Update
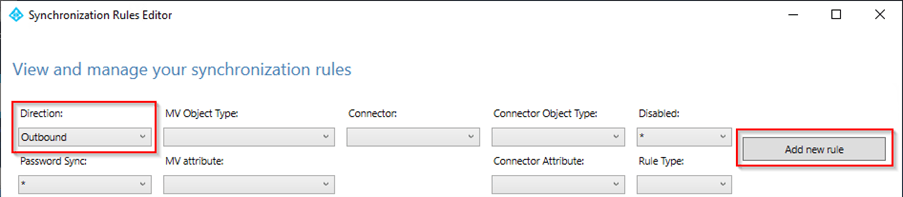
Once ready hit ‘Add’. Now the inbound rule is created to read from AD, let’s make the rule to write outbound to Azure AD, therefore switch the direction to ‘Outbound’ and again hit ‘Add new rule’.
In the wizard at the description step enter the following details and hit ‘Next’:
- Name: Out to Azure AD – EmployeeHireDate
- Connected System: yourtenant.onmicrosoft.com – AAD
- Connected System Object Type: user
- Metaverse Object Type: person
- Precedence: 201
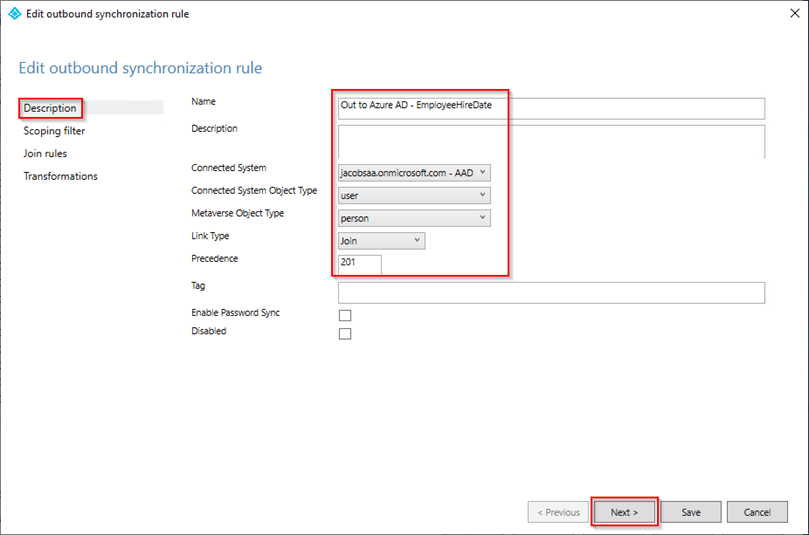
The scoping filter & join rules can be left unconfigured, so we can continue straight to ‘Transformations’. Within the Tranformations step hit ‘Add transformation’ and use the following transformation settings:
- FlowType: Direct
- Target Attribute: employeeHireDate
- Source: employeeHireDate
- Merge Type: Update
Once ready hit ‘Add’, now let’s make sure the EmployeeLeaveDateTime value can be synchronized.
Therefore, open the ‘Synchronization Rules Editor’ and ensure that the direction at the top is set to ‘Inbound’ and hit ‘Add new rule’.
In the wizard at the description step enter the following details and hit ‘Next’:
- Name: In from AD – EmployeeLeaveDateTime
- Connected System: yourdomain.local
- Connected System Object Type: user
- Metaverse Object Type: person
- Precedence: 202
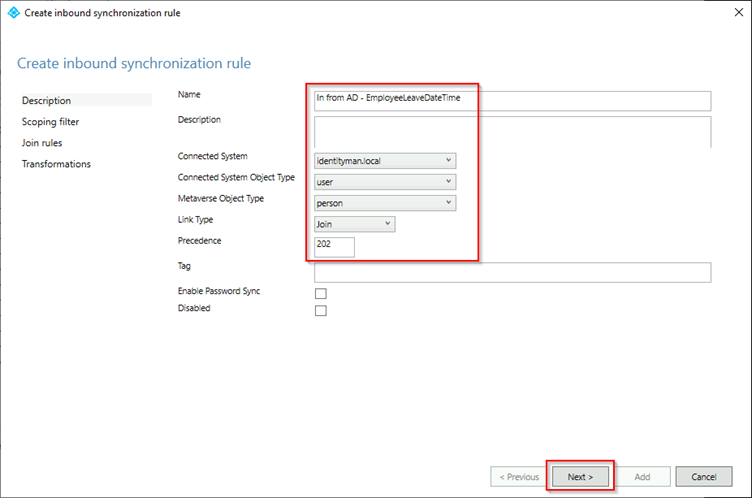
The scoping filter & join rules can be left unconfigured, so we can continue straight to ‘Transformations’. Within the Tranformations step hit ‘Add transformation’ and use the following transformation settings:
- FlowType: Direct
- Target Attribute: employeeLeaveDateTime
- Source: {the source attribute which you are going to use in AD for the EmployeeHireDate, e.g. extensionAttribute14 or msDS-CloudExtensionAttribute2}
- Merge Type: Update
Once ready hit ‘Add’. Now the inbound rule is created to read from AD, let’s make the rule to write outbound to Azure AD, therefore switch the direction to ‘Outbound’ and again hit ‘Add new rule’.
In the wizard at the description step enter the following details and hit ‘Next’:
- Name: Out to Azure AD – EmployeeLeaveDateTime
- Connected System: yourtenant.onmicrosoft.com – AAD
- Connected System Object Type: user
- Metaverse Object Type: person
- Precedence: 203
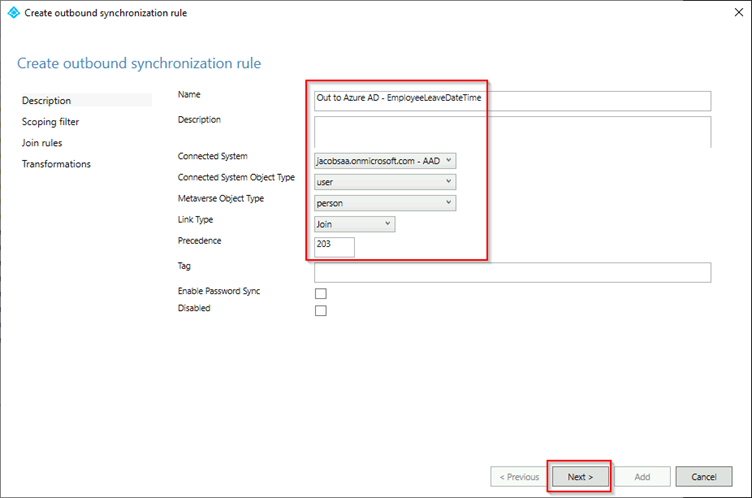
The scoping filter & join rules can be left unconfigured, so we can continue straight to ‘Transformations’. Within the Tranformations step hit ‘Add transformation’ and use the following transformation settings:
- FlowType: Direct
- Target Attribute: employeeLeaveDateTime
- Source: employeeLeaveDateTime
- Merge Type: Update
Once ready hit ‘Add’ and enable the sync again with the PowerShell cmdlet:
Set-ADSyncScheduler -SyncCycleEnabled $true
The configuration for Azure AD Connect is now in place.
Now our hybrid infrastructure is ready for Lifecycle Workflows let’s make sure that the user properties are configured properly as well! 🙂
Step 3 – Make sure the information is available on your accounts!
Now that we have configured the tenant settings, let’s make sure the properties on accounts are configured correctly. Let’s start with a simple value which is the manager value, this value needs to be populated correctly in Azure AD for workflows to trigger correctly. If this is not filled on user accounts some steps will fail (e.g. sending an email to the manager of the user). Because of that the workflow will fail, so please do make sure these values are populated correctly.
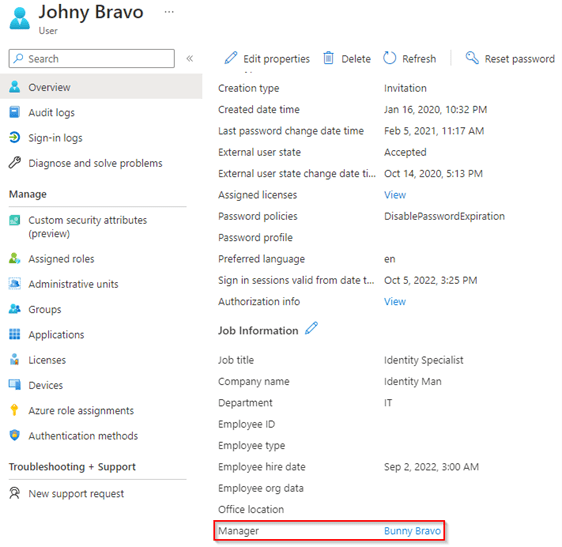
NOTE: Because an email is send to the manager, it’s important that the manager has a mailbox as well, otherwise onboarding workflows will run into an error.
The second value is the PreferredLanguage value, as discussed in step 1, this value will determine the language of emails and has the highest preference on the user object level, the more you are populating this value the better it will be for your end users. For cloud only users this can be configured via the Graph API with the following API Call:
PATCH https://graph.microsoft.com/beta/users/upn@yourdomain.com
{
   "preferredLanguage": "EN"
}
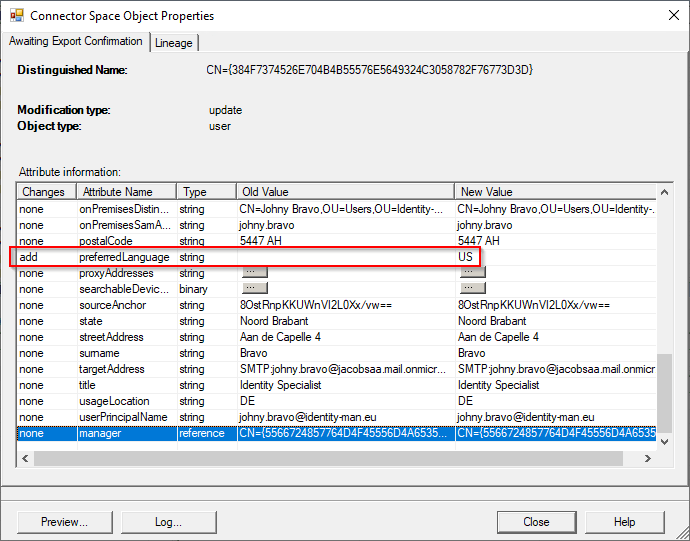
For synced accounts this needs to be changed in the on-premises Active Directory, if you have populated the country value correctly on user objects this can easily be done by copying the value which is in the attribute name ‘c’ (country) to the ‘preferredLanguage’ attribute.

With the next synchronization cycle the updates will be applied in Azure AD for the user account.
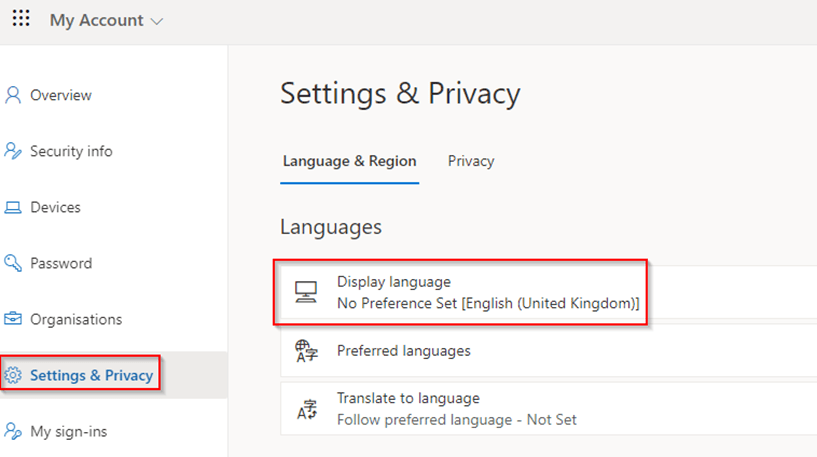
The result of these settings will be the following.
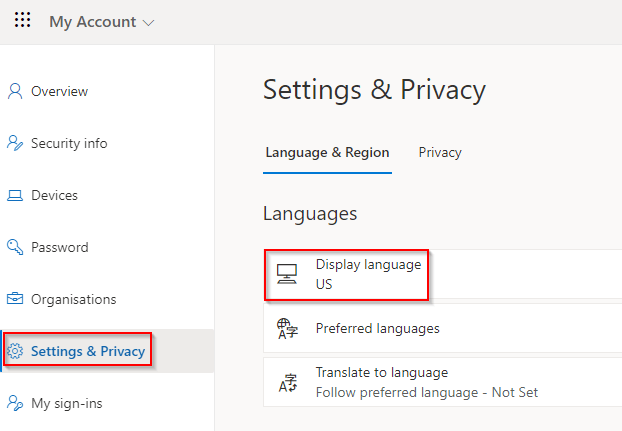
For users for which this isn’t set the tenant default setting will be used as you can see below.
For users for which this value is configured by administrators (e.g. Johny Bravo) the preferredLanguage set on the user account, in this case ‘US’, will be used. Explicitly
Now the manager and PreferredLanguage are configured there are two values left to configure, which are the EmployeeHireDate and EmployeeLeaveDateTime. Let’s first mention that the way these values need to be configured are very strict in formatting. More of these details can be found here on the docs, once you understand the date/time notation let’s continue!
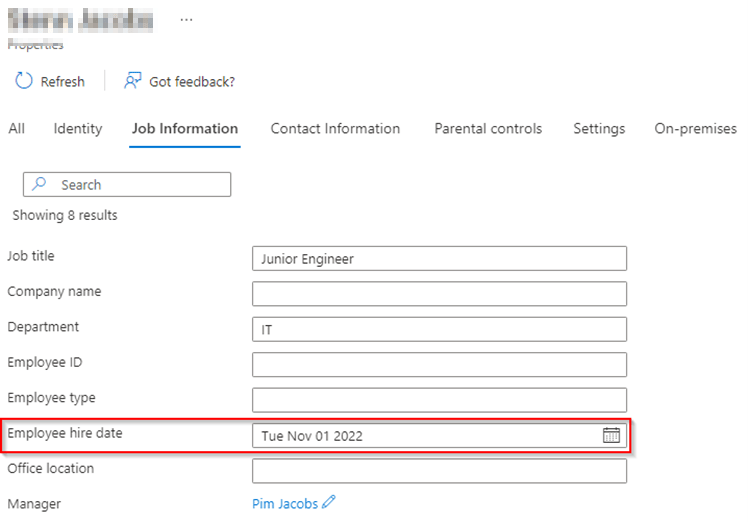
For the EmployeeHireDate for cloud only accounts, we can use the UI to configure these values. For that open the user account in Azure Active Directory, note the empty value for ‘Employee hire date’ and hit ‘Edit properties’.

Configure the Employee Hire Date for the end user to the actual start date when the user has their first day of work. By default in the UI, we can only select a date, which simply means that the user will join at 12AM which is straight at midnight (0:00).
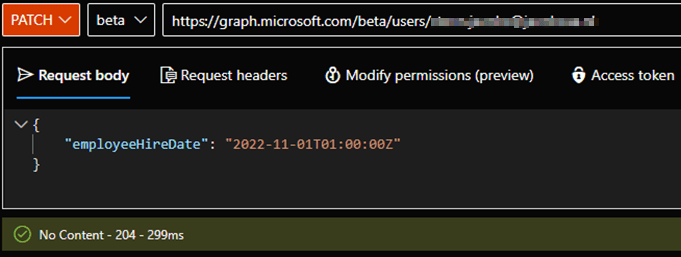
Another way we can set the EmployeeHireDate for cloud only accounts is via the Microsoft Graph API, if you want to do this you can use the following API call, whereby you can customize the actual time:
PATCH https://graph.microsoft.com/beta/users/upn@yourdomain.com
{
   "employeeHireDate": "2022-12-01T02:00:00Z"
}
For users who are synced we can set this value as well, for this you need to use the attribute in the Active Directory which you picked as the source attribute for your EmployeeHireDate (as explained in step 2). In my case this is msDS-cloudExtensionAttribute1 synced with Azure AD Connect. In here I’ve entered the value ‘20221101010000.0Z’ which will result in a EmployeeHireDate of ‘Nov 1, 2022, 2:00 AM’ on the Azure AD portal.

NOTE 1: In my example for user synced via Cloud Sync you need to configure ExtensionAttribute15 instead of msDS-cloudExtensionAttribute1.
NOTE 2: As you can see the notation of the EmployeeHireDate differs between the Graph API and the on-premises notation, this is by design. Other notations won’t be accepted by the Graph API or result in sync errors. If you want to know more details about these notations these can be found here on the docs.
Now we are done configuring the EmployeeHireDate, let’s look at the EmployeeLeaveDateTime. The EmployeeLeaveDateTime can today be edited directly via the Microsoft Graph API, Azure AD Connect or Azure AD Connect Cloud Sync, the value isn’t available in the UI.
NOTE: To be able to read and write the EmployeeLeaveDateTime you need to have User-LifeCycleInfo.ReadWrite.All or Directory.AccessAsUser.All permissions. This is done to protect sensitive data from being exposed to the organization, you don’t want to cause panic or see that your contract is being ended before actually being informed.
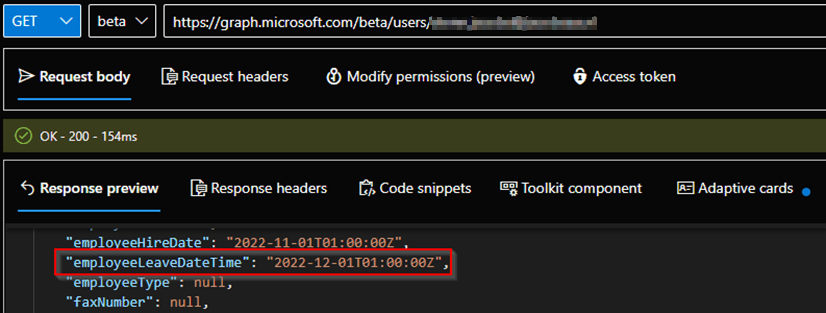
First let’s look at cloud only accounts, therefore let’s go to the Microsoft Graph Explorer and let’s retrieve the settings of one of the cloud only users with the following API call:
GET https://graph.microsoft.com/beta/users/upn@yourdomain.com
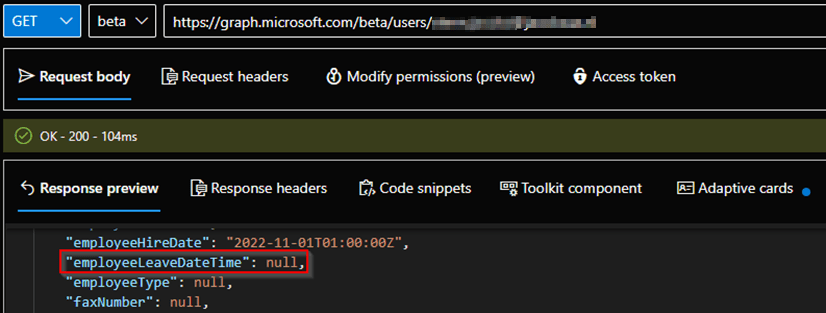
As we can see the value is ‘null’ meaning it’s not configured now let’s execute the following API call, to configure an EmployeeLeaveDateTime:
PATCH https://graph.microsoft.com/beta/users/upn@yourdomain.com
{
   "employeeLeaveDateTime": "2022-12-01T02:00:00Z"
}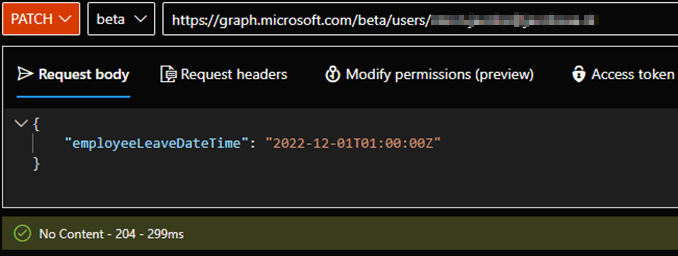
You should receive the output ‘No Content – 204’ which means the value has been set correctly. This is something we can see and verify when we run again the GET API call.
For users who are synced we can set this value as well, for this you need to use the attribute in the Active Directory which you picked as the source attribute for your EmployeeLeaveDateTime (as explained in step 2). In my case this is msDS-cloudExtensionAttribute2 synced with Azure AD Connect. In here I’ve entered the value ‘20221201010000.0Z’ which will result in a EmployeeHireDate of ‘Dec 1, 2022, 2:00 AM’ on the Azure AD portal.
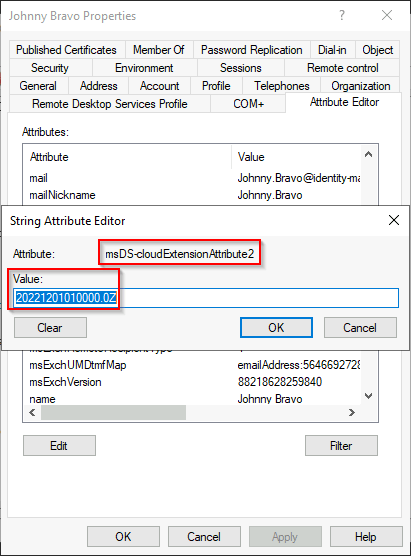
NOTE 1: In my example for user synced via Cloud Sync you need to configure ExtensionAttribute14 instead of msDS-cloudExtensionAttribute2.
NOTE 2: Also, for the EmployeeLeaveDateTime you see that the notation differs between the Graph API and the on-premises notation, this is by design. Other notations won’t be accepted by the Graph API or result in sync errors. If you want to know more details about these notations these can be found here on the docs.
Again, it’s important to mention that the timing here is crucial, so if a user starts at the 1st of December, make sure that the hire date time of the user is set to e.g. 1AM so you’re sure the workflows have already triggered before the user starts his new job. For the EmployeeLeaveDateTime it’s the other way around, set the time value to run at the end of the day, this so the user is able finish his last day accordingly.
Step 4 – Prepare Lifecycle Workflows tasks for hybrid support
Now that we have configured the tenant settings, made sure our hybrid identity infrastructure is synchronizing the actual values and made sure these values are correctly configured on the accounts. There is one last step to take before we can build the actual Lifecyle Workflows, which is making sure that we are able to run workflow tasks against the on-premises Active Directory (as most organizations are still hybrid).
As logic apps don’t have native integration to connect to Active Directory but can work with Azure Automation whereby Azure Automation can make use of Hybrid Workers this is the way to go for now. So, let’s have a look at how to get your Hybrid Worker agent connected to an Azure Automation account!
For that go the Azure Portal and search for ‘Automation Accounts’, if you haven’t deployed one yet, first make sure you have one.
Once you’re in the ‘Automation Account’ go to ‘Inventory’, in here we need to make sure that a Log Analytics Workspace is connected to the Automation Account. If you haven’t deployed one yet, first make sure you have one (this to prevent a Log Analytics space from being created with a scrambled name, as renaming afterwards isn’t possible).
Once ready hit ‘Enable’.

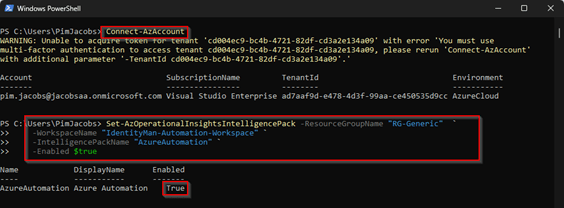
Once this is enabled, we need to make sure the Azure Automation solution in the Log Analytics Workspace is enabled. To do this let’s connect via PowerShell and enable the solution with the PowerShell commands below:
Connect-AzAccount
Set-AzOperationalInsightsIntelligencePack -ResourceGroupName "RG-Generic"  `
-WorkspaceName "IdentityMan-Automation-Workspace" `
-IntelligencePackName "AzureAutomation" `
-Enabled $true
Now the solution is enabled let’s make sure the virtual machine designated as Hybrid Worker is reporting to the Log Analytics Workspace, which is the first step to have the virtual machine functioning as Hybrid Worker. In my example I’m using a virtual machine on the Azure Platform, but you can use on-premises servers as well, the only difference is that the agent needs to be installed separately for on-premises servers.
For this the first step is to go to the Azure Portal and go to the ‘Log Analytics Workspace’ configured earlier. In here click on ‘Agents management’ and make sure to copy the ‘Workspace ID’ and ‘primary key’.
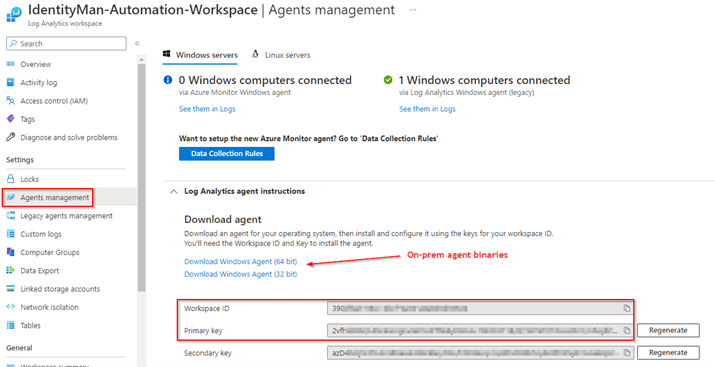
NOTE: As you can see you can download the agents for your on-premises servers here as well.
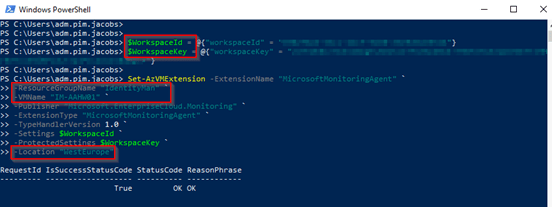
Once we know the values make sure update the PowerShell script below (WorspaceID, WorkspaceKey, ResourceGroupName, VMName & Location) and run the script on your hybrid worker virtual machine to get it connected:
Connect-AzAccount
$WorkspaceId = @{"workspaceId" = "< Workspace ID>"}
$WorkspaceKey = @{“workspaceKey" = "<Workspace primary key>"}

Set-AzVMExtension -ExtensionName "MicrosoftMonitoringAgent" `
-ResourceGroupName "<ResourceGroupName of VM>" `
-VMName "<VM Name>" `
-Publisher "Microsoft.EnterpriseCloud.Monitoring" `
-ExtensionType "MicrosoftMonitoringAgent" `
-TypeHandlerVersion 1.0 `
-Settings $WorkspaceId `
-ProtectedSettings $WorkspaceKey `
-Location "<Azure Region e.g. WestEurope>"
Now before we can finalize the hybrid worker configuration, let’s first make sure you have a ‘hybrid worker group’ within the ‘Automation account’.

Once you’ve verified or created the hybrid worker group, let’s verify the ‘URL’ and ‘Access key’ of the ‘Automation account’.
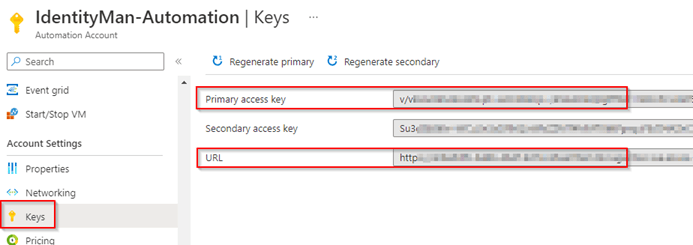
Once we know the values again update the PowerShell script below (GroupName, URL & Key) and run the script on your hybrid worker virtual machine to connect it to the Hybrid Worker Group:

Import-Module -Name HybridRegistration.psd1
Add-HybridRunbookWorker -GroupName "<hybrid worker group name>" `
-Url "<Automation Account URL>" `
-Key "Automation Account Access Key"
The result of this action should be an active hybrid worker agent within your hybrid worker group, this should be the machine we just added.

Now the hybrid worker is up and running, the last step is to make sure that we can execute runbooks on the hybrid worker with a ‘run as account’, this becomes very handy when we need to have permissions to execute write, update or delete actions in Active Directory. For this configure the credential of a service account (with permissions) which exists in your on-premises Active Directory beneath the ‘Credentials’ option of the ‘Automation Account’ (this service account doesn’t need to be synchronized to Azure AD).
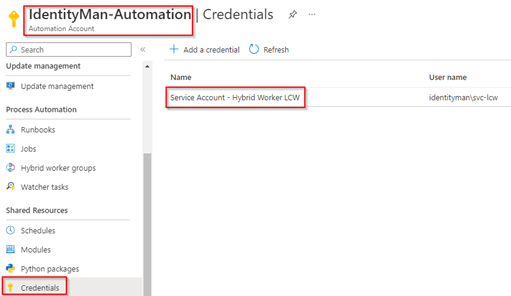
Once the ‘Credential’ is configured go to the Hybrid Worker Group, go to the ‘Settings’, select use ‘Custom’ hybrid worker credentials and select the credential we added in the previous step and hit ‘Save’

The Hybrid Worker group is now configured correctly and is ready for use with Runbooks, Logic Apps and therefore Lifecycle Workflows :-).
Conclusion
After you’ve followed the above four steps your environment is ready to start using the actual LifeCycle Workflows. You did configure the tenant settings, prepared the hybrid identity infrastructure, attributes / settings on user accounts and the hybrid worker agent for integration with the on-premises active directory. This means we can start using the LifeCycle Workflows for onboarding and offboarding workflows as the source is configured correctly.
In my next blog we will therefore go directly into creating an onboarding workflow and we will have a look at how LifeCycle Workflows can work in hybrid environments with the use of Logic Apps.
I hoped you enjoyed reading this new blog within the Azure AD Identity Governance series! Stay tuned for my next Azure AD Identity Governance blog soon :-).
- An Introduction to Azure AD Identity Governance
- Identity Governance 1 of 10: Implementing a Strong Identity Foundation
- Identity Governance 2 of 10: Implementing Identity Lifecycle management for guest users – part 1
- Identity Governance 2 of 10: Implementing Identity Lifecycle management for guest users – part 2
- Identity Governance 2 of 10: Implementing Identity Lifecycle management for guest users – part 3
- Identity Governance 3 of 10: Configuring Provisioning in 3rd party apps for (guest) users
- Identity Governance 4 of 10: Implementing LifeCycle Workflows – Configure the basics
- Identity Governance 4 of 10: Implementing LifeCycle Workflows – Configure onboarding workflows
- Identity Governance 4 of 10: Implementing LifeCycle Workflows – Configure offboarding workflows
- Identity Governance 5 of 10: Using the hidden gems in Azure AD access packages, all you need to know! – Part 1
- Identity Governance 5 of 10: Using the hidden gems in Azure AD access packages, all you need to know! – Part 2
- Identity Governance 5 of 10: Using the hidden gems in Azure AD access packages, all you need to know! – Part 3
- Identity Governance 5 of 10: Using the hidden gems in Azure AD access packages, all you need to know! – Part 4
- Identity Governance 6 of 10: Using the brand new Entra Inbound Provisioning API for Identity Lifecycle Management!
- Identity Governance 7 of 10: Recertify access by using Microsoft Entra Access Reviews! – Part 1
- Identity Governance 7 of 10: Recertify access by using Microsoft Entra Access Reviews! – Part 2
- Identity Governance 8 of 10: Implementing Privileged Identity Management
- Identity Governance 9 of 10: Implementing a Terms of use
- Identity Governance 10 of 10: Review by Monitoring and reporting

2 thoughts on “Starting with brand new Azure AD Lifecycle Workflows – Part 1”