A warm welcome to my next blog in the Identity Governance series (which is the first one of 2024), and the second blog about recertifying access by using Entra Access Reviews. In the first blog we looked at how to setup an access review successfully in your organization. In this second blog we will learn how to use the Microsoft Graph API and Microsoft Purview sensitivity labels to ‘Enable Access Reviews on scale’ within Microsoft Entra.
If you’ve never heard of recertifying access, Microsoft Entra Access Reviews or heard of it but never worked with it before. Please read my earlier blog first to learn more about all functionalities, current limitations and possibilities within Microsoft Entra Access Reviews.
Once you know how Microsoft Entra Access Reviews can be setup and configured, are aware which resources an Access Review can be applied to, and the limitations it has today. Let’s dive into ‘Enabling Access Reviews on scale within Microsoft Entra by using the Microsoft Graph API and sensitivity labels!’ in three steps.
Enabling Microsoft Entra Access Reviews on scale
Step 1 – EnableMIPLabels in Microsoft Entra ID
As we are going to use sensitivity labels, which can be configured within the Microsoft Purview compliance portal, to enable Microsoft Entra Access Reviews on scale our first step is to make sure that once Sensitivity Labels are created, these are populated in Microsoft Entra ID as well. By default, this isn’t the case.
For that open a PowerShell Window and run the following cmdlet to connect to Microsoft Graph with the right permissions:
Import-Module Microsoft.Graph.Beta.Identity.DirectoryManagement
Connect-MgGraph -Scopes “Directory.ReadWrite.All”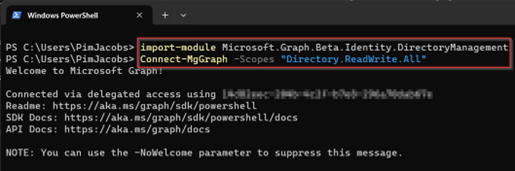
Once connected execute the following cmdlets to update the directory settings so sensitivity labels can be populated onto Microsoft 365 Groups in Microsoft Entra.
$grpUnifiedSetting = Get-MgBetaDirectorySetting -Search DisplayName:"group.Unified"
Write-Output $grpUnifiedSetting

$params = @{
          Values = @(
          @{
          Name = "EnableMIPLabels"
          Value = "True"
          }
          )
}

Update-MgBetaDirectorySetting -DirectorySettingId $grpUnifiedSetting.Id -BodyParameter $params
Once this is executed, we have made sure that the sensitivity labels can now be synchronized to Microsoft Entra ID so we can use these values to apply particular access reviews. Now let’s continue to the next step to create sensitivity labels and make sure the LabelSync is executed.
Step 2 – Define labels and label policies and execute the LabelSync
Once the labels can be synchronized to Microsoft Entra ID let’s first make sure that we execute the LabelSync. For that we do (unfortunately) need global administrator permissions. Connect with PowerShell 7 to the Microsoft Purview compliance portal with the following cmdlet:
Connect-IPPSSession -UserPrincipalName {admaccount@tenantname.onmicrosoft.com}Once connected execute the cmdlet below to execute the Label Sync to Microsoft Entra ID so labels set on groups are synchronized to Entra ID:
Execute-AzureAdLabelSync
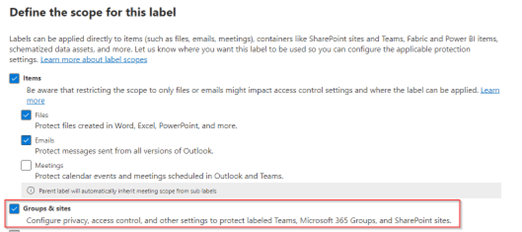
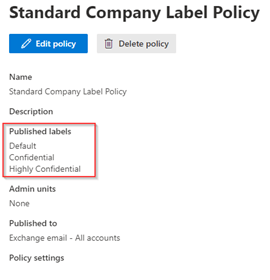
Now the sync is in place, let’s make sure labels are created, as you can see, I’ve three labels created with the names: ‘Default’, ‘Confidential’ and ‘Highly Confidential’. Important is that the ‘Scope’ for the labels contains ‘UnifiedGroup’.

If the label doesn’t contain ‘UnifiedGroup’, edit the label and make sure that within the scoping of the label ‘Group & Sites’ is selected, this so we can apply this label to Microsoft 365 Groups.
NOTE: This setting will be greyed-out if you haven’t executed step 1.
Next is to make sure there is a label policy published, important to know is that only the users which have the label published will see this in the Entra Admin Portal. So if you didn’t publish the label to your global admin account, you will never see it in Microsoft Entra ID.
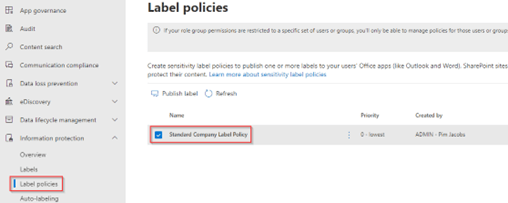
In my case I’ve published all three labels to all users in my tenant.
NOTE: This process can take up to 24 hours before the labels are published and activated and therefore visible within Microsoft Entra.
This results that the label can be selected within Microsoft Entra ID for Microsoft 365 Groups as you can see. If one or more of these groups already had a label applied this will also be visible in Entra ID as you can see in the example below.

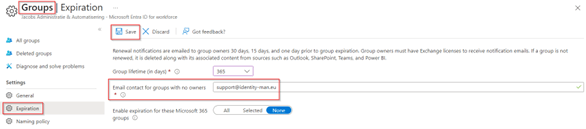
At last, as we will be using the Group Owners as the reviewer on the Entra Access Reviews which we are going to apply on scale, we need to make sure we are receiving a notification if a group contains no owner within the environment. For that go to the Entra Admin portal, go to ‘Groups’, hit ‘Group Settings’, go to ‘Expiration’ and make sure that the ‘Email contact for groups with no owners’ is configured and pointing to the correct email address.
Now we’ve got the sensitivity labels synchronized to Microsoft Entra ID and have configured the notification settings for Microsoft 365 groups without owners. Let’s make sure that we can use these sensitivity labels to apply Microsoft Entra Access Reviews on scale with different access reviews settings per sensitivity label.
Step 3 – Creating Access Reviews on scale for Microsoft 365 Groups
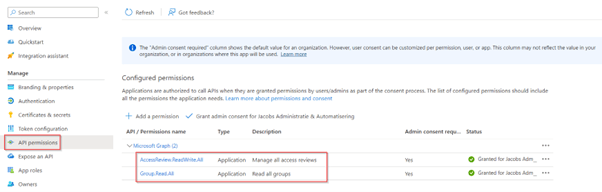
First of all let’s make sure we have a managed identity (or service principal) available in your tenant which has the application permissions‘AccessReview.ReadWrite.All’ & ‘Group.Read.All’ configured and consented. This will make sure we can run the script with recurrence and without user intervention (from an Azure Automation Account as example). Therefore, each group with a sensitivity label will have an Entra Access Review applied.
Once the permissions are given to the managed identity (or service principal) download the ‘Enable_Access_Reviews_On_Scale_M365_Groups’ PowerShell script from my GitHub repository.
Once downloaded, the script is ready for use with a managed identity (if the above permissions are configured correctly). If you however, for a good reason, want to use a service principal you must change the statement on line two to ‘$false’ and define the variables of your service principal (rule 5-7) to make a successful connection.

Once the script is altered to match your tenant preferences, you have the option to change the Access Review Request Body within the script. The first Access Review Request Body is defined for the ‘Confidential’ Access Review (at rule 33-90), if you are using a different label name please change ‘Confidential’ to match your label name.

The second Access Review Request body is defined for the ‘Highly Confidential’ Access Review (at rule 96-153), if you are using a different label name please change ‘Highly Confidential’ to match your label name.

On this learn page more instructions and examples can be found to tweak the Access Review Request Body to your own requirements. To help you understand the differences between the two Access Review Request Body’s in my examples, I’ve created the following table which highlights the differences in yellow.
| Confidential | Highly Confidential |
| Only Guest users | All Users |
| Group owner(s) executing review | Group owner(s) executing review |
| All mail notifications enabled | All mail notifications enabled |
| Justification required on approval | Justification required on approval |
| No default decisions | Defaults decisions enabled by using the recommendations |
| Duration of access review 21 days | Duration of access review 21 days |
| Auto apply decisions made during review | Auto apply decisions made during review |
| Show recommendations | Show recommendations |
| Semi annual review without end date | Quarterly review without end date |
Once you’ve configured the Access Review Request Body to your own needs and put in the right label names, we need to change line 204 within the script so the right labels are being send over to the function which creates the Access Review Request body. Therefore, make sure to change the ‘AcceptLabelResponse’ to match the label names for which you want to create an access review, and which are also configured within the function we just made changes too.

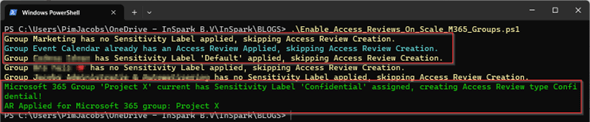
Once the changes are saved and have been applied, let’s execute the script. As you can see the script is providing the desired output to know exactly why groups are skipped or for which groups an Access Review will be created.
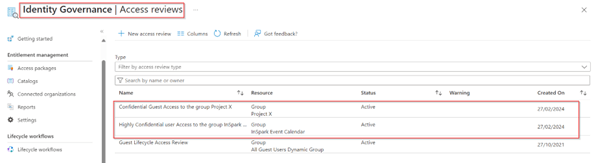
Once the script is finished, we can see that at the Identity Governance Access Review overview the Access Reviews have been created successfully with the right properties.
Looking at the Audit logs we can also see that the Access Reviews are successfully created, in my case with the use of a Managed Identity!

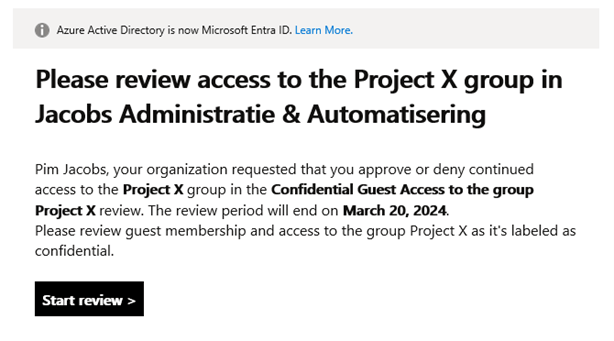
And more important, as you can see the group owner of the group is now receiving the right Access Review in their mailbox with the right content and request to start the actual review.
By making sure the above script is scheduled daily, we secure the Microsoft 365 groups which have ‘Confidential’ and ‘Highly Confidential’ sensitivity labels applied with a mandatory Access Review.
Conclusion
Now we’ve walked through the setup how to enable sensitivity labels in Microsoft Entra ID and you know how to create and publish sensitivity labels in the Microsoft Purview Compliance Portal. You can use these sensitivity labels to apply Microsoft Entra Access Reviews on scale based on the provided script which looks at the sensitivity label configured on the Microsoft 365 Group and the corresponding Microsoft Entra Access Review settings as defined within the script.
By using this method, we can make sure that Microsoft 365 Groups classified with the ‘Confidential’ and ‘Highly Confidential’ label both have an access review applied but with different settings belonging to the classification. With that the Microsoft Entra Access Review is always send over to the group owner and we did make sure that if no group owner is configured an alert is send out to IT to make sure a group owner is being configured on the Microsoft 365 Group.
With that I hope I’ve challenged you to use the Microsoft Purview Sensitivity Labels feature to embrace the use of Microsoft Entra Access Reviews. Both can go hand in hand with each other with the right strategy and configuration.
Having said that I hoped you enjoyed reading this new blog within the Microsoft Entra Identity Governance series! Stay tuned for my next blog within the Identity Governance series which will be all about Privileged Identity Management, the ways you provide permissions and how to govern this process!
- An Introduction to Azure AD Identity Governance
- Identity Governance 1 of 10: Implementing a Strong Identity Foundation
- Identity Governance 2 of 10: Implementing Identity Lifecycle management for guest users – part 1
- Identity Governance 2 of 10: Implementing Identity Lifecycle management for guest users – part 2
- Identity Governance 2 of 10: Implementing Identity Lifecycle management for guest users – part 3
- Identity Governance 3 of 10: Configuring Provisioning in 3rd party apps for (guest) users
- Identity Governance 4 of 10: Implementing LifeCycle Workflows – Configure the basics
- Identity Governance 4 of 10: Implementing LifeCycle Workflows – Configure onboarding workflows
- Identity Governance 4 of 10: Implementing LifeCycle Workflows – Configure offboarding workflows
- Identity Governance 5 of 10: Using the hidden gems in Azure AD access packages, all you need to know! – Part 1
- Identity Governance 5 of 10: Using the hidden gems in Azure AD access packages, all you need to know! – Part 2
- Identity Governance 5 of 10: Using the hidden gems in Azure AD access packages, all you need to know! – Part 3
- Identity Governance 5 of 10: Using the hidden gems in Azure AD access packages, all you need to know! – Part 4
- Identity Governance 6 of 10: Using the brand new Entra Inbound Provisioning API for Identity Lifecycle Management!
- Identity Governance 7 of 10: Recertify access by using Microsoft Entra Access Reviews! – Part 1
- Identity Governance 7 of 10: Recertify access by using Microsoft Entra Access Reviews! – Part 2
- Identity Governance 8 of 10: Implementing Privileged Identity Management
- Identity Governance 9 of 10: Implementing a Terms of use
- Identity Governance 10 of 10: Review by Monitoring and reporting
