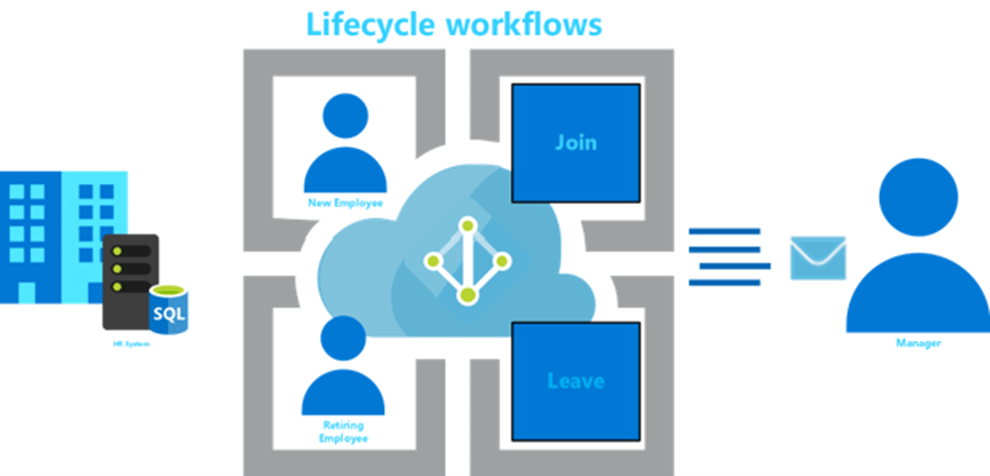
A warm welcome to my next blog in the Identity Governance series which is the last part of the new feature called Azure AD Lifecycle Workflows.
In my previous blog posts we talked about ‘Configuring the basics’ to implement and run Lifecyle Workflows in your Azure AD tenant followed by ‘Onboarding your end users’ to streamline the onboarding process. If you haven’t read these blogs, I recommend you do that first and take action where needed in your environment.
Once you’ve configured the basics and configured the onboarding scenarios, we can start implementing the actual workflows for offboarding. But where to start and what tasks should be in your offboarding flows and in which order?
For that I’ve written this last blog to walk you through the deployment steps with ‘real-life’ examples. We will do this in five simple steps, so let’s dive in and make sure your offboarding workflows are configured correctly and can run successfully!
Configure your offboarding workflows
Step 1 – Define your offboarding process
Like with configuring your onboarding workflows, offboarding workflows start as well with first thinking about the offboarding process; What are you doing right now to get a user offboarded in your IT environment? I hope the answer isn’t ‘nothing’ or ‘wait until HR is notifying IT’ as that is asking for problems and can become a high risk for your company. Some of these users have access to the ‘most valuable assets’ of your company and therefore need to be offboarded, having a solid streamlined process for it is therefore crucial.
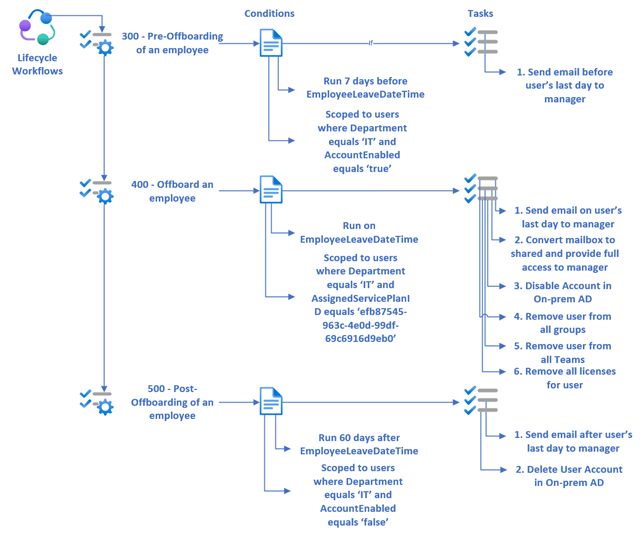
To kick-start your offboarding flows it’s extremely helpful to make a logic flow in Microsoft Visio (or another product) to get ‘all cards on the table’ and design your offboarding workflows. An example of an offboarding flow can be found below (feel free to copy and fine-tune for your own needs).
NOTE: Microsoft has published a learn article which you can find here which can help you determine the above flow for your environment (I’ve only used a few steps of this article to shrink the size of this blog).
Once the flow is clear and you’ve determined which steps you need to take in your offboarding workflows, you may notice that some kind of on-premises integration is required, e.g. for disabling or deleting the account. These tasks are by default only available for cloud accounts, for other integrations we are today depending on Logic Apps which we can run with ‘Custom Task Extension’ from Lifecycle workflows.
Step 2 – Prepare for custom extensions
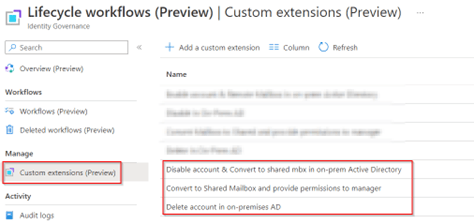
So, first let’s make sure we have the three actions (disable account, delete account and convert mailbox) already defined as a custom extension before configuring the workflows. For that go to the Azure AD and go to Identity Governance, click on ‘Lifecycle Workflows’ hit ‘Custom extensions’ and hit ‘+ Add a custom extension’.

Within the ‘Add a custom extension’ screen configure the ‘basics’ which exists of a Name and Description. These are my custom Extensions name and descriptions:
- Name: Disable account & Convert to shared mbx in on-prem Active Directory
Description:
This task will trigger a logic app which does the following:
– Set description on account in AD
– Disable the account in on-prem AD
– Convert Mailbox to Shared in on-prem AD.
- Name: Convert to Shared Mailbox and provide permissions to manager
Description:
This task will trigger a logic app which does the following:
– Convert Mbx to Shared in Exchange Online
– Add the manager of the user with ‘full access’ permission on the mailbox.
- Name: Delete account in on-premises AD
Description:
This task will trigger a logic app which does the following:
– Delete the account in Active Directory

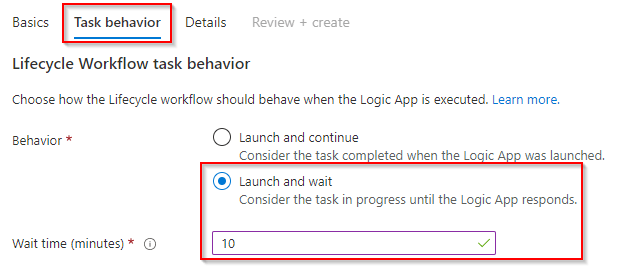
Next to configure is the ‘Task behavior’ whereby you can choose for two options:
- Launch and continue – Which launches the logic app and doesn’t wait if the logic app succeeds.
- Launch and wait – Which launches the logic app and waits if the logic app succeeds, the wait time can be configured separately.
In my example I’ve configured ‘launch and wait’ as I want to make sure all the logic app runs are successful and report back to the actual workflow with a wait time of 10 minutes.
In the ‘Details’ screen we can either connect to an existing logic app or create a new one. I would strongly recommend creating a new Logic App via the custom extension as that will put the required details already in the logic apps as step(s). Therefore, make sure ‘Yes’ is selected at ‘Create a logic app’ and configure the ‘Subscription’, ‘Resource Group’ and give the ‘Logic app a name’ (Pro tip: use the same name in the logic app as the one you’ve used in the name of the actual workflow). Once ready hit ‘Create a logic app’.
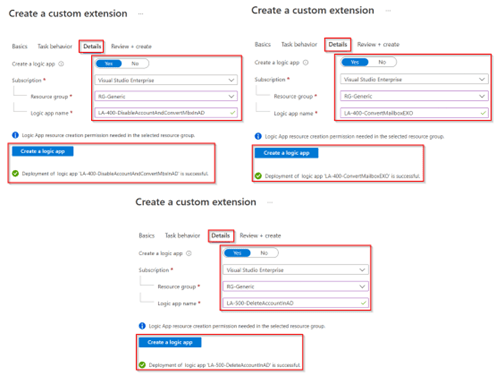
Wait until the Logic Apps are created, if successful go to the next screen and hit ‘Create’ to create the custom task extensions. As you can see, we created three custom task extensions with the names:
- Disable account & Convert to shared mbx in on-prem Active Directory;
- Convert to Shared Mailbox and provide permissions to manager;
- Delete account in on-premises AD;
Step 3 – Create your Lifecycle Workflows in Azure AD
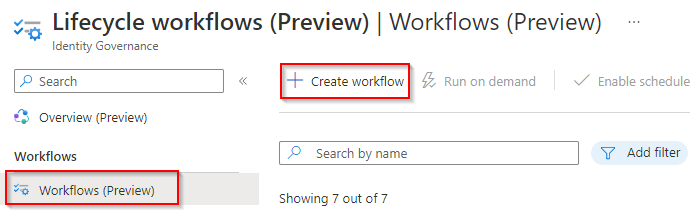
Once we have configured the ‘Custom task extension’ we can start building these offboarding workflows, for that we go to the Azure AD and go to Identity Governance, click on ‘Lifecycle Workflows’ hit ‘Workflows’ and hit ‘Create Workflow’.
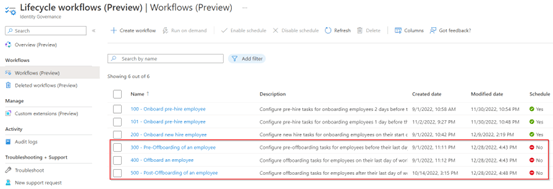
Within the ‘Choose a template’ setting we have 6 pre-defined workflow templates, for the offboarding scenario’s there are four templates which you can select and use, in my example I’ve used the following templates:
- Workflow 300 – Pre-Offboarding of an employee
- Workflow 400 – Offboard an employee
- Workflow 500 – Post-Offboarding of an employee
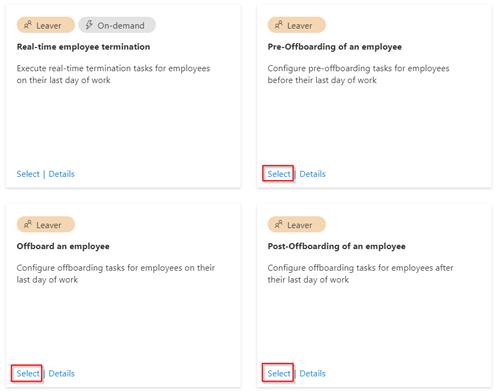
NOTE: As you can see the ‘Real-time employee termination’ is a template which can ONLY be run on-demand, you can design a workflow for ‘example’ scenarios which you run on demand and not scheduled.
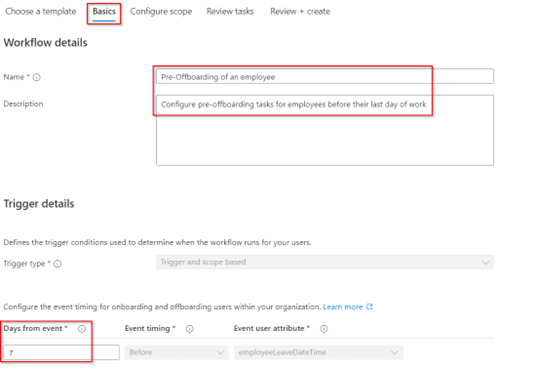
The next step allows you to configure the ‘basics’ of the workflow template like Name, Description and Trigger details. In my example I’ve configured the following settings:
- Workflow 300
- Name: 300 – Pre-Offboarding of an employee
- Description: Configure pre-offboarding tasks for employees before their last day of work.
- Trigger Details:
- Days from event: 7
- Event timing: Before
- Event user attribute: EmployeeLeaveDateTime
- Workflow 400
- Name: 400 – Offboard an employee
- Description: Configure offboarding tasks for employees on their last day of work.
- Trigger Details:
- Days from event: 0
- Event timing: On
- Event user attribute: EmployeeLeaveDateTime
- Workflow 500
- Name: 500 – Post-Offboarding of an employee
- Description: Configure offboarding tasks for employees after their last day of work
- Trigger Details:
- Days from event: 60
- Event timing: After
- Event user attribute: EmployeeLeaveDateTime
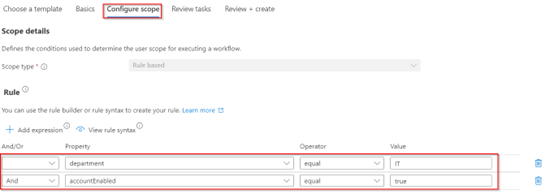
Within the next screen ‘Configure Scope’ we are able to restrict the workflow to only run for specific user accounts, e.g. only the users from IT. In my examples I’ve scoped my workflows to only run for the users which have the department set to ‘IT’ and made sure that it ‘makes sense’ to run the workflow or made sure that previous workflows have been executed first to create a ‘fail safe’. This is important as we for example don’t want to inform the manager if the account is already disabled or in examples where we send out emails to the manager, as for that it’s required that the user has an Exchange Online license plan assigned.
- Workflow 300 – Pre-Offboarding of an employee
- Rule syntax: (department eq ‘IT’) and (accountEnabled eq true)
- Workflow 400 – Offboard an employee
- Rule syntax: (department eq ‘IT’) and (assignedPlans/any(a:a/servicePlanId eq efb87545-963c-4e0d-99df-69c6916d9eb0))
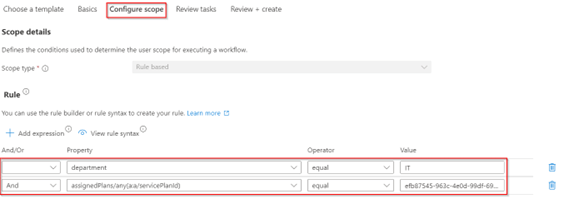
NOTE: In the above example the ServicePlanId is referring to the Exchange Online Plan 2 product.
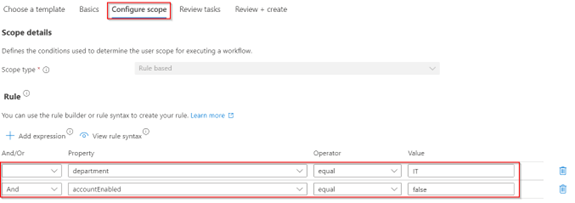
- Workflow 500 – Post-Offboarding of an employee
- Rule syntax: (department eq ‘IT’) and (accountEnabled eq false)
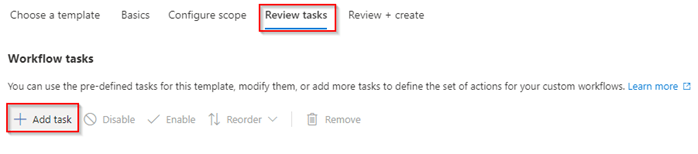
The next screen is all about ‘Review Tasks’, which are simply the tasks which are executed by the workflow once it’s triggered. By default, workflow templates contain pre-created task(s), so my first step is always to delete those and hit ‘Add Task’ to add the tasks which are required to have in there.
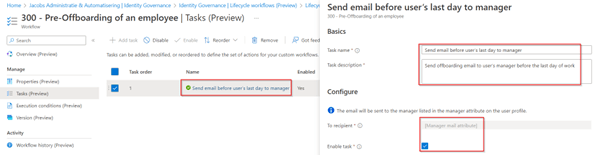
For the workflow ‘300 – Pre-Offboarding of an employee’, I’ve configured the following tasks:
- Task Name: Send email before user’s last day to manager
- Task Details: Send offboarding email to user’s manager before the last day of work
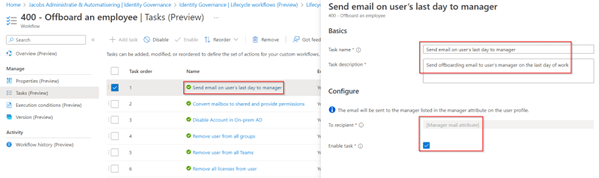
For the workflow ‘400 – Offboard an employee’, I’ve configured the following tasks:
- Task Name 1: Send email on user’s last day to manager.
Task Details 1: Send an offboarding email to user’s manager on the last day of work.
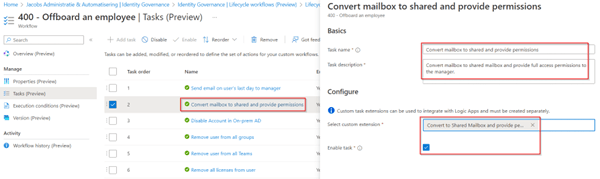
- Task Name 2: Convert mailbox to shared and provide permissions.
Task Details 2: Convert mailbox to shared mailbox and provide full access permissions to the manager.
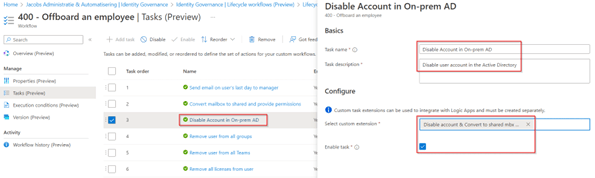
- Task Name 3: Disable Account in On-prem AD.
Task Details 3: Disable user account in the Active Directory.
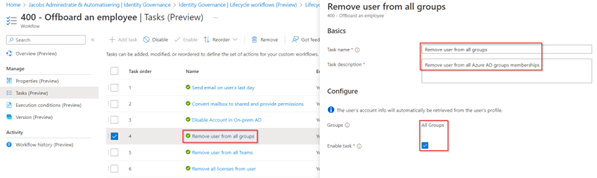
- Task Name 4: Remove user from all groups.
Task Details 4: Remove user from all Azure AD groups memberships.
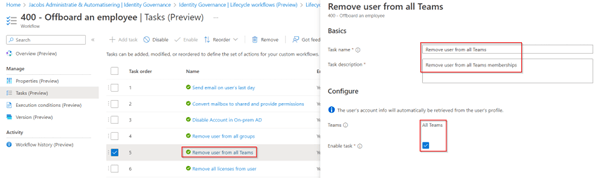
- Task Name 5: Remove user from all Teams.
Task Details 5: Remove user from all Teams memberships.
- Task Name 6: Remove all licenses from user.
Task Details 6: Remove all licenses assigned to the user.

And for the workflow ‘500 – Post-Offboarding of an employee’, I’ve configured the following tasks:
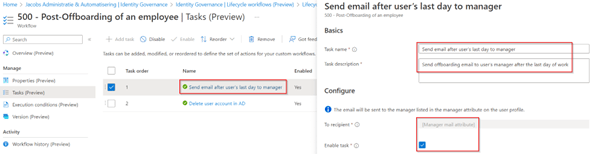
- Task Name 1: Send email after user’s last day to manager.
Task Details 1: Send offboarding email to user’s manager after the last day of work.
- Task Name 2: Delete user account in AD.
Task Details 2: Delete the user account in Active Directory.

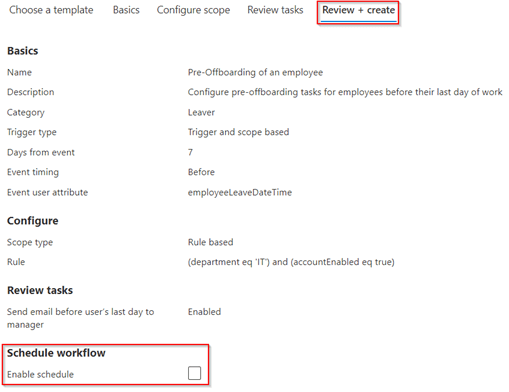
Once you walked through the configuration of one of the three workflows described above and landed on the ‘Review & Create’ screen make sure to for now leave the ‘Enable Schedule’ disabled (unchecked) this as we are going to run test first before actively scheduling the workflow in your environment.
Once ready hit ‘Create’. Now if you walked through my steps explained above, you did create three offboarding workflows as shown below.
Again, I can hear you thinking ‘Are we there yet already?’. Well almost, as we still need to configure the custom extension we created earlier (Logic Apps and Workbooks), so let’s dive into the last step before we can go testing our offboarding flows!
Step 4 – Configure your custom extensions
Configuring your custom extensions, e.g. Logic Apps and attached services like runbooks in Azure Automation, is not that complex. To use them however, it’s important that you’ve followed ‘Step 4 – Prepare Lifecycle Workflows tasks for hybrid support’ in my first blog post which you can find here.
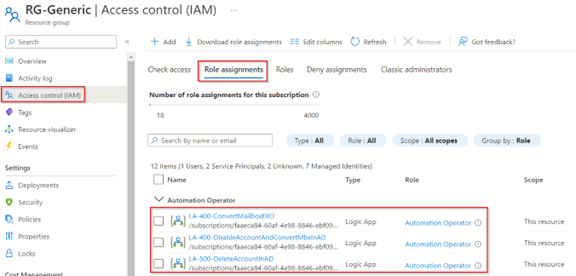
Once you’re ready and prepared your environment with a hybrid worker, let’s start with making sure that all the three Managed Identities, which have been created during the creation of the Custom Extension, have the right permissions on the resource group containing the automation account. This is required so these Logic Apps can start a runbook and get retrieve the job status.
For that go the Resource Group in the Azure Portal and hit ‘Access control (IAM)’. In here make sure that all three ‘Managed Identities’ of the Logic Apps are added as an ‘Automation Operator’ at the Resource Group level.
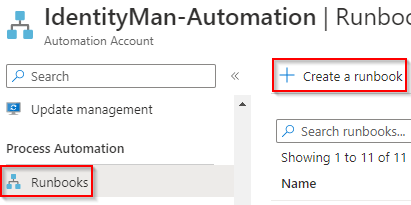
Once you’ve done this let’s make sure there are runbooks for all these Logic Apps within the Automation Account with the correct steps. For this go to the ‘Automation Account’ hit ‘Runbooks’ and hit ‘+ Create a runbook’.
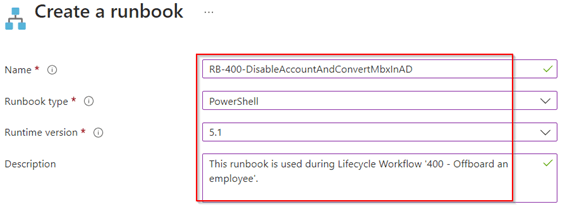
Make sure to provide a corresponding ‘Name’, choose ‘PowerShell’ as the runbook type, pick ‘5.1’ as the runtime version and define a ‘Description’. Once ready hit ‘Create’.
Do the same for the second runbook and once again hit ‘Create’.

And at last walk through the same steps for the third runbook and hit ‘Create’.

Once created please make sure the correct steps are available within the runbook as PowerShell code, in here you can go totally nuts :-). I’ve build my own example PowerShell scripts which are all available on my GitHub account:
- RB-400-ConvertMailboxEXO.ps1
- RB-400-DisableAccountAndConvertMbxInAD.ps1
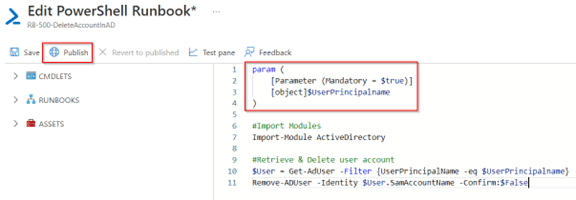
- RB-500-DeleteAccountInAD.ps1
In all runbooks there is a crucial step to take, which is the ‘parameter called UserPrincipalName’ and in one of the runbooks the second ‘paramater called ManagerMail’. This is what we are going to push as a variable from the Logic App to the Runbook so we can execute the correct actions on the correct user account(s) in Active Directory. Once ready hit ‘Publish’ to publish the Runbook and make it usable from the Logic App (hitting save will only save the runbook but won’t make it usable for the Logic App).
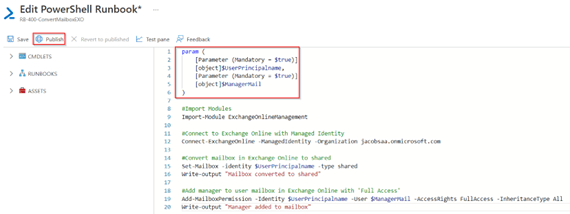

NOTE: As you can see, in one runbook I’m using some remote mailbox cmdlets via the ‘Add-PSSnapIn’, I’m doing this to stay in a supported state with my synced identities. If you want to use this ‘light weight SnapIn’ as well and want to know how, you can find more details here on the docs. Please make sure this module is installed and available on the hybrid worker.
Once the runbooks are published it should show you a green checkbox saying ‘Published’.

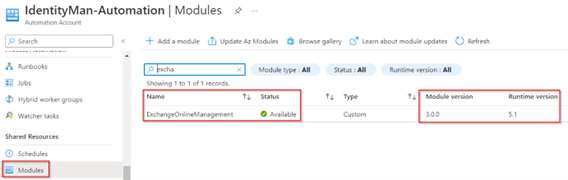
As you may have noticed, one of the runbooks isn’t using any on-premises modules, which is right as it’s only depending on Exchange Online. For that we are going to run it directly within the Automation Account (in Azure), for that to work however we need to take a few extra steps. The first one is making sure the module is installed within the Automation Account, for that go to the ‘Automation Account’ hit ‘Modules’ and make sure ‘ExchangeOnlineManagement’ is added as Runtime version ‘5.1’. Wait until the status is reported back as ‘Available’.
The next step is making sure the ‘Managed Identity’ of the ‘Automation account’ has the right permissions, this as we are going to connect with the Managed Identity of the automation account to Exchange Online, more information can be found here on the docs as well. Therefore, within the ‘Automation account’ go to ‘Identity’ and note down the ‘System assigned Object ID’.
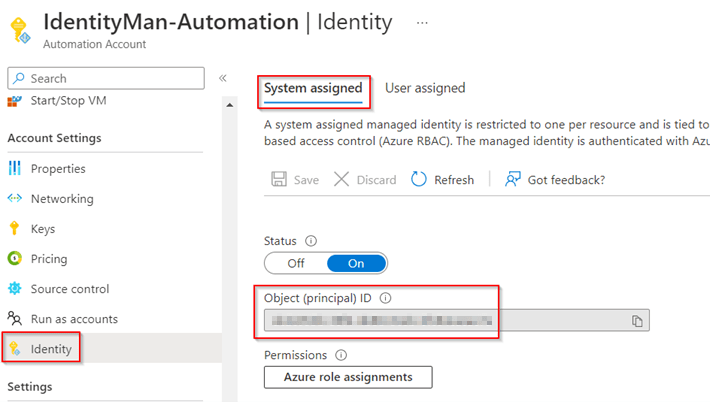
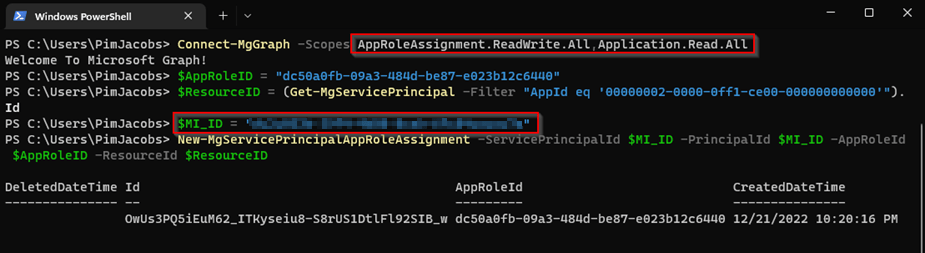
Once you’ve noted down the ‘System assigned Object ID’ run the PowerShell script below (from your own machine). Make sure the variable ‘$MI_ID’ is changed to the ‘System assigned Object ID’ you just noted down in the previous step.
Connect-MgGraph -Scopes AppRoleAssignment.ReadWrite.All,Application.Read.All
$AppRoleID = "dc50a0fb-09a3-484d-be87-e023b12c6440"
$ResourceID = (Get-MgServicePrincipal -Filter "AppId eq '00000002-0000-0ff1-ce00-000000000000'").Id
$MI_ID = "xxxxxxxx-xxxx-xxxx-xxxx-xxxxxxxxxxxx"
New-MgServicePrincipalAppRoleAssignment -ServicePrincipalId $MI_ID -PrincipalId $MI_ID -AppRoleId $AppRoleID -ResourceId $ResourceID
New-MgServicePrincipalAppRoleAssignment -ServicePrincipalId $MI_ID -PrincipalId $MI_ID -AppRoleId $AppRoleID -ResourceId $ResourceID
If successful the output below is shown, this will make sure we can use the service principal to ‘Manage Exchange as an Application’.
This can also be seen beneath the permissions of the ‘Managed Identity’ in Azure AD beneath the ‘Service Principal (Enterprise Application)’ as you can see below.
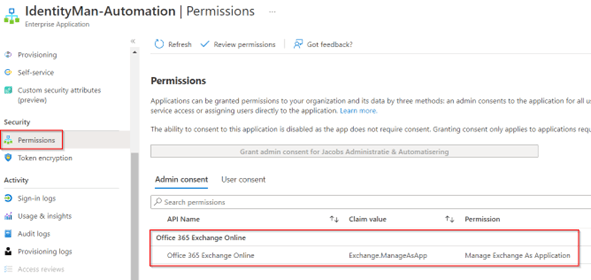
Of course, this doesn’t provide actual permissions with Exchange Online but only allows the Managed Identity to ‘Manage Exchange as an Application’. Therefore, based on least privileges, add the ‘Managed Identity’ of the ‘Automation Account’ to the role ‘Exchange Recipient Administrator’ within Azure Active Directory.
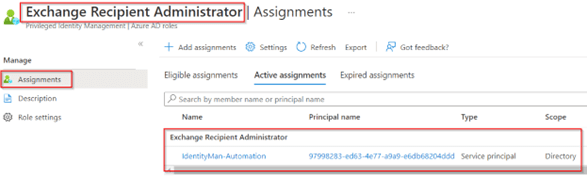
This will provide the Managed Identity the permissions to make changes in Exchange Online which are limited to the rights of an Exchange Recipient Administrator.
Once the automation account and permissions are ready, we can continue to the last step which is configuring the Logic Apps. The Logic Apps were already pre-created during Step 2 where we created the Custom Extensions in Lifecycle Workflows. Therefore, in the Azure Portal search for ‘Logic Apps’, click on the first ‘Logic App’ you are planning to edit and hit ‘Edit’.

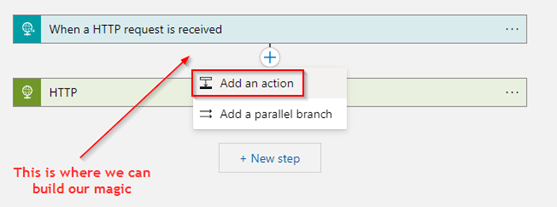
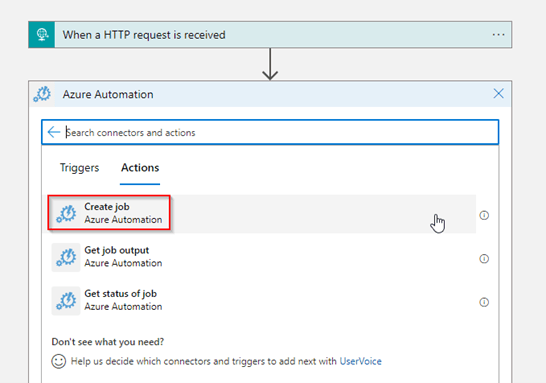
As you can see during the deployment of the ‘Custom Extension’ pre-defined steps are configured in the Logic App. Please DO NOT remove these steps as this is crucial for the Logic App to function correctly, only add steps between the two actions. This can be done by hitting the ‘+’ sign and selecting ‘Add an action’.
In here search for ‘Azure Automation’ and select ‘Create Job’.
For LA-400-ConvertMailboxEXO we need to make sure the ‘Subscription’, ‘Resource Group’, ‘Automation Account’, ‘Runbook Name’, ‘Wait for Job’, the ‘Runbook Parameter UserPrincipalName’ and the ‘Runbook Parameter ManagerMail’ settings are correctly configured.
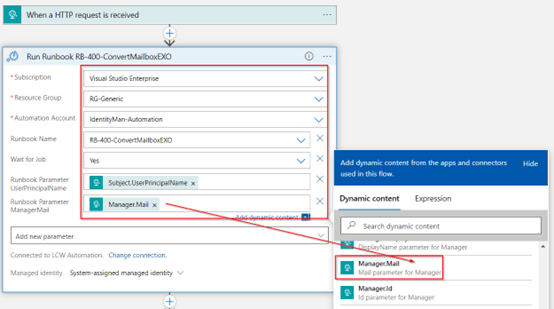
NOTE: If you can’t select information via drop downs this means the managed identity of the Logic App doesn’t have the right permissions on the ‘Resource Group’.
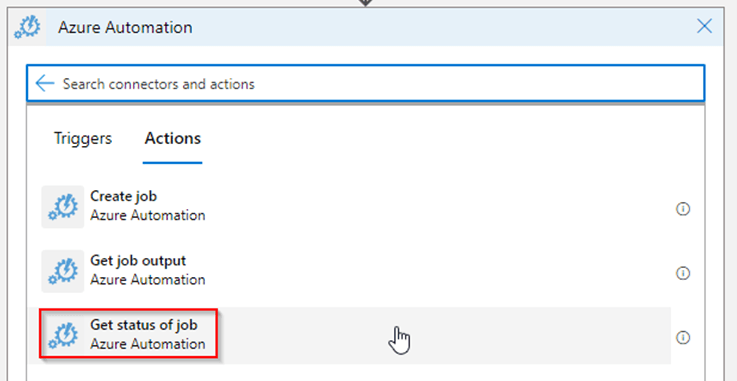
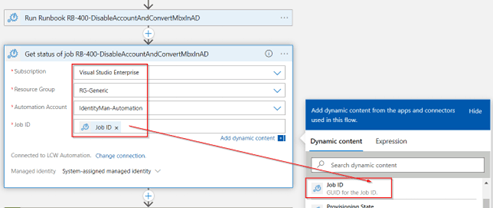
Below the ‘Create Job’ action, let’s add another action from ‘Azure Automation’ called ‘Get status of Job’. This is because we want to know if the runbook was completed successfully.
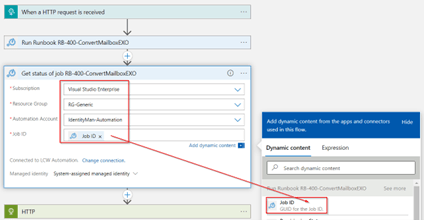
In here make sure the ‘Subscription’, ‘Resource Group’, ‘Automation Account’ and ‘Job ID’ settings are correctly configured.
For LA-400-DisableAccountAndConvertMbxInAD we need to make sure the ‘Subscription’, ‘Resource Group’, ‘Automation Account’, ‘Hybrid Automation Worker Group’, ‘Runbook Name’, ‘Wait for Job’ and the ‘Runbook Parameter UserPrincipalName’ settings are correctly configured.
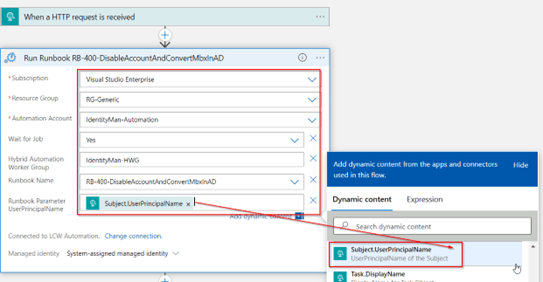
NOTE: If you can’t select information via drop downs this means the managed identity of the Logic App doesn’t have the right permissions on the ‘Resource Group’, only the ‘Hybrid Automation Worker Group’ is something you need to type in manually.
Below the ‘Create Job’ action, let’s add another action from ‘Azure Automation’ called ‘Get status of Job’. This is because we want to know if the runbook was completed successfully.

In here make sure the ‘Subscription’, ‘Resource Group’, ‘Automation Account’ and ‘Job ID’ settings are correctly configured.
For LA-500-DeleteAccountInAD we need to make sure the ‘Subscription’, ‘Resource Group’, ‘Automation Account’, ‘Hybrid Automation Worker Group’, ‘Runbook Name’, ‘Wait for Job’ and the ‘Runbook Parameter UserPrincipalName’ settings are correctly configured.

NOTE: If you can’t select information via drop downs this means the managed identity of the Logic App doesn’t have the right permissions on the ‘Resource Group’, only the ‘Hybrid Automation Worker Group’ is something you need to type in manually.
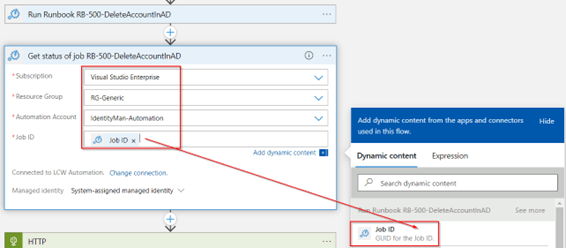
Below the ‘Create Job’ action, let’s add another action from ‘Azure Automation’ called ‘Get status of Job’. This is because we want to know if the runbook was completed successfully.
In here make sure the ‘Subscription’, ‘Resource Group’, ‘Automation Account’ and ‘Job ID’ settings are correctly configured.
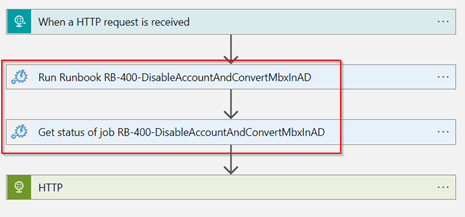
Eventually rename the steps you’ve added with a friendly name and verify they are configured between the pre-defined steps.
For LA-400-ConvertMailboxEXO the Logic App looks like the example shown below.

For LA-400-DisableAccountAndConvertMbxInAD the Logic App looks like the example shown below.
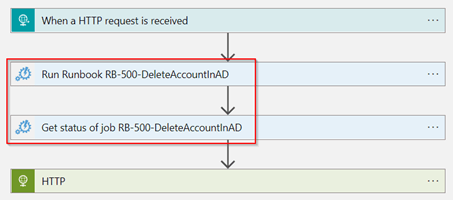
For LA-500-DeleteAccountInAD the Logic App looks like the example shown below.
NOTE: Of course, you can do much and much more with Logic Apps. So if you feel comfortable, feel free to go nuts and add other steps whereby you integrate with other APIs if required :-).
Once you are ready and finalized the configuration within all Logic Apps don’t forget to hit ‘Save’.

We have now made sure all configuration items are in place as we did configure:
- Three custom extensions.
- Three offboarding workflows.
- Permissions of the Managed Identity of the Logic Apps on the resource group.
- Three runbooks within Azure Automation.
- Permissions of the Managed Identity of the Automation Account for Exchange Online
- Three logic apps which are connected to custom extensions.
That brings us to the last step which is testing your workflows and finalizing them for use in production :-)!
Step 5 – Test your workflows and roll-out to production
For the last step we of course first need a test account, so let’s use the account which we used during the testing of the onboarding workflows, in our case ‘Johnny.bravo@identity-man.eu’.

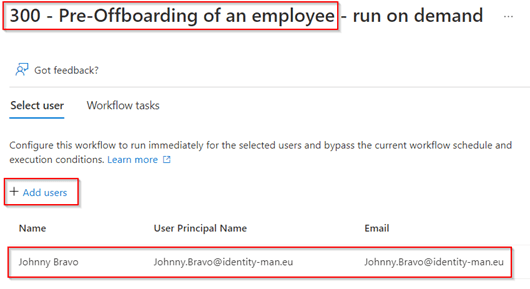
Once you’re ready to offboard the user, let’s go to the first offboarding workflow called ‘300 – Offboarding of an employee’ and hit ‘Run on demand’.

In here select the user ‘Johnny.bravo@identity-man.eu’ which was provisioned with the onboarding workflows and is synced from the on-premises Active Directory, once selected hit ‘Run Workflow’.
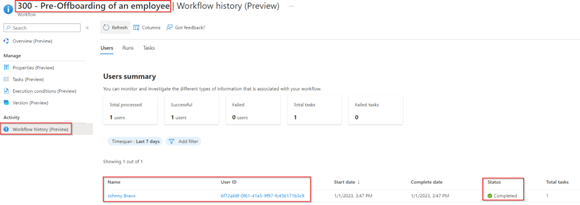
The workflow kicks off and, in this case, will trigger an email send to the manager of the user. If this is successful, the status of this offboarding flow will report ‘Completed’.
The email the manager receives will inform him someone of his team is scheduled to leave the organization and will look like the one below and can’t be customized today.
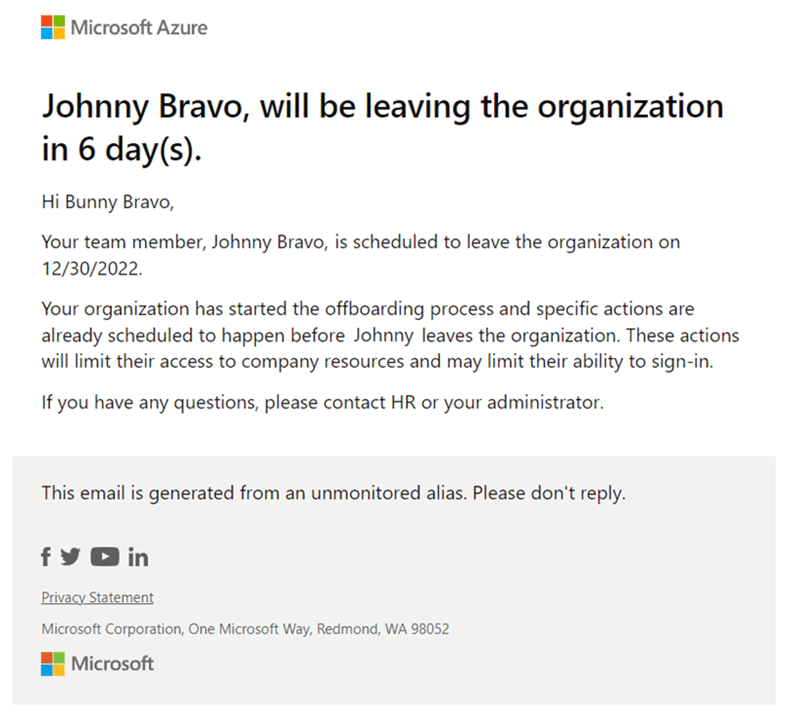
NOTE: When running these workflows on-demand the workflow will always use the email template belonging to the task ‘Send email on user’s last day’ even if within the workflow other leaver email templates are used.
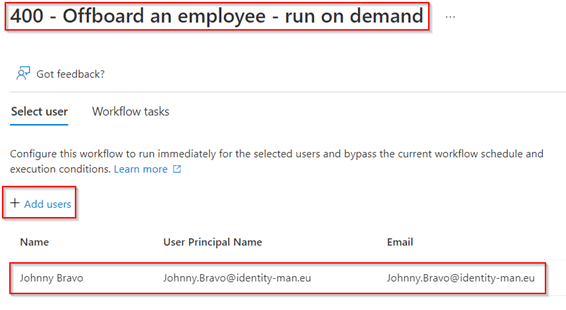
Once the email is verified and all things are good, let’s go to the second offboarding workflow called ‘400 – Offboard an employee’ and hit ‘Run on demand’.

In here again select the user we just used in the first offboarding workflow run, in my case that was ‘Johnny.bravo@identity-man.eu’, once selected hit ‘Run Workflow’.
The workflow kicks off and, in my example, will:
- Send an email to the manager to inform him about the user’s last workday.
- Runs the Logic App ‘LA-400-ConvertMailboxEXO’, which triggers the runbook in Azure Automation to convert the mailbox to a shared mailbox and provide the manager ‘Full Access’ permissions on the user his mailbox.
- Runs the Logic App ‘LA-400-DisableAccountAndConvertMbxInAD’, which triggers the runbook in Azure Automation to disable the user account in Active Directory and set properties on the account (e.g. description, shared mailbox).
- Removes the user from all groups in Azure AD.
- Removes the user from all Teams in Azure AD.
- Removes all licenses assigned to the user.
If this is all successful, the status of this offboarding flow will report ‘Completed’.
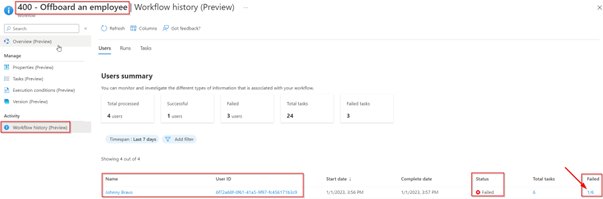
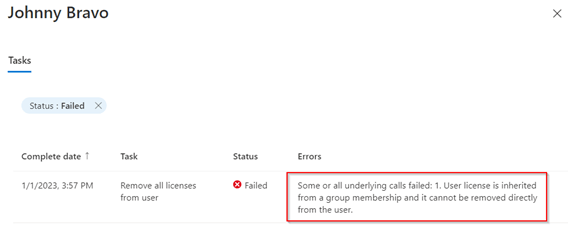
As you can see in my case I’m receiving a failed status, so let’s click on the failed tasks number on the right end of the screen to see what the error is. As you can see below not all licenses can be removed as they are managed via group membership. As you can imagine these tasks follow up quickly in the workflow, because of that the license inherited from the group membership aren’t removed yet, so it does make sense that it throws us an error.
NOTE: I’ve reported the above to the product group already, so let’s hope they can just ignore this error and mark the task as ‘completed’ once all ‘direct’ assigned licenses are removed. If you’re using this step in one of your offboarding workflows, my recommendation would be to put it straight at the end, this as the workflow stops at the first ‘failed’ task, so task which are ‘next in line’ aren’t executed anymore within a workflow.
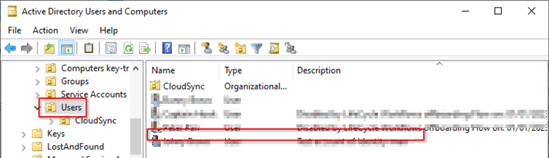
As we can ignore the failed message shown above, we can start verifying if all actions are successfully executed for the offboarding of the account. For that let’s first verify in Azure Active Directory if the account is disabled, as you can see the user is now disabled and the description on the account has been updated.

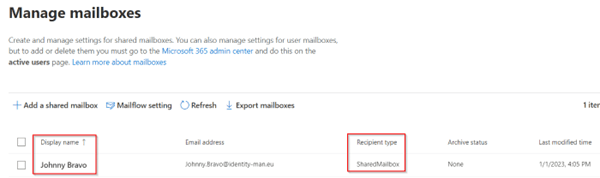
If we look in Exchange Online, we can see the mailbox has been converted to a shared mailbox.
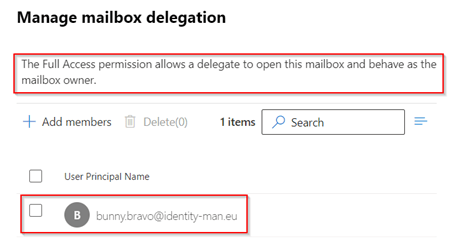
And when looking at the mailbox delegation properties of this account, we can see the manager has been added with ‘Full Access’ permissions to the mailbox.
We can also verify the email has been sent over to the manager informing him or her that the team member is leaving the organization today and that actions are being executed or scheduled for the offboarding of the account.

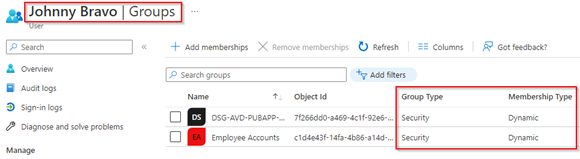
We can also confirm that the user is remove from all groups (except dynamic groups which are still applicable).
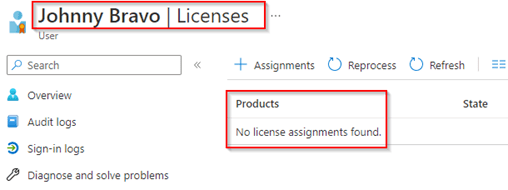
And at last, we can verify that, although there was an error, all the licenses are removed from the user account.
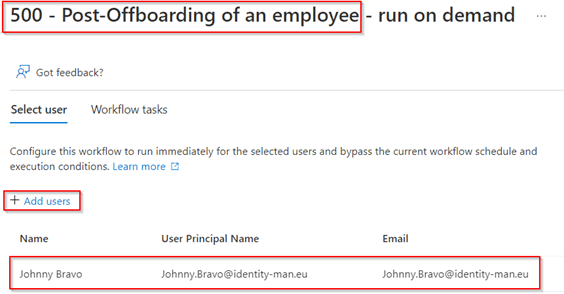
Now the user is deprovisioned and disabled (after the Azure AD Connect or Cloud Sync run has kicked-in), we can run the last workflow called ‘500 – Offboarding of an employee’ and hit ‘Run on demand’.

In here again select the user we just deprovisioned and disabled with the first and second offboarding Lifecycle workflow, in my case that is ‘Johnny.bravo@identity-man.eu’, once selected hit ‘Run Workflow’.
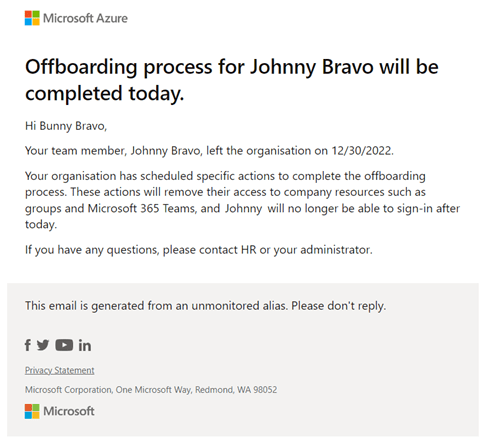
The workflow kicks off and, in this case, will send an email to the manager about the final offboarding of the end user’s account and will, as a final step, delete the account in Active Directory. If this is all successful, the status of this offboarding flow will report ‘Completed’.
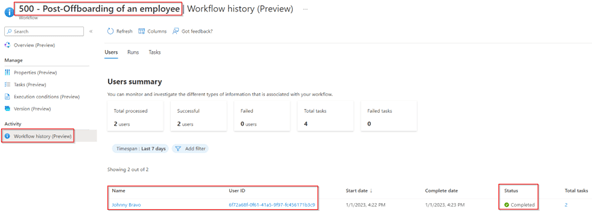
We can also verify this by checking the mailbox of the manager of Johnny Bravo, which happens to be Bunny :-). As you can see, I’ve received an email which informs the manager the user has left the organization already and final steps are now being executed.
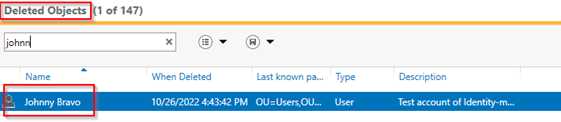
Next let’s verify in Active Directory that the user is really deleted, as you can see in the screen below the user object has been deleted in Active Directory.
And can now be recovered, if needed, from the recycle bin in Active Directory (if turned on).
NOTE: Important to remember is that when using the ‘Run on demand’ feature scoping filters don’t apply. So, the workflow is run anyway, even if your users aren’t matching the ‘scoping’ criteria configured on the workflow.
Once you’re happy with all the results, it’s time to enable the scheduling, for that you can simply hit the ‘Enable Schedule’ button on each workflow we created, resulting in an automated offboarding setup which is future proof and can easily be tweaked and customized to your demands :-).
Conclusion
After you’ve followed the above five steps, you have configured your offboarding flows and (I hope) tweaked the offboarding flows to fit your scenario. We walked through the setup of Custom Extensions, pre-offboarding workflows, offboarding workflows, post-offboarding workflows, configured Logic Apps and Runbooks in Azure Automation and configured the correct permissions on the managed identities. This means you can now finally automate and schedule your offboarding workflows with the use of Lifecycle workflows and if you did follow all three parts of Lifecycle workflows, you’ve even automated the end-to-end process (apart from user creation).
This combined with the onboarding workflow steps makes sure you’ve automated your on- and offboarding process from start to finish!
I hoped you enjoyed reading this new blog within the Azure AD Identity Governance series! Stay tuned for my next Azure AD Identity Governance blog soon :-).
- An Introduction to Azure AD Identity Governance
- Identity Governance 1 of 10: Implementing a Strong Identity Foundation
- Identity Governance 2 of 10: Implementing Identity Lifecycle management for guest users – part 1
- Identity Governance 2 of 10: Implementing Identity Lifecycle management for guest users – part 2
- Identity Governance 2 of 10: Implementing Identity Lifecycle management for guest users – part 3
- Identity Governance 3 of 10: Configuring Provisioning in 3rd party apps for (guest) users
- Identity Governance 4 of 10: Implementing LifeCycle Workflows – Configure the basics
- Identity Governance 4 of 10: Implementing LifeCycle Workflows – Configure onboarding workflows
- Identity Governance 4 of 10: Implementing LifeCycle Workflows – Configure offboarding workflows
- Identity Governance 5 of 10: Using the hidden gems in Azure AD access packages, all you need to know! – Part 1
- Identity Governance 5 of 10: Using the hidden gems in Azure AD access packages, all you need to know! – Part 2
- Identity Governance 5 of 10: Using the hidden gems in Azure AD access packages, all you need to know! – Part 3
- Identity Governance 5 of 10: Using the hidden gems in Azure AD access packages, all you need to know! – Part 4
- Identity Governance 6 of 10: Using the brand new Entra Inbound Provisioning API for Identity Lifecycle Management!
- Identity Governance 7 of 10: Recertify access by using Microsoft Entra Access Reviews! – Part 1
- Identity Governance 7 of 10: Recertify access by using Microsoft Entra Access Reviews! – Part 2
- Identity Governance 8 of 10: Implementing Privileged Identity Management
- Identity Governance 9 of 10: Implementing a Terms of use
- Identity Governance 10 of 10: Review by Monitoring and reporting

Hi Pim, thanks for a great beautifully written article. I have a few questions though if you don’t mind?
Firstly, you mention the use of a service account ‘with permissions’ – I assume you mean a local AD account but what are the minimum permissions required for this to work?
Secondly, it looks like ‘run as account’ is being deprecated in favour of managed identities, would you be willing to update your article to use those instead?
Thanks again for a great write up!
Nate
LikeLike
Hi Nathan,
The answer on the first question is indeed a local AD account, the minimum permissions for that account for the offboard flow is at least modify and delete permissions. For both the onboarding and offboarding flows I’ve delegated control on OU level with the following tasks:
– Create, delete, and manage user accounts (required to change the account settings and delete the account eventually).
– Reset user passwords and force password change at next logon (Required to enable the account).
– Read all user information (required to read settings from the account).
The answer on your second question is, I’m already using managed identities, so I’m not using a ‘run as account’, all is based on managed identities apart from the integration with AD as mentioned in your first question which doesn’t support a managed identity.
Hope the above answer your questions, happy to answer more if needed.
LikeLiked by 1 person