A warm welcome to my next blog in the Identity Governance series which will focus on implementing a strong identity foundation! This blog is a follow up on the introduction blog of Identity Governance and will make sure your environment is ready for an implementation of all Identity Governance parts.
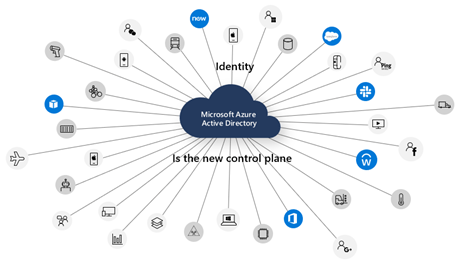
As you may already know, everything within the Microsoft Azure AD is built around an identity, without one you won’t have access to resources in Azure AD. This makes the Identity one of the most important parts within the Azure AD and therefore it’s important that the Identity is built on a strong and secure identity foundation.
I can hear you thinking, okay but what is a ‘strong and secure identity foundation’? Well in my opinion a strong and secure Identity foundation consists of the following parts:
- First of all make sure that all your (hybrid) identities, used within your organization, are available within the Azure AD;
- Secondly make sure that important global settings within the Azure AD are configured for a good, safe and secure user experience, as well as an environment that is easy and steady to maintain (by IT);
- Once this is done apply security measurements on those (hybrid) identities in the Azure AD;
- Now that the identities are secured you can decide to implement a password-less identity, which adds an extra layer of security to your Azure AD user accounts;
- And, last but not least, I would recommend you to centralize your identities to one single Active Directory forest as this will benefit the Identity Lifecycle process later on.
Most of the above mentioned points are all part of the principle ‘zero-trust’, the Azure AD is accessible from everywhere with an internet connection these days. For that reason zero-trust is becoming quite critical, Microsoft is giving you the tools to implement ‘zero-trust’ in your environment, it’s up to you to configure and use them!
To help you with some guidance through the above mentioned points we will go over them one-by-one. This, in order to prepare your environment for a solid Identity Governance implementation.
1. Centralize your identities in Azure AD
The first step is to centralized your identities in one single Azure AD environment. Configurations and policies which you create within your tenant are applied to your tenant only. If you are working with multiple tenants that means you need to repeat the desired configurations for each tenant independently.
Besides the configuration changes and policies which you need to repeat in a multi-tenant scenario, you will limit yourself in the ability to implement a solid identity lifecycle process, including the user provisioning to 3rd party applications. Or, at a minimum, make it more complex than it needs to be. It therefore makes applying an Identity Governance strategy quite hard within a multi-tenant scenario. So the first lesson is: if you’re able to create one single tenant and host all your identities in one single tenant, please use one single tenant and don’t make life harder than it has to be :-).
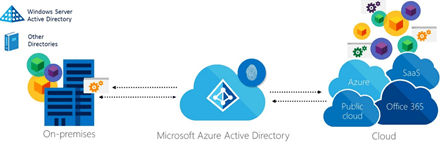
Now that you know we should host all identities from one single tenant preferably, (or eventually multi-tenant when there is no other option), the starting point will be to create your Azure AD identities. This can either be an identity sourced from the Azure AD (cloud identity), or it can be an identity sourced from the Active Directory and synchronized to the Azure AD (hybrid identity). I would always recommend to use a hybrid identity if you still have lots of on-premises resources which you may want to access with your identity in active directory. If you have migrated all of your on-premises Active Directory resources to the Azure AD, or don’t even have an on-premises Active Directory, a cloud identity sourced from Azure AD will be the best choice.
When looking at a cloud identity the following topics are really important to take into account:
- Make sure accounts are created consistently – This will make sure users are easy to find in the address book and can easily be reached (and found) by e-mail / MS Teams for external users (i.e johny.bravo@identity-man.eu);
- Apply licenses in Azure AD based on a (dynamic) group – To make sure each user has the same set of license functionalities applied start using the group based licensing feature in Azure AD;
When looking at a hybrid identity the following topics are really important to take into account:
- Install Azure AD connect – Install Azure AD Connect, not with ‘Express Settings’. One simple reasons why ‘Express Settings’ aren’t recommended is because it will synchronize the whole forest instead of a few OU’s. This is to make sure your accounts are synchronized correctly, more information can be found here.
- Make sure accounts are created consistently – This will make sure users are easy to find in the address book and can easily be reach by e-mail / MS Teams for external users (i.e johny.bravo@identity-man.eu);
- Use the UserPrincipalName value as username – Change the ‘UserPrincipalName’ value in Active Directory to match be the same as the email value. This will benefit the SSO experience to the Exchange on-premises environment (if any). Besides that Azure AD will ask the user for their email address, which is always their username, so if these values match this will be of great end user benefit;
- Only synchronize users and groups to the Azure AD which are required – It’s helpful to only synchronize those users which are required to be available in Azure AD. Therefore in the configuration wizard of Azure AD Connect only synchronize those users & groups which are actually required in Azure AD, this all based on OU filtering in the Azure AD Connect wizard (i.e. the groups DNS admins and DHCP admins don’t have a function within the Azure AD);
- Use the MSDS-ConsistencyGuid as the sourceAnchor – The MSDS-ConsistencyGuid seems not that important, however it actually is of great benefit. In the past the objectGUID was always the default sourceAnchor, however as this is a managed GUID by the Active Directory Forest it’s not very helpful in cases of backup & restore of user accounts and Active Directory migrations. Therefore I would strongly urge you to use the MSDS-ConsistencyGuid as the sourceAnchor in the Azure AD Connect configuration. If you are not using this value already, the change impact is minimal. If you are currently using ADFS however, I recommend reading up on the changes needed to maintain ADFS-functionality. More information about the MSDS-ConsistencyGuid feature can be found here;
- Make sure password hash sync is enabled – Password Hash Sync will synchronize the hash of the hash of the password set in Active Directory. Sometimes organizations still think the actual password is synchronized but that’s not 100% true! A hash of the hash of the actual password is synchronized. Microsoft states they do not have access to your actual password. Now when this feature is enabled you are able to logon with your username and password to the Azure AD, but even more important Azure AD will be able to monitor for you if your users are using ‘leaked credentials’. This often happens when people are using the same password on i.e. LinkedIn, where these passwords of LinkedIn have been published on the internet and hackers are able to use them Azure AD can as well. Furthermore, setting default passwords (like ‘P@ssw0rd’, yes we know about your standard password!) can be prevented using Password Protection. This is all meant to bring in more security to your environment! More information about leaked credentials can be found here;
- Make sure password write-back is enabled – Password write-back is a nice functionality which can be used to let users reset their password on their own via the Azure AD and have that new password being written back to the Active Directory. On the other hand you should not only enable this functionality for Self-Service functionalities, this as we also want to trigger a password reset when leaked credentials are detected. This to make sure that users are forced to do a password reset when these leaked credentials are detected an therefore to improve the security posture of your hybrid identities. More information about self-service password reset and the write-back option can be found here.
- Enable Seamless single sign-on – As we are using a hybrid identity which is sourced from the on-premises Active Directory environment, we can enable Seamless SSO for a swift logon experience. This will benefit the user experience as users don’t want to type in their password multiple times a day, instead they don’t have to type in their password. The user will simply logon seamless with their Active Directory account, that they are probably already using on their workplace, to their Azure Active Directory account. More information about the Seamless single sign-on option can be found here.
- Make sure the permissions on the service account in active directory are configured correctly – As a service account is required within Active Directory which has permissions to write-back information from the Azure AD to the Active Directory it’s extremely important to secure this account and only apply permissions which are required. This can all be managed via the PowerShell script which is included within the installation of Azure AD Connect. Unfortunately I still see lots of organizations making this account a member of the Domain Admins group, although that’s never been required and brings in high security risks. More information on how to use these standard scripts for the service account of Azure AD Connect can be found here.
- Apply licenses in Azure AD based on a (dynamic) group – To make sure each user has the same set of license functionalities applied start using the group based licensing feature in Azure AD.
- Implement and configure Azure AD Connect Health – This to monitor the health of your hybrid identity environment as it becomes crucial in you route to the cloud (Azure AD Connect, Active Directory Domain Services and Active Directory Federation Services (if in place)). More information can be found here.
Now all the identities are available within the Azure AD, we can continue to our next step, which is configure important global settings within the Azure AD.
2. Configure important global settings
When you create your Azure AD tenant all settings within the tenant are set to default values. These default values are set to values which don’t have a ‘zero-trust’ mind set. So important is to make changes to the default configuration of these important settings.
As there are loads of settings within Azure AD, I’ve listed the most important ones to set and configure below:
- Azure AD Company branding settings – Company branding settings are important for end user recognition and to an environment which is ‘trusted’ by the end user. This mainly as it will brand your tenant with your company logo and background. Some functionalities (like Windows Autopilot) even do have a hard requirement that company branding is configured on the tenant level.
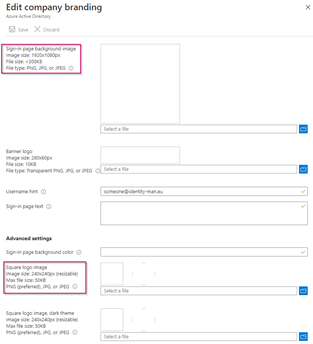
More information about company branding settings can be found here;
- Azure AD User settings – The Azure AD User Settings are important to configure correctly to secure your environment. This is done to make sure that (breached) users won’t be able to register ‘malware’ applications, which can access your company data. Additionally, you can make sure with the second setting that only administrators are able to access the Azure Administration portal.

- Azure AD External collaboration settings – The Azure AD external collaboration settings can be found within the user settings page and define access for guest (B2B) accounts. In here the most important settings are set the guest user access to “Guest user access is restricted to properties and memberships of their won directory object (most restrictive)” or “Guest users have limited access to properties and memberships of directory objects” (Depending on what is best for your scenario. On the other hand we don’t want guest (B2B) accounts to invite other guests (B2B) accounts within a tenant which isn’t owned by them, therefore set the value for “Guests can invite” to “no”;

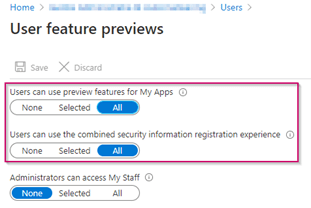
- Azure AD User feature previews – The Azure AD user feature previews can be found within the user settings page and define some important functionalities the user can use (this is a bit clunky though as not all settings are preview features). The first setting is to use the preview feature of MyApps, this will make sure the user is using the new MyApps experience, which is helpful later when you connect 3rd party web-based apps to the Azure AD. The second setting is the combined security information registration experience, which isn’t a preview feature anymore and which makes sure the MFA & SSPR registration is combined into one single experience. This means that when someone enters their security information (MFA methods) these are automatically also usable to do a self-service password reset, preventing having to configure separate (similar) methods for that functionality;
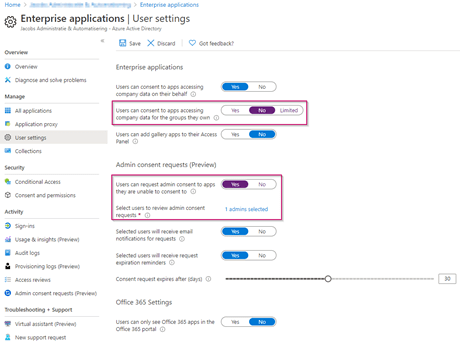
- Azure AD Enterprise Applications settings – Now that the user settings are defined the last step, when looking at the most important settings, is to configure the Azure AD Enterprise Application settings. In here we configure that users aren’t able to consent to apps accessing company data for the groups they own. On the other hand we configure that users can request admin consents to apps which they are unable to consent to, this to make sure they can at least file a request for access with an explanation. The last step we need to take is to configure the users who can review the admin consent permission request (these users will receive an email with the requests the users creates, so they can approve or deny the consent request).
- Azure AD Enterprise Applications consent & permission settings – Now to make the life of the administrators a bit easier in this approval process, we can allow the user to consent to some permissions for applications. For that, we go to the User Consent Settings which can be found underneath the Azure AD Enterprise Applications blade. In here we set the first value to Allow user consent for apps from verified publishers, for selected permissions (Recommend), which will allow the user to provide listed consent permissions to applications. The second setting is around group owner consents, as this will provide lots of permissions we set this value to ‘do not allow group owner consent’, for this we rather have the user file a request which can be approved by an IT administrator.
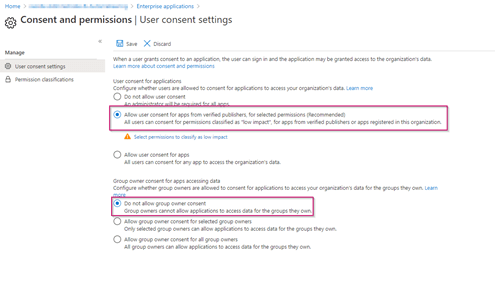
Now we have allowed the user to consent applications for selected permissions it’s of course important to configure these selected permissions. This can be done within the Permission classification settings, in here you can hit all checkboxes to accept the default permissions followed by hitting the ‘Yes, add selected permissions’. This will allow the user to only share personal information with the application, the user is therefore not able to share actual data permissions (that requires the user to file a request again).

Now that all of these important Azure AD settings have been configured, there is one important reminder which you shouldn’t forget. Which is to review these requests (which you do receive in the mailbox of the administrator in the previous steps). On the other hand these requests made by end users can also be found in the Azure AD portal at the Admin consent requests tab under the Enterprise Applications Settings in Azure AD.

When you select one of the applications requests, made by your end users, you’re able to review the access permissions to this app by hitting ‘Review permissions and consent’. Whereby you’re able, as an administrator, to either execute the consent for the user or for the whole organization (i.e. if the app is used by whole organization you would chose for a consent for the whole organization, this as you don’t want to approve for each single user 🙂 ).

3. Apply security measures on the Azure AD accounts
Now that we finished the configuration of the important global settings within the Azure AD, it’s time to apply ‘standard’ security measures on the Azure AD accounts. With Azure AD Accounts we won’t only talk about the end user accounts, but your admin accounts as well.
Starting your Identity Governance journey doesn’t make sense when you didn’t apply security measures on your Azure AD Accounts. With that I mean that implementing Identity Governance does require some ‘standard’ security measurements in advance. Reason why is that securing accounts within Azure AD is of a higher importance in comparison to Identity Governance. Therefore, first improve you security, then follow with your Identity Governance implementation!
When looking at these ‘standard’ security measures, I’m talking about the following:
- Implement a basic set of Azure AD Conditional Access Rules;
- Which will protect your admin accounts and user accounts with Azure Multi-Factor Authentication;
- Which will make sure your break the glass account is implemented and protected;
- Which will make sure named locations are defined;
- Implement Azure AD Password protection;
Implement a basic set of Azure AD Conditional Access Rules
The implementation of a basic set of Azure AD Conditional Access rules exists (at a bare minimum) of at least four rules. These are shown in the image below.

- Identity-Man-M365-Admins – This rule will make sure that every administrator with an M365 administrator role assigned is always protected with Multi-Factor Authentication.
- Identity-Man-Azure-Admins – This rule will make sure that every administrator which is accessing the Azure portal is always protected with Multi-Factor Authentication (Azure Admins possibly won’t have an M365 Administrator role assigned, hence the reason for this Conditional Access rule).
- Identity-Man-Break-the-Glass – This rule will make sure that the break the glass account (or better called ‘When shit hits the fan account’) can only be used on trusted locations (as defined within the named locations settings).
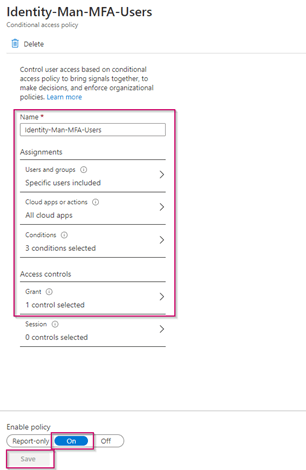
- Identity-Man-MFA-Users – This rule will make sure that all your end user accounts are protected with Multi-Factor Authentication as well.
Now if you do already have the above in place, you can proceed to the password protection part. If you don’t, no need to worry, the steps below will explain how to get this conditional access baseline in place with the above four mentioned policies.
Let’s first start with the named locations, which can be found in the Azure AD blade, by going to Security, followed by Conditional Access and there hit Named Locations.
In here you’re able to add an ‘+ IP Ranges location’, give it a friendly name (in my case I used my Home Office), followed with my public IP address (browse address). The checkbox ‘Mark as a trusted location’ is very helpful as we can used that within conditional access rules. On the other hand this checkbox is used in different products as well, like Identity Protection, i.e. to prevent false positives from this IP address.

Now we have configured the named location it’s time to start with our first Conditional Access rule, which is the M365 Admins rule. Let’s go to the conditional access configuration by going to the Azure AD blade, select Security, followed by Conditional Access, which will bring you to the policies screen. In here hit ‘+ New policy’.
The screen below will open, in here make sure to set the following values for the M365 Admins policy:
- Name: Identity-Man-M365-Admins;
- Users and Groups: Include all Directory roles except Directory synchronization accounts and make sure to exclude your ‘break the glass account’;
NOTE: Please do not select the ‘Directory synchronization accounts’ as this will break your synchronization with Azure AD Connect.
- Cloud apps or actions: All cloud apps;
- Conditions: Any location;
- Access Control: Grant and Require multi-factor authentication;
- Enable Policy: ON;

NOTE: When hitting ‘Save’ please make sure to select ‘I understand that my account will be impacted by this policy. Proceed anyway.’. This is to make sure your account isn’t excluded from this policy.
Now the first policy is created, let’s configure the second policy as well for the Azure Administrators with the following values:
- Name: Identity-Man-Azure-Admins;
- Users and Groups: Include all users and make sure to exclude your ‘break the glass account’;
- Cloud apps or actions: Microsoft Azure Management;
- Conditions: Any location;
- Access Control: Grant and Require multi-factor authentication;
- Enable Policy: ON;

NOTE: Again when hitting ‘Save’ please make sure to select ‘I understand that my account will be impacted by this policy. Proceed anyway.’. This is to make sure your account isn’t excluded from this policy.
Now the second policy is created, let’s create the third policy for the break the glass account(s) with the following values:
- Name: Identity-Man-Break-the-Glass;
- Users and Groups: Include all ‘Break the glass’ accounts;
- Cloud apps or actions: All cloud apps;
- Conditions: Include Any location and exclude all trusted locations;
NOTE: This is the trusted location we created a few steps back.
- Access Control: Block access;
- Enable Policy: ON;

NOTE: Don’t forget to hit save once done.
And to conclude the list of policies, let’s create the last policy which will force MFA for the end users with the following values:
- Name: Identity-Man-MFA-Users;
- Users and Groups: Include all license groups;
NOTE: You can also include all users, however that will definitely have impact in existing environments, especially when looking at service accounts, starting with groups which are used for licensing is much easier;
- Cloud apps or actions: All cloud apps;
- Conditions: Include Any location, Include Any device platform and include All clients apps;
- Access Control: Grant and Require multi-factor authentication;
- Enable Policy: ON;
NOTE: Don’t forget to hit save once done.
We now have created the ‘standard’ conditional access policies which give you a good starting point to protect your administrator accounts and user accounts it’s time to have a look at password protection.
4. Implement Azure AD Password protection
Azure AD Password Protection is a nice addition to make sure the password which your end users are using aren’t listed on the global or custom banned password list (BPL).

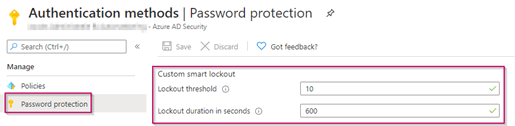
For starters the most important settings which you’re able to configure in the password protection area for cloud only accounts are the ‘Custom smart lockout’ settings and the ‘Custom Banned Passwords’. For the ‘Custom Smart lockout’ feature I do recommend to put the ‘Lockout duration in seconds’ to 600, this as this will set the lockout duration in Azure AD for accounts to 10 minutes, which is perfectly acceptable for end users.
Next step is to implement the ‘Custom Banned Password’ feature! For this feature it’s important to pick password you don’t want your users to use. Therefore configure the following settings:
- Enforce custom list: ‘Yes’;
- Custom banned password list: i.e. summer, spring, welcome, companyname01!, etc.;

NOTE: Don’t forget to hit ‘Save’ once done.
Now once we try do to a reset on the Azure Portal for a cloud account with the password ‘1D3nt1ty123!’ we can see the password isn’t accepted from the audit logs in Azure AD. The status reason ‘PasswordDoesnotComplyFuzzyPolicy’ simply means that the password is listed on the banned password list in Azure AD.

The user notification the end user will see is “We’ve seen that password too many times before. Choose something harder to guess.”, whereby the user needs to re-enter a new password and try again.

The reason why the password ‘1D3nt1ty123!’ is blocked is that the word identity exists within the password. Therefore even something similar to the word identity won’t be accepted as you can see. This as Microsoft transforms the letters to numbers and vice versa for you, so by putting a word on the custom banned password list, you won’t only block that specific word but also similarities to that specific word. Is there a “classic” password that you and your colleagues just can’t seem to get rid of (“[companyname]01!”, “Monday01!”)? This is the time to get rid of it, once and for all!
NOTE: Please be aware that passwords resets on the Microsoft 365 Admin Portal won’t be written back to Active Directory or will be held against the Azure AD Global and Custom banned password list. Therefore never do change passwords as an administrator from the Microsoft 365 Admin center! This is a known by issue by Microsoft, which I unfortunately won’t expect to be resolved soon.
Now as most of you are running a hybrid scenario, your passwords are managed from the Active Directory, therefore let’s make sure the Azure AD Password Protection feature is extended to the on-premises environment. The first step which you need to take is to deploy the Azure AD Password Protection agents on your Domain Controllers, more information on how to do this can be found here.
NOTE: The Azure AD Password Protection agent requires a Password Protection proxy agent to connect to the Azure AD, this agent can deployed on the domain controllers as well, but it can also be deployed on a different (separate) member server. This is required even though the domain controller has a direct connection to the internet. The actual Password Protection agent therefore only needs to have access to the proxy agent server(s), which should have internet connectivity. Once installed, if you’re using a proxy you can configure this proxy agent to communicate to a HTTP proxy server.
Now once those agents (including the proxy agents) are deployed, we can configure the other settings within Azure AD which do make sure the feature is extended to Active Directory as well and monitor and test the behavior. Therefore configure these settings with the following values:
- Enable password protection on Windows Server Active Directory: ‘Yes’;
- Mode: ‘Audit’.

NOTE: Don’t forget to hit ‘Save’ once done.
Once the above is configured and we try to do a password reset with a faulty password, like ‘Identity123!’, we can see within the Event Viewer on the Domain Controller that because the mode is set to ‘Audit’ the password is still accepted on the Active Directory.

Now that the functionality is verified and you are happy with the result, let’s change the Password Protection mode to ‘Enforced’ and hit ‘Save’.

Once the above is configured let’s restart the service ‘Azure AD Password Protection DC Agent’ on all domain controllers to retrieve the new password protection policy from Azure AD instantly. Once restarted, within the event viewer we can see the new password protection policy is received, whereby audit is set to 0 (disabled) and enabled is set to 1 (enabled).

Once the above is configured and we try again to do a password reset with the faulty password ‘Identity123!’, we can see within the Event Viewer that because the Mode is set to ‘Enforced’ the password is blocked, same we already had in place for cloud only accounts!

Within Active Directory Users and Computers you will see the following notification when you try to do the above password reset, this as a result of the password protection policies.
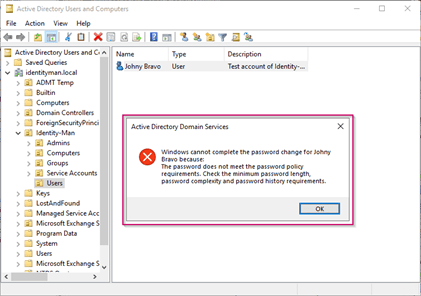
Password protection is now implemented for your environment. Important to know is that Password Protection only kicks in on a password change event! Password protection therefore won’t trigger a password reset for users who are currently already using a banned password (from the global or custom banned password list)!
5. Implement password-less on the Azure AD accounts
Now we have implemented ‘standard’ security measurements on the accounts it’s time for the next step which is working password less. As I already wrote several blogs about password less I will give you a short intro with references to my other blogs.

Password-less is a user friendly high secure option to logon to Azure AD- and Active Directory connected resources. Users don’t have to remember their password anymore but logon by phone sign-in (Authenticator app), biometrics or PIN (Windows Hello for Business or FIDO2 keys). These methods are very user friendly, as it’s less complex to apply (or to remember in case of a PIN). Where users previously used post-its to remember their password, they now will use their fingerprint, face recognition or mobile phone to sign-in.
The ultimate goal of course is to eliminate passwords as these are vulnerable for brute-force attacks. Today that’s not possible, however I would strongly urge you to get ready and be prepared for the future by starting your password less journey and implementation for your end users today.
To start your password less journey & implementation I would recommend you to start reading the following blogs:
- Introduction to a password-less era!
- Going password-less with phone sign-in
- Going password-less with Windows Hello for Business
- Going password-less with Windows Hello for Business Hybrid
- Going password-less with FIDO2 Security Keys Part 1
- Going password-less with FIDO2 Security Keys Part 2
6. Centralize your identities in one single Active Directory Forest
Now that you’ve walked through the previous steps around building a strong identity foundation, for a preparation of your Identity Governance implementation, there is only one step left. This step is: centralizing your synchronized (hybrid) identities in one single Active Directory forest. This step is listed as the last step but still is important when looking at Identity Governance. Imagine you would have three Active Directory forests and one Azure Active Directory environment and are planning to enable Identity Lifecycles from Azure AD. That would indicate Identity Lifecycles management can be used, but in which of these three Active Directories should your Identity Lifecycle management tool (which can be Azure AD via i.e. Workday) provision those Identities? Even if there are tools which are able to do this, your on-premises Identity setup will become extremely complex and hard to maintain and manage.
For that reason it becomes important that your synchronized (hybrid) identities are centralized within one single Active Directory Forest. If this is not yet the case for your environment this can be achieved by using ADMT, and other 3rd party tools. Complexity of a migration like this is dependent on what applications and services you still have hosted in your on-premises environment and are Active Directory integrated.
If you are planning to do an Active Directory migration to centralize your identities I would strongly urge you to incorporate the following actions into your plan:
- Make sure all mailboxes are migrated to Exchange Online first – this so you don’t need to put effort in a mailbox migration between forests, migrating to Exchange Online offers way more functionality and eases the identity migration;
- Make sure autodiscover is pointing to Exchange Online – To prevent pop-ups which are prompting for your ‘old’ domain credentials (after the identity migration) make sure that once all mailboxes are moved your autodiscover record is pointing to Exchange Online;
- Create a one-way trust between the domains – Where the source domain (outgoing) is trusting the target domain (incoming), this mainly to support access via SIDHistory;
- Install ADMT – Install the ADMT server in the target domain;
- Install Password Export Server – Install the Password Export server in the source domain, preferably on the domain controller hosting the PDC FSMO role. The account used to do password exports is sourced from the target domain, this as the target domain is trusted by the source domain via the domain trust;
- Change ADMT to migrate Exchange values as well – By default ADMT won’t migrate Exchange attributes, follow the steps in this URL to excluded no attributes(“”), this so all Exchange attributes will be migrated as well to the target forest. (Only execute this step when mailboxes are migrated to Exchange Online).
- Make sure you will migrate SIDHistory to the target domain – This as we want to preserve the access rights given on file shares as example. Access on file shares i.e. is always set based on the SID of the group or user. If we do migrate these values for users and groups access to these file share will stay working with your new target account;
- Make sure you’re using the MSDS-ConsistencyGuid as the source anchor in Azure AD Connect – This to make sure that the link/glue between the Active Directory Account and Azure Active Directory Account will be ‘switched’ automatically;
- Bring users out-of-sync (old forest) and in-sync (new forest) – Once users are migrated, make sure the user in the source domain will be placed in an OU which isn’t synchronized to Azure AD. At the same time make sure these users are moved in the target domain to an OU which is synchronized to the Azure AD. By doing this Azure AD Connect will link the Azure AD object to the object migrated to the target forest. Preferably this will take place in one single synchronization action in Azure AD Connect to prevent a soft delete in Azure AD and all connected services.
Once the above is achieved all your synchronized (hybrid) identities are sourced from one single Active Directory, this means we can easily implement an Identity Lifecycle solution(s) for your employees!
Conclusion
After you’ve followed the above topics around building a strong identity foundation, we have a good and solid baseline to build our Identity Governance solution on. There are way more features you can use & configure for your identity foundation, i.e. Identity Protection, Microsoft Defender for Identity, etc. It’s of course important to have a look at these functionalities as well, they are however not mandatory for a solid Azure AD Identity Governance implementation. In the next blogs we will have a look at the Identity Governance features in much more detail, starting with Identity Lifecycle Management which will cover:
- The joiner & leaver process for employees;
- The update process for internal job changes of employees;
- Effect on the leaver process for specific services (i.e. OneDrive & Exchange Online);
- The joiner & leaver process for guest (B2B) users.
I hoped you enjoyed reading my second blog of this series about Azure AD Identity Governance! Stay tuned for my next Azure AD Identity Governance blog soon :-).
- An Introduction to Azure AD Identity Governance
- Identity Governance 1 of 10: Implementing a Strong Identity Foundation
- Identity Governance 2 of 10: Implementing Identity Lifecycle management for guest users – part 1
- Identity Governance 2 of 10: Implementing Identity Lifecycle management for guest users – part 2
- Identity Governance 2 of 10: Implementing Identity Lifecycle management for guest users – part 3
- Identity Governance 3 of 10: Configuring Provisioning in 3rd party apps for (guest) users
- Identity Governance 4 of 10: Implementing LifeCycle Workflows – Configure the basics
- Identity Governance 4 of 10: Implementing LifeCycle Workflows – Configure onboarding workflows
- Identity Governance 4 of 10: Implementing LifeCycle Workflows – Configure offboarding workflows
- Identity Governance 5 of 10: Using the hidden gems in Azure AD access packages, all you need to know! – Part 1
- Identity Governance 5 of 10: Using the hidden gems in Azure AD access packages, all you need to know! – Part 2
- Identity Governance 5 of 10: Using the hidden gems in Azure AD access packages, all you need to know! – Part 3
- Identity Governance 5 of 10: Using the hidden gems in Azure AD access packages, all you need to know! – Part 4
- Identity Governance 6 of 10: Using the brand new Entra Inbound Provisioning API for Identity Lifecycle Management!
- Identity Governance 7 of 10: Recertify access by using Microsoft Entra Access Reviews! – Part 1
- Identity Governance 7 of 10: Recertify access by using Microsoft Entra Access Reviews! – Part 2
- Identity Governance 8 of 10: Implementing Privileged Identity Management
- Identity Governance 9 of 10: Implementing a Terms of use
- Identity Governance 10 of 10: Review by Monitoring and reporting
