In my previous blog I’ve given you a full introduction to password-less, now let’s get into some more detail. This first blog out of 5 will describe how to enable password-less authentication via the phone sign-in option in Azure Active Directory.
A short introduction into password-less phone sign-in
The Microsoft Authenticator app enables users to verify their identity and authenticate to their work or personal account. Microsoft Authenticator can be used to augment a password with a one-time passcode or push notification. The app can also be used to verify multiple factors and replace the need for a password.
Instead of using a password, users confirm their identity using their mobile phone through fingerprint scan, facial or iris recognition, or PIN. Built on secure technology similar to what Windows Hello uses, this tool is packaged into a simple app on a mobile device making it a convenient option for users. The Microsoft Authenticator app is available for Android and iOS.
Required technical steps for password-less phone sign-in
NOTE: For all of the next steps within this blog and the upcoming blogs an AD Premium P1 license must be used.
Step 1: Prepare for Multi-Factor Authentication
The first step is to make sure that accounts are enabled with Azure Multi-Factor Authentication (MFA). These days we can achieve this by using Conditional Access rules, these rules can be configured in (almost) any dynamic method that you prefer. But before we do that let’s verify first if the user accounts which you want to use for password-less are in a ‘disabled’ state within the Office 365 MFA portal.
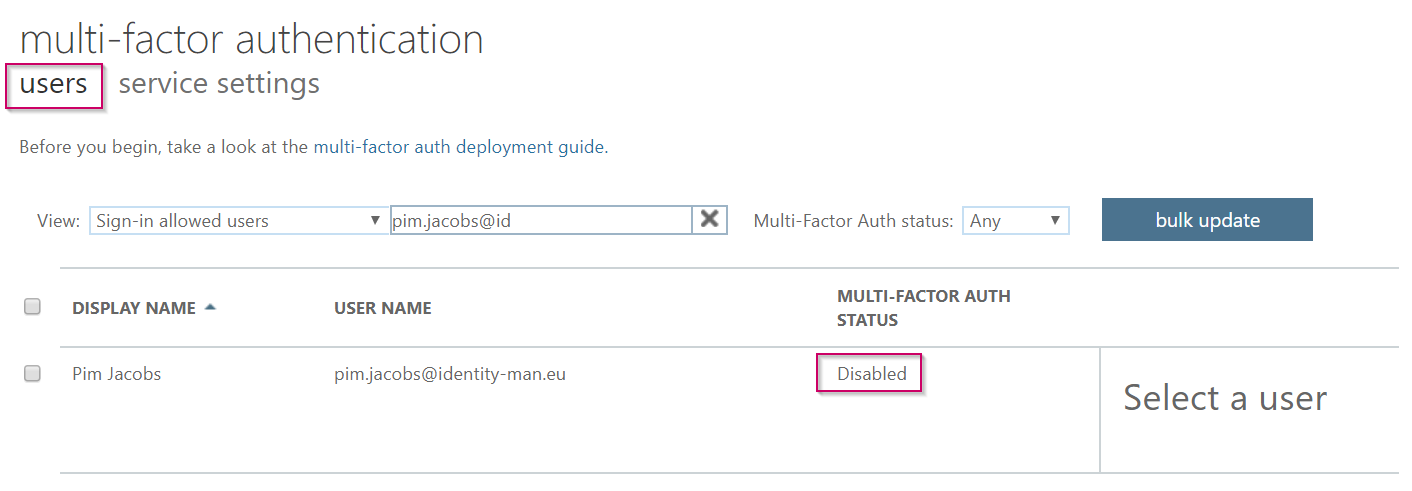
You can find this Office 365 MFA portal if you go to the Azure portal, open the ‘Azure Active Directory‘ blade, click on the ‘Users‘ tab and from there hit ‘Multi-Factor Authentication‘.

Once you’re in the Office 365 MFA portal please hit the ‘Users‘ tab and make sure that the accounts which you want to enable for password-less have a ‘Multi-Factor Auth Status‘ of ‘Disabled‘. We need to do this as this could affect the behavior of MFA prompts and therefore also the password-less prompts and experience.
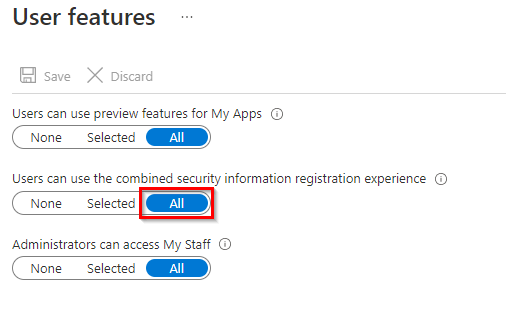
Now you’ve verified that the user is disabled in the Office 365 MFA portal let’s make sure that the user feature ‘Users can use the combined security information registration experience‘ is turned on. This feature will let you use the new MFA & SSPR (Self-Service Password Reset) enrollment feature and will therefore also enable the user to use password-less features like the Authenticator app or FIDO2 keys.
You can find this setting when you go to the ‘Azure Active Directory‘ blade, select ‘User settings‘ and within user settings click on the ‘Manage User feature settings‘ hyperlink. Please make sure the setting is set to ‘All‘ or that the users for which you want to enable password-less are included in the group selected here. This is a hard requirement for the password-less enrollment, if this isn’t the case password-less authentication won’t work.
NOTE: This is a tenant wide setting, if you aren’t using SSPR or MFA this can be changed without user impact, if you’re already using SSPR or MFA, please make sure to apply this to a group first and check what the behaviour is before enabling this for all users. Once done make the necessary changes for your end users instructions where applicable.
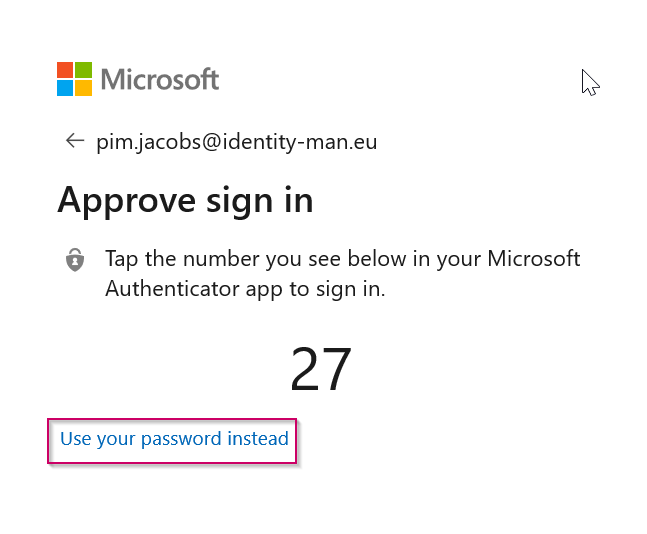
Now when this is all done and configured, let’s create a conditional access rule which will prompt the user for MFA, this is not required but strongly recommended as the password-less screen can also be bypassed by clicking ‘Use your password instead‘ and besides that it’s also an extra security measurement which you should consider to implement and required for Windows Hello for Business (hybrid) enrollments (explained in the next blog of these series).
Step 2: Enable Multi-Factor Authentication
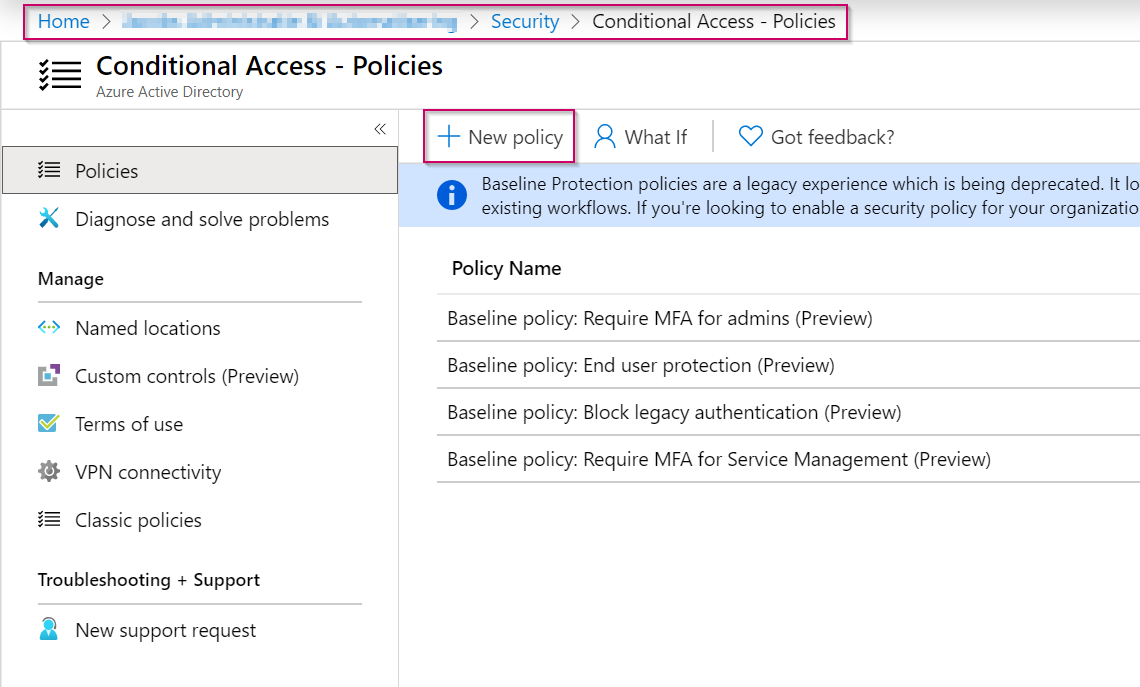
Now to create the conditional access rule for MFA go to the ‘Azure Active Directory blade‘ within the Azure Portal. From there select the ‘Security‘ blade and hit ‘Conditional Access‘. From here you can create a new conditional access policy by clicking on ‘New Policy‘.
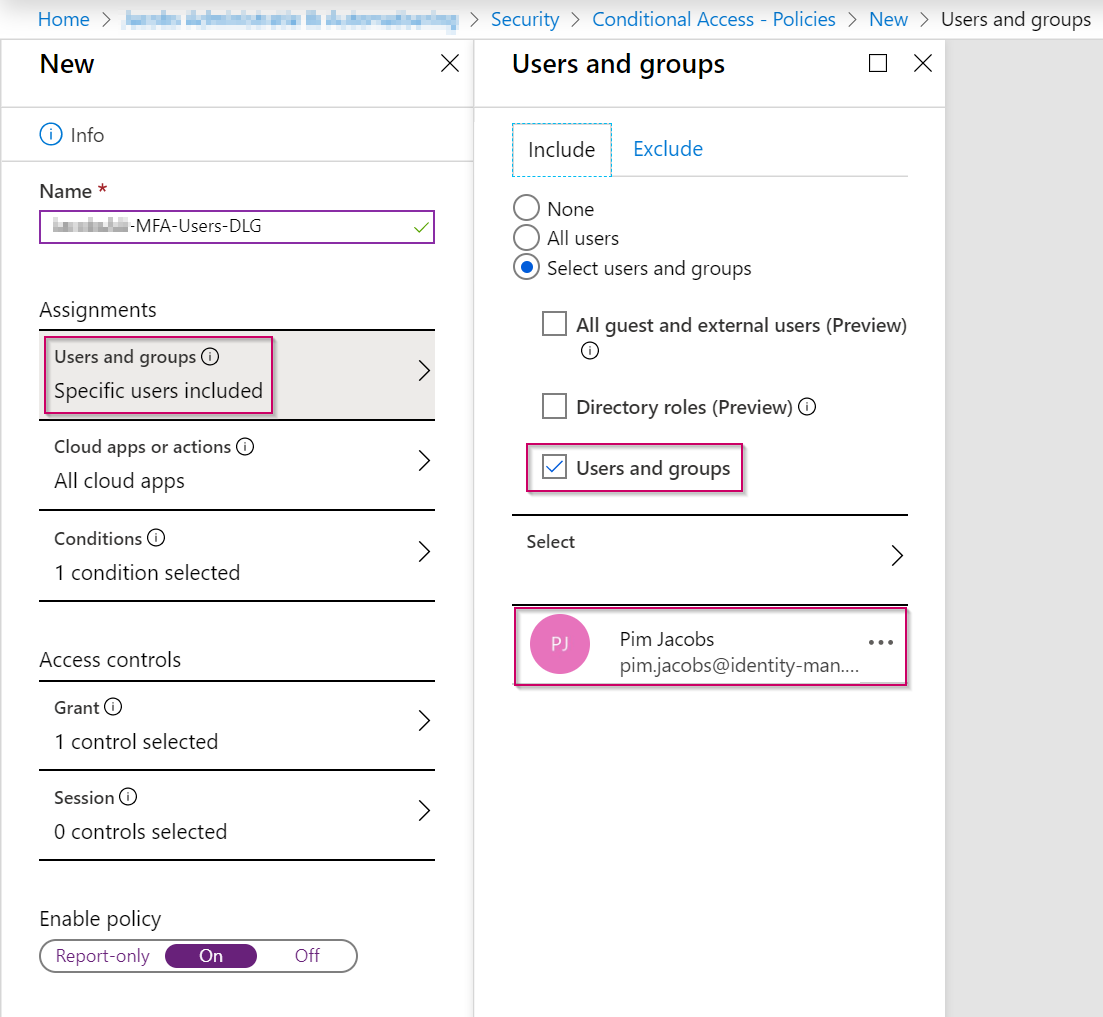
NOTE: The example described below can be implemented as a conditional access rule for MFA but enhancements are possibly required for your own environment. Therefore please test this first and make enhancements to the rule where needed. In this case we will implement MFA for a single user, but you can of course also select a group containing several user accounts.
First start by giving the Conditional Access rule a friendly name, once done in the Assignments section beneath ‘users and groups‘ make sure that the correct group of users is included for which you want to enable MFA.
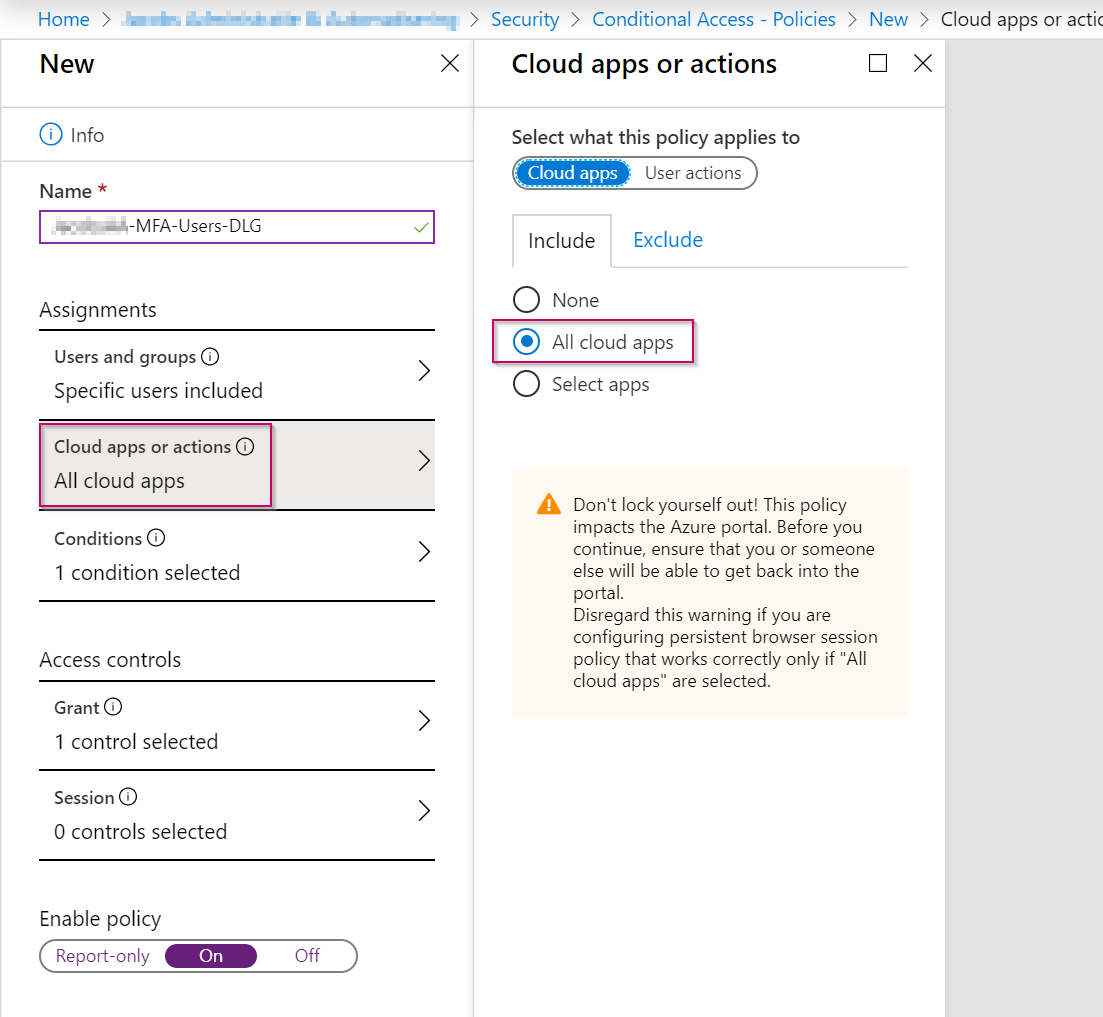
Once the user or groups are selected, the next step is to include ‘Cloud apps‘. These are apps connected to your Azure AD environment and can be found within the ‘Enterprise Applications‘ section within the ‘Azure Active Directory‘ blade. In this example I’ve included ‘All cloud apps‘, this is always advised to do, as this will prevent new apps from being bypassed with MFA because they aren’t added to the conditional access rule.
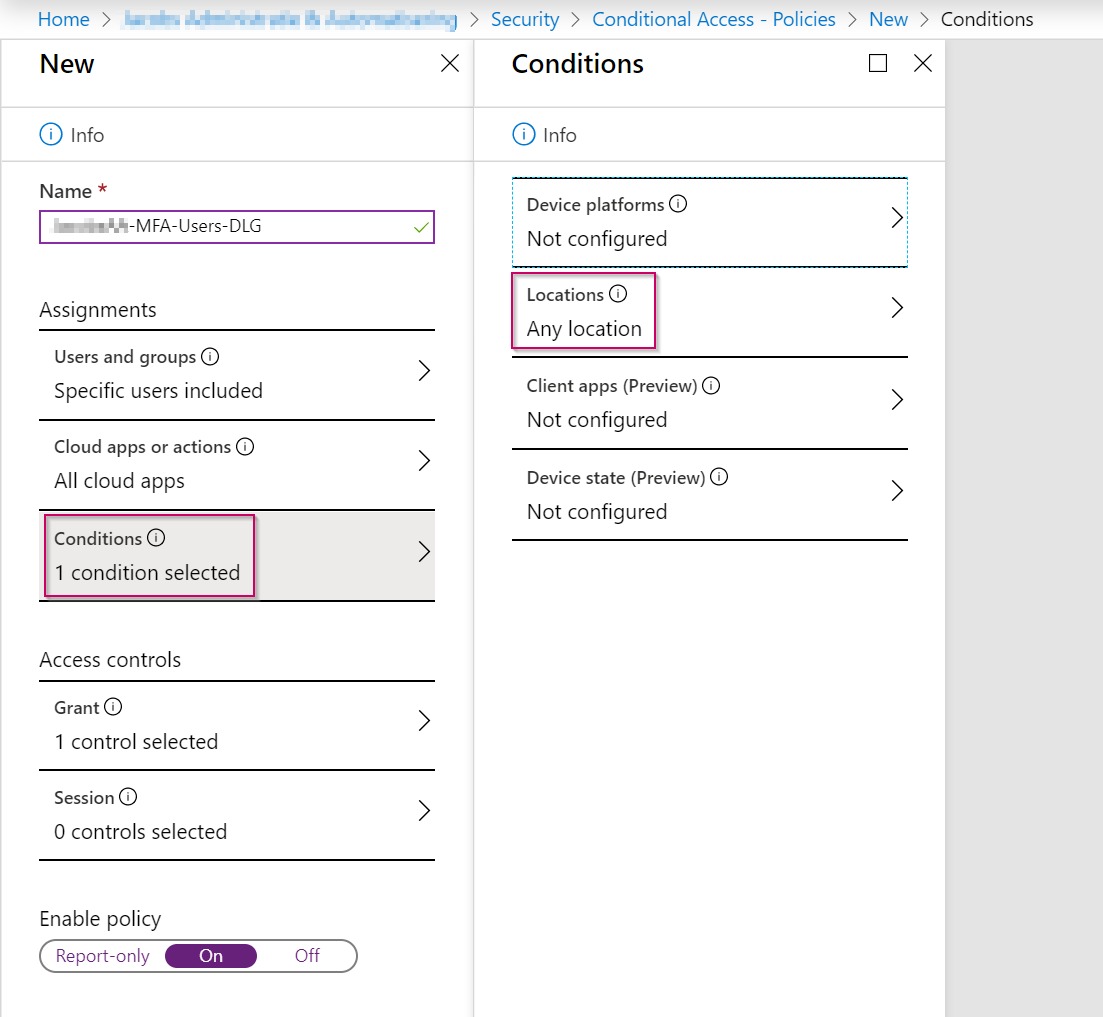
Now within the ‘Conditions‘ we are going to make sure that the conditional access policy is applied to ‘Any location‘. This will make sure that there’s a zero-trust model, meaning you will always get an MFA prompt when signing in, regardless of your location. In some cases you will see that this is quite annoying for end users, if that’s the case you can make an exclusion for a ‘trusted location‘ (like an office location) which you can define beneath the ‘Named Locations‘ within the Conditional Access blade. Within this ‘Named Location‘ you can define public IP’s, give the location a name and if required, mark the location as a ‘Trusted location‘.
NOTE: If you’re using Azure AD joined devices or Hybrid Azure AD joined devices an exclusion for a trusted location shouldn’t be used as users on these devices shouldn’t be challenged for MFA anyway as there device (can) functions as a second factor.
Now within the ‘Access Controls‘ setting we will grant access to users matching this rule as described above. Because ‘Require multi-factor authentication‘ is selected beneath the ‘Grant‘ section as shown below, they are challenged with a MFA prompt.
Please don’t forget to select the ‘On‘ button beneath the ‘Enable policy‘ setting and hit save to make sure the rule is applied.

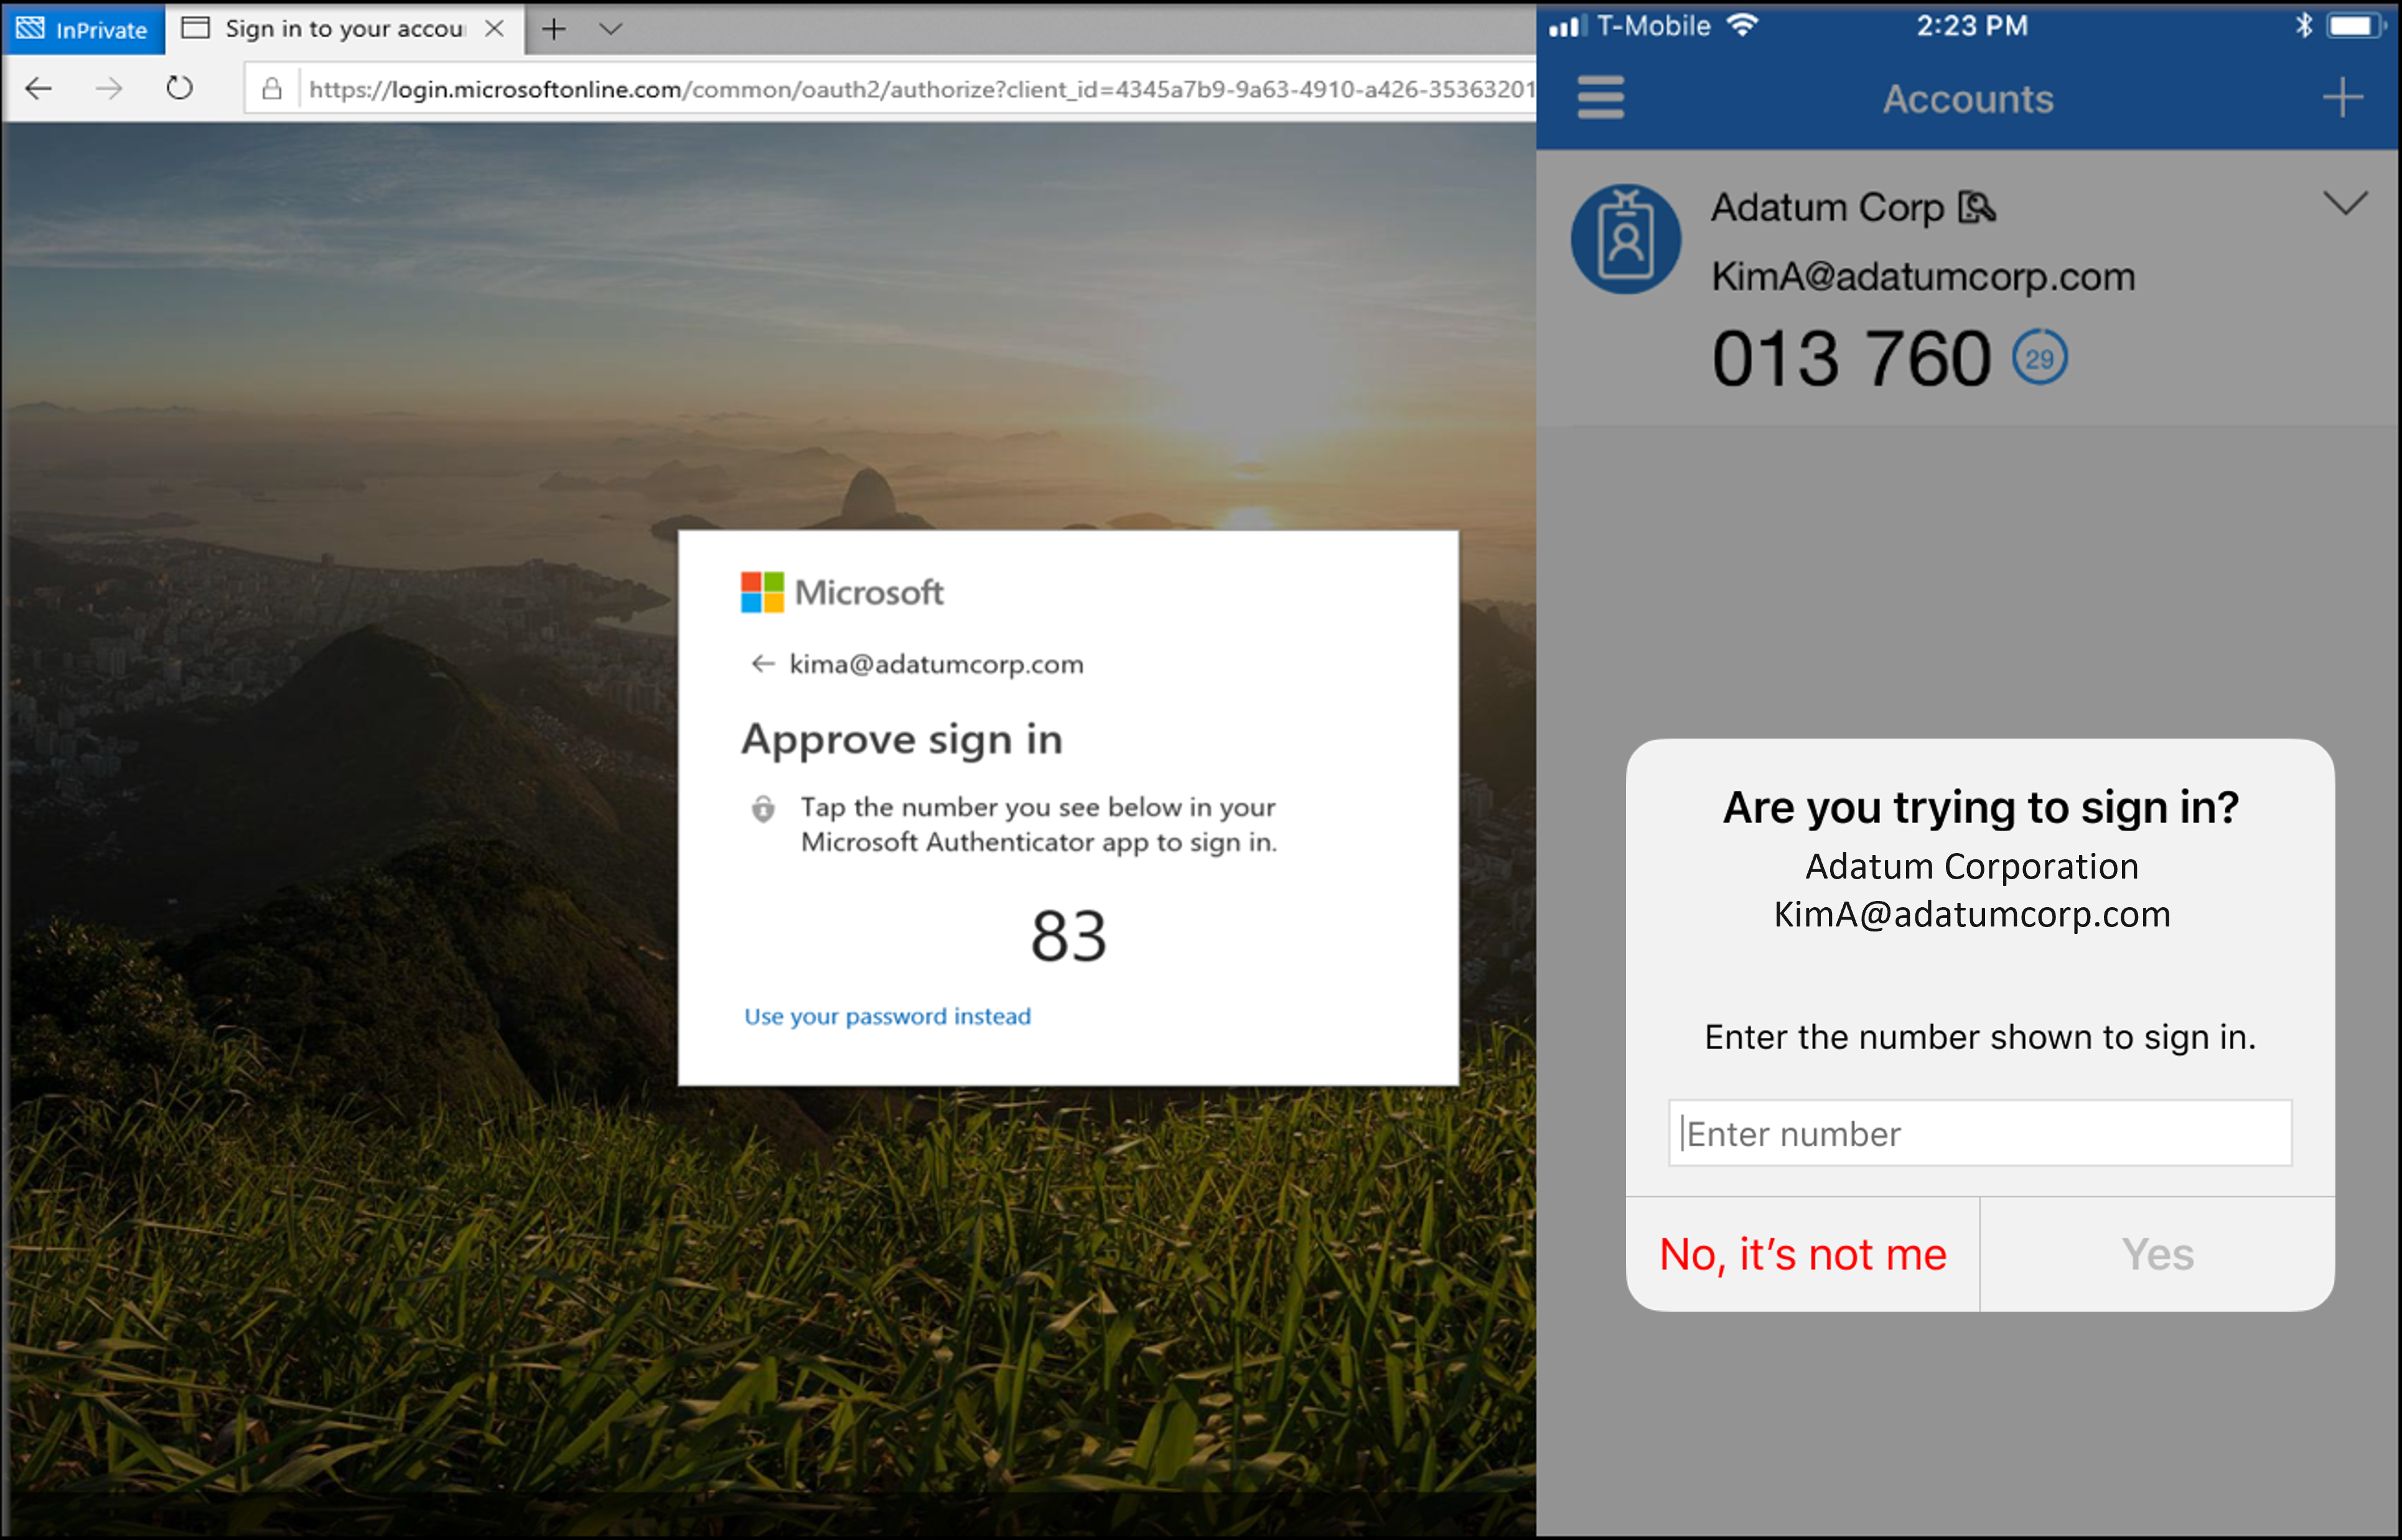
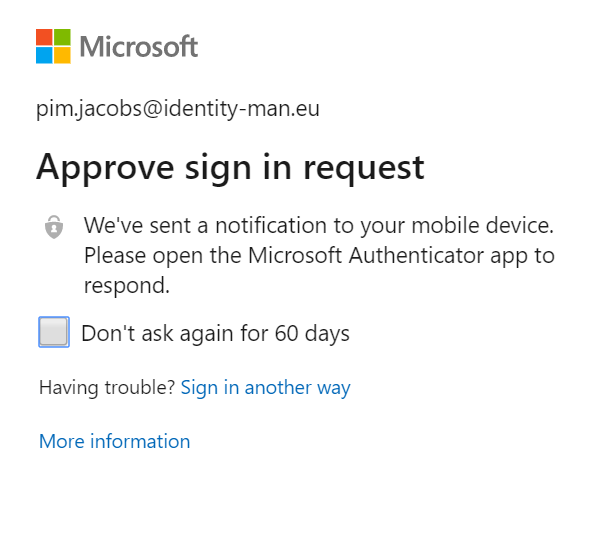
If the user is already enrolled correctly for MFA, the MFA prompt within a browser should look like the following and a prompt will be send to the mobile phone with an approve or deny message.
If the user isn’t enrolled he or she will receive a prompt for the enrollment which looks like the notification below:
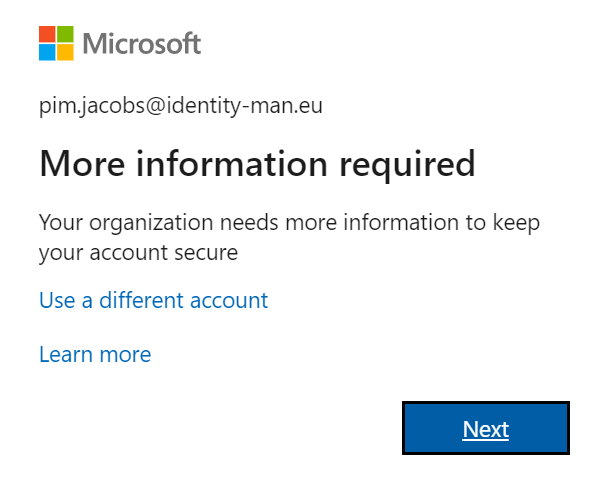
If this is the case please follow the enrollment instructions and make sure the Authenticator app is used with push notifications. A different method can be used for MFA but cannot be used for password-less phone sign-in.
NOTE: Methods can always be changed for already enrolled users via this url.
Step 3: Check the Azure AD Connect settings
Now MFA is implemented and the user is enrolled for MFA and has push notifications configured, we can make the necessary settings to start enabling password-less. First thing which is important to know, is that password-less authentication in combination with AD FS won’t work out of the box, AD FS will interrupt the password-less flow. As AD FS is (pretty much) based on old technology (AD authentication) and Azure AD authentication is simply more secure due to all security measurements. I would strongly recommend you to migrate your AD FS environment to Azure AD (which I will describe in 4th blog of this series).
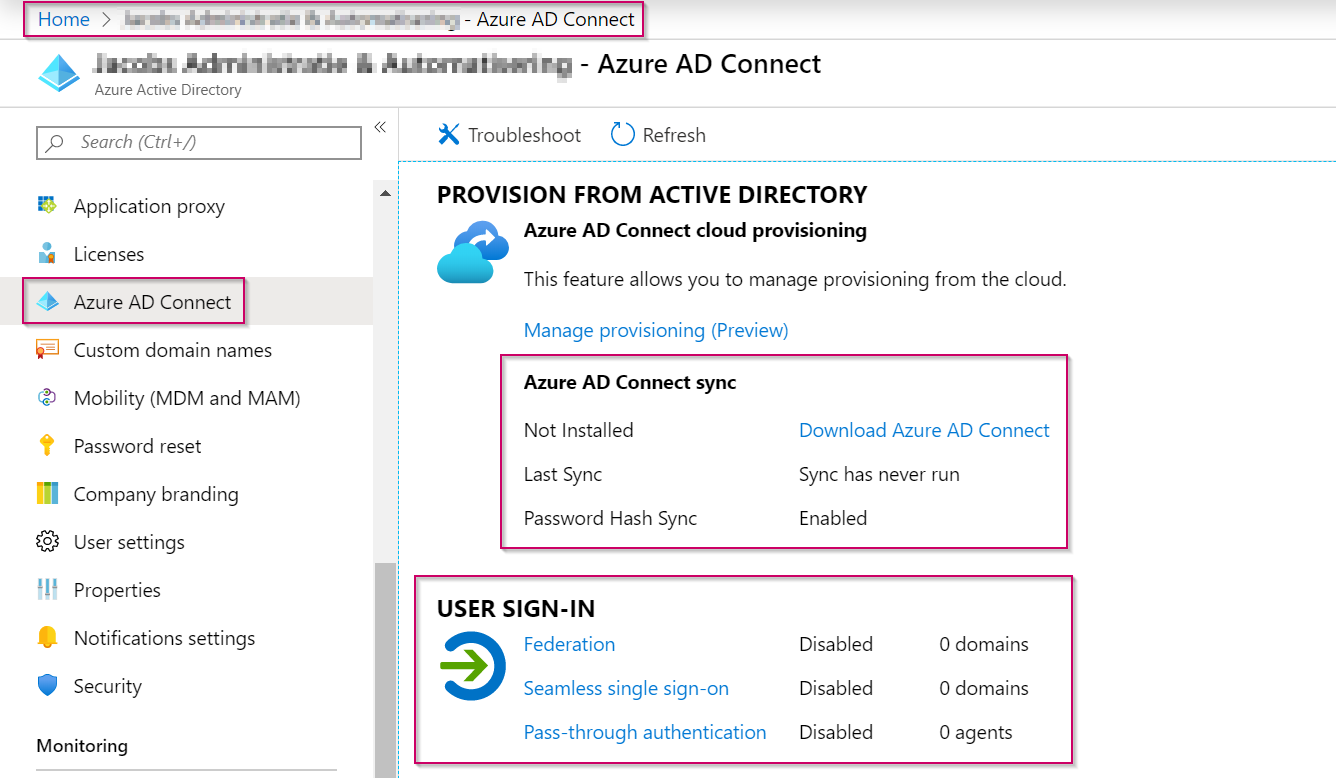
It’s therefore important to check if any domains within your tenant are configured for ‘Federation‘. You can check this by opening the ‘Azure Active Directory‘ blade and select ‘Azure AD Connect‘. As you can see my own tenant isn’t configured with Azure AD Connect and has 0 domains enabled for Federation. This means my tenant and the configuration of the domains inside it are password-less ready!
Step 4: Configure Azure AD for password-less phone sign-in
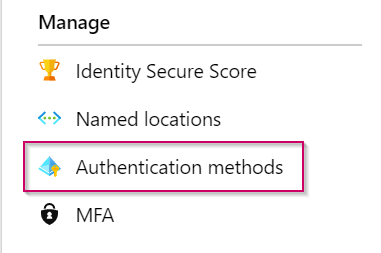
So let’s start and get some password-less users within this tenant, to start again go to the ‘Azure Active Directory‘ blade, select the ‘Security‘ tab and in here select ‘Authentication Methods‘.
As you can see there are currently five ‘Authentication Methods‘ available within the policies screen. These are the ‘FIDO2 Security Key‘, ‘Microsoft Authenticator‘, ‘Text message‘, ‘Temporary Access Pass‘, and ‘Certificate-based authentication‘ options. Let’s hope that in the future more options become available beneath this section.
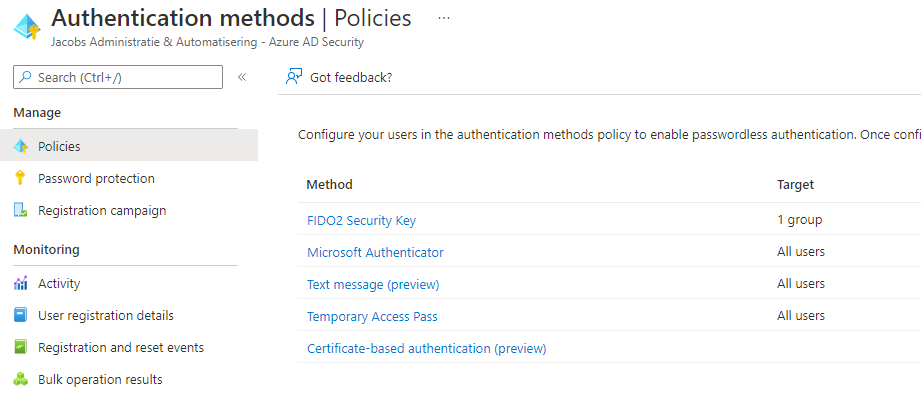
As this blog post is focusing on the password-less experience from the Authenticator app, please select ‘Microsoft Authenticator‘ and enable the policy. In the example below I’ve enabled this policy for a specific user group as you can see.
NOTE: Don’t be afraid to enable this policy for your end users, this as end users have to enable password-less phone sign-in themselves from the Authenticator app. And just in case, if something goes wrong while configuring, the ‘Discard‘ button shown on the ‘Authentication Methods‘ page will reset the settings back to the defaults before editing.
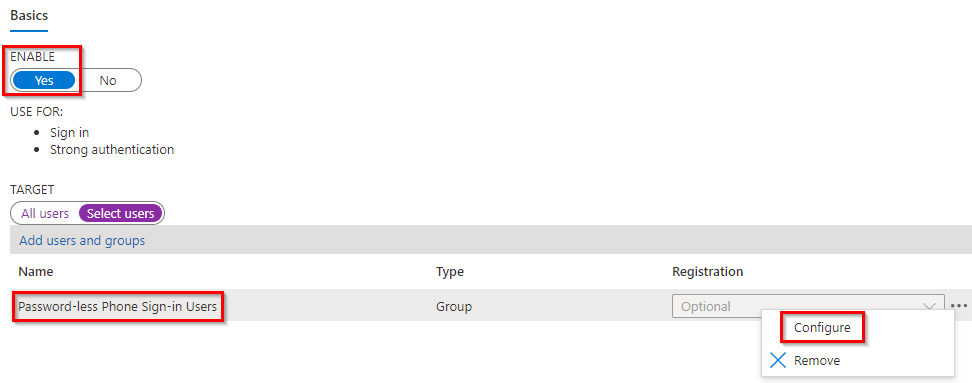
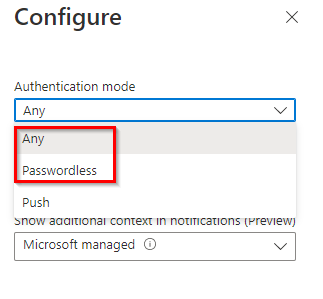
Once you have added to group, please hit ‘Configure‘. And make sure the ‘Authentication mode‘ is set to at least ‘Passwordless‘ but preferably ‘Any‘ so users can use all methods the Authenticator App offers.
Once ready hit ‘Done‘ and don’t forget to hit the ‘Save‘ button to fully save the Microsoft Authenticator App Policy.
NOTE: Interested in the ‘Number Matching’ feature or the ‘Additional Context in Notification feature’, please check-out this blog post.
Once saved Azure should will show you an updated status, which should look like the screen below and will tell the policy is enabled for one specific user group in this case.

Step 5: Make sure that end-users enable the ‘phone sign-in’ option within the Authenticator app
The technical setup for the password-less phone experience is now complete from the Azure Active Directory. Now let’s make sure that your end users can use this functionality by providing them the next steps.
NOTE: The steps below assume that your end users have already configured the Microsoft Authenticator app for the use of MFA, if not ask these specific users to go to this link to change their behaviour and let them use the Authenticator app or target them with the ‘Registration Campaign’ covered in this blog post.
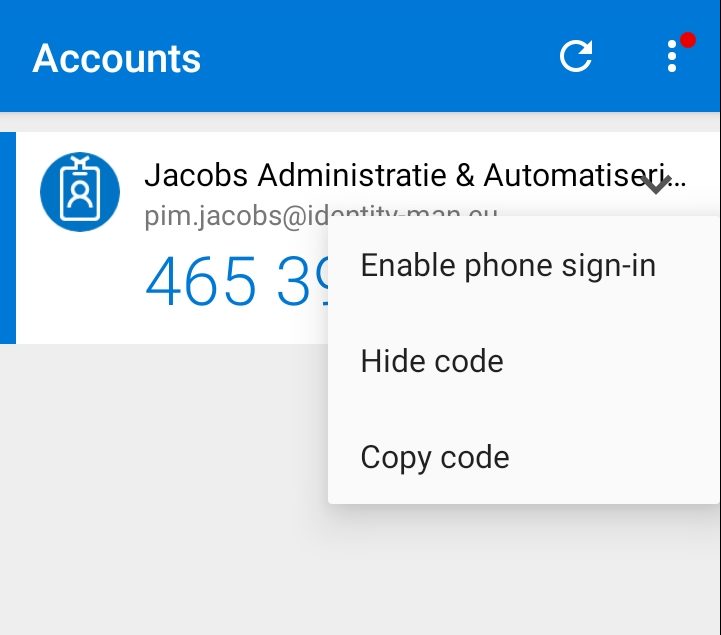
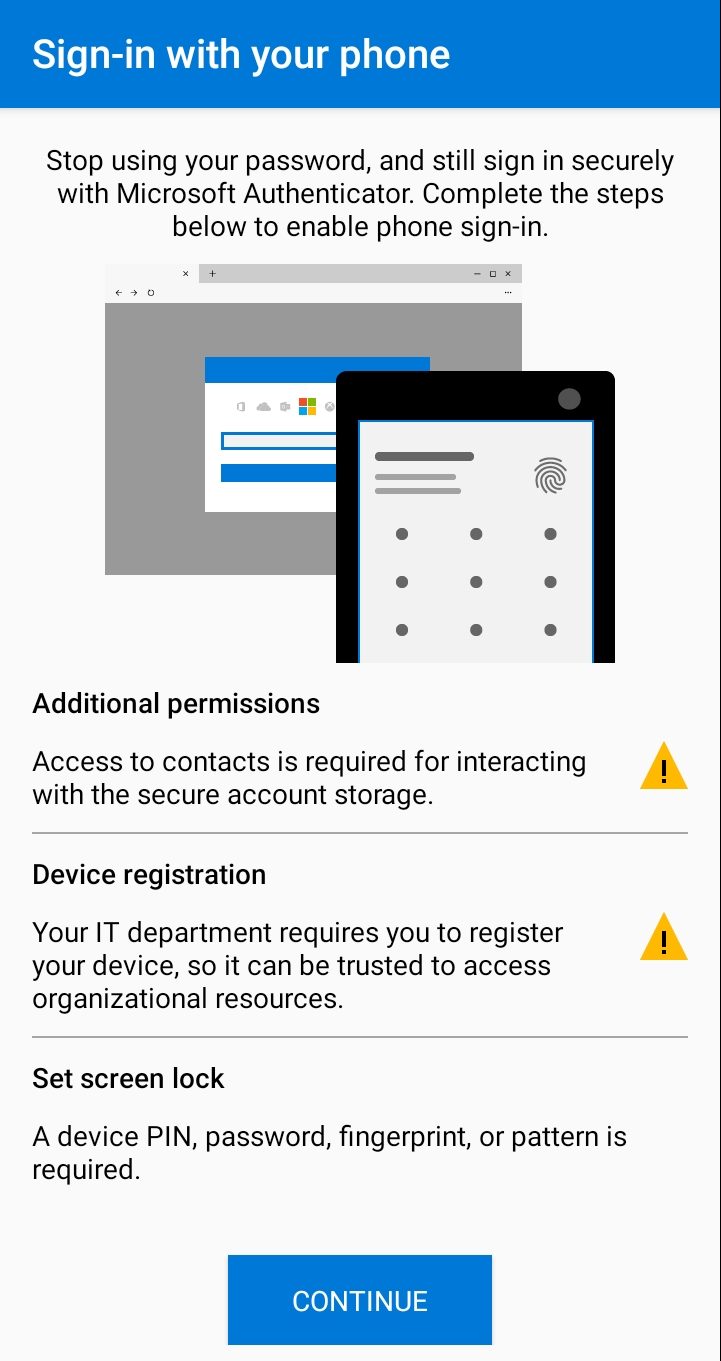
Now as a user open the Authenticator app, select the arrow pointing below next to the account for which you want to enable password-less phone sign-in and hit ‘Enable Phone Sign-in‘.
NOTE: Please make sure that your device is secured with a PIN, Face ID or fingerprint. If you’re using iOS and want to enable this for new accounts please checkout this blog post of this series, if you’re using Android, you need to be patient!
To continue with the password-less phone sign-in option hit ‘Continue‘.
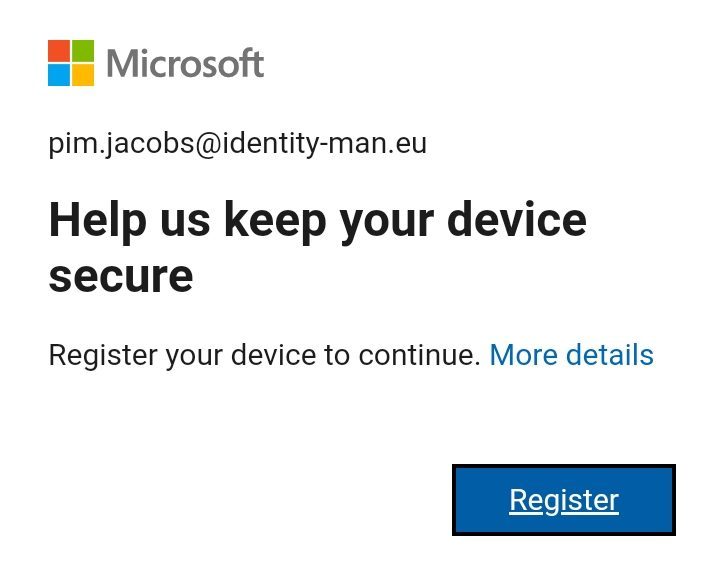
Once you hit the ‘Continue‘ button you will be asked to ‘Register‘ your mobile device, please select ‘Register‘ to complete the registration of your mobile device within the Azure AD to make sure it becomes usable for password-less phone sign-in (this doesn’t mean the device will be managed, it’s just registration against the Azure AD).
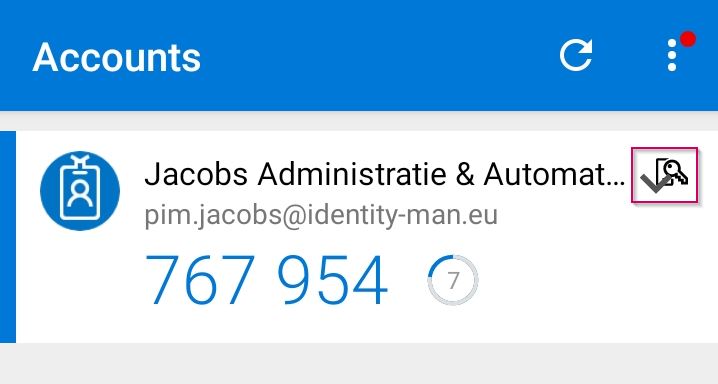
Once done you will see that an icon has appeared within the Authenticator app next to your account. This means your account is successfully enabled for password-less phone sign-in.
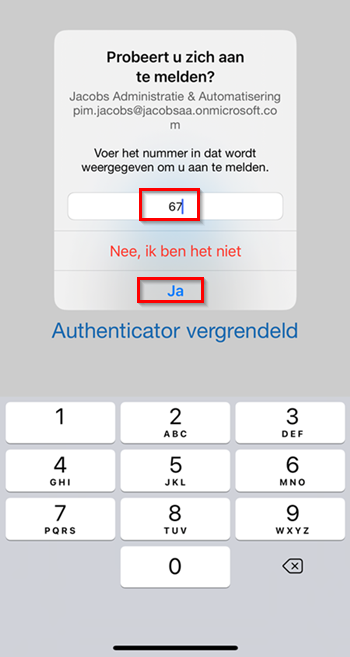
Now let’s try to logon via a web-browser by going to https://portal.office.com as an example. Once you’ve typed in or selected your user name you will be challenged with a number on the web page and a pop-up within the Authenticator app.

Within the Authenticator app you will see the same number, please enter number (in this case 67) and hit ‘Yes‘. Once done you will be challenged to enter your PIN or use face recognition or a fingerprint as a second factor next to the number.
Once this is done you’re successfully logged on with the password-less phone sign-in option, the first step in going password-less is here!
Each app which you have or will connect with the Azure AD can now automatically be password-less (woeehooo 🙂 ).
In the next four blogs I will continue explaining how to implement the password-less options from a technical and user point of view, once available the links below will become active:
- Introduction to a password-less era
- Password-less 1 of 5: Going password-less with phone sign-in
- Password-less 2 of 5: Going password-less with Windows Hello for Business
- Password-less 3 of 5: Going password-less with Windows Hello for Business Hybrid
- Password-less 4 of 5: Going password-less with FIDO2 Security Keys Part 1
- Password-less 4 of 5: Going password-less with FIDO2 Security Keys Part 2
- Password-less 5 of 5: Expanding password-less to Azure AD Applications Part 1
- Password-less 5 of 5: Expanding password-less to Azure AD Applications Part 2
- Password-less 5 of 5: Expanding password-less to Azure AD Applications Part 3
- Password-less continued: Upgrading your password-less experience with Windows Hello for Business Hybrid cloud-trust.
- Password-less continued: Using the Passwordless Phone Sign-in experience for multiple accounts on iOS!
- Password-less continued: Using a Temporary Access Pass for Bootstrapping your Passwordless Journey
