The phone sign-in, Windows Hello for Business (hybrid) and FIDO2 Security Key options which I’ve described in the last five blogs do provide you password-less options to logon to services which are by default connected to the Azure AD. But what about other web-based applications which you’re using in your environment like Slack, Salesforce, SAP, TopDesk or any other app you may have?
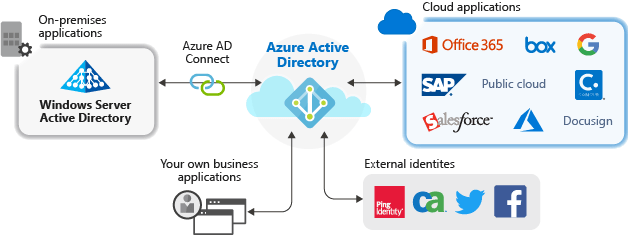
Well it’s simple if those apps fall under one of the application types described below I strongly encourage you to connect those apps to the Azure AD as well:
- #1 Azure AD Gallery applications – Azure AD has a gallery that contains thousands of applications that have been pre-configured for single sign-on and password-less authentication via the Azure AD. Some of the applications which your organization is using are most likely available within the gallery.
- #2 Non-Gallery applications – Connect your own applications to the Azure AD to support single sign-on, and therefore password-less. You can integrate any web link you want, or any application that renders a username and password field on a sign-in page which supports SAML, OpenID Connect protocols, or supports SCIM.
- #3 On-premises applications with Application Proxy – Via the Azure AD Application Proxy, you can integrate your on-premises web apps to connect to Azure AD for single sign-on and password-less. This is done by proxying traffic to an on-premises web-application through the Application Proxy, and enabling SSO on the application in the process. That way end users can access your on-premises web apps in the same way they access services connected to the Azure AD like Office 365 and therefore provide them with a password-less experience.
- Custom-developed applications – When building your own line-of-business applications, you can integrate them with Azure AD to provide single sign-on and a password-less experience. This can be done by creating an app registration within the Azure AD. This app registration can then be used by the application to access Azure AD resources, such as user-information and enable sign-on on behalf of the application.
Once you have connected those 3rd party applications with the Azure AD they will use the same authentication mechanism to authenticate and therefore can make use of the password-less authentication flow. Additionally, you can easily provide an application overview and access to your users via the MyApps portal.
From a security perspective it will, in addition to the above, give you the ability to apply conditional access or risk-based access on the applications for better security. This will increase your organizations security posture and enable a smooth and user-friendly and password-less user experience.
This first out of three blogs about connecting 3rd party applications to the Azure AD will describe how you can discover the above mentioned web-based applications used within your environment.
Discover 3rd party applications in your environment
The first step in getting 3rd party web-based applications connected to the Azure AD is to discover those applications in your environment.

This can be done in three steps:
- Via AD FS application activity – This option will discover all applications which are connected to your AD FS environment. It will show their current usage and will show if the application can be migrated to the Azure Active Directory, and if not it will show you what you need to change to be able to migrated it.
- Via Cloud App Security Discovery – This option will discover applications which are used by your users. Discovery can either be done via log collectors or by using the Microsoft Defender ATP integration, to discover those applications.

- Via manual research – Do some investigation, ask each department to make a list of apps they are using and see if they come back with applications which aren’t covered by the above two scenario’s. This sounds like a lot of work but it gives you as an IT administrator the ability to secure those applications and make sure that they can be accessed via a password-less experience.
As the last option in the above mentioned list is pretty straight forward, I will only explain the first two options in more (technical) detail.
Discover 3rd party applications with AD FS application activity
The first option to discover 3rd party applications is to use AD FS Application Activity within the Azure AD.
AD FS Application Activity is a separate blade within Azure Active Directory which will only show data if you have installed Azure AD Connect Health on your AD FS farm (including the WAP servers). The installer for this can be found here.
NOTE: To make use of this functionality you need to have AD Premium P1 licenses, by default the first Azure AD Connect Health agent is installed with the installation of Azure AD Connect and requires one AD Premium P1 license. Each additional agent (for AD FS or AD DS) requires 25 additional AD Premium P1 licenses, i.e. if you have 4 servers in your AD FS farm (excluding Azure AD Connect) you need 101 AD Premium P1 licenses.
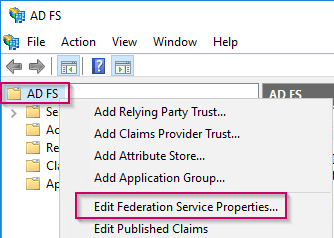
Once you’ve installed the agents on all the servers in your AD FS farm and connected those agents to your Azure AD tenant, you need to enable auditing on your AD FS farm (if you haven’t already). For this go to the AD FS MMC, right click ‘AD FS’ and select ‘edit the federation service properties’.
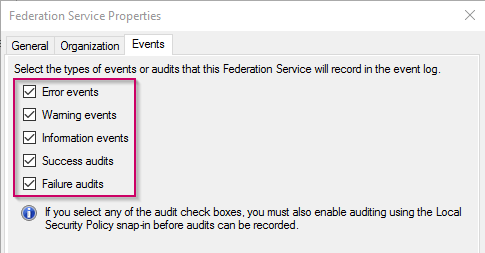
Within the Federation Service Properties enable all checkboxes and hit ‘OK’.
As also mentioned in the note, we need to make sure that the local security policy allows auditing, otherwise we won’t see any usage on the AD FS Application Activity blade. For that to work, go to the local group policy (gpedit.msc) editor and go to Computer Configuration – Windows Settings – Security Settings – Advanced Audit Policies – Local – Object Access. In here enable both success and failure audit events settings within the setting ‘Audit Application Generated’ and hit ‘OK’.

After a while you will see your AD FS farm within the ‘Azure Active Directory Connect Health’ blade in Azure beneath ‘AD FS Services’.
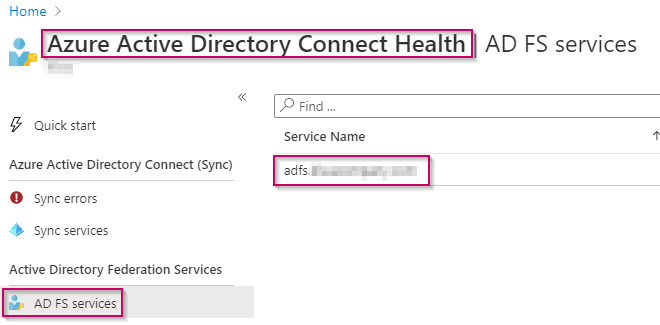
In here it’s important that the status is reported back as ‘Healthy’.

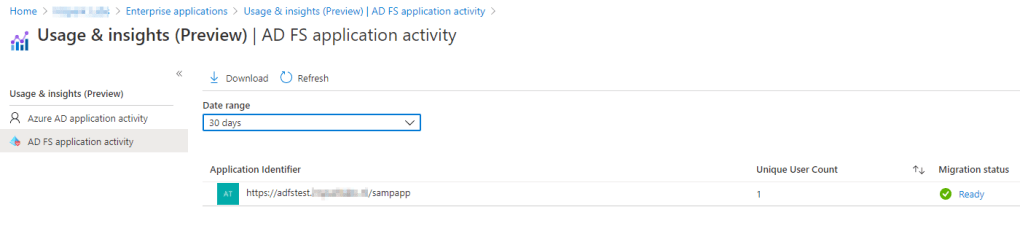
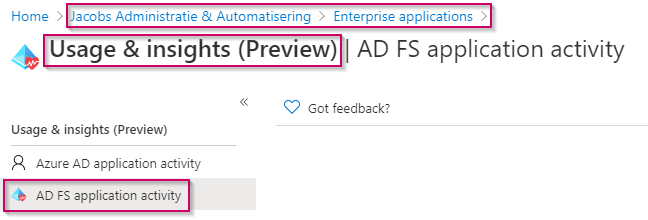
Once this is all done you’re ready to use the AD FS Application Activity blade in Usage & Insights within the Azure AD beneath Enterprise Applications.
NOTE: It can take some time before you actually see data in here.
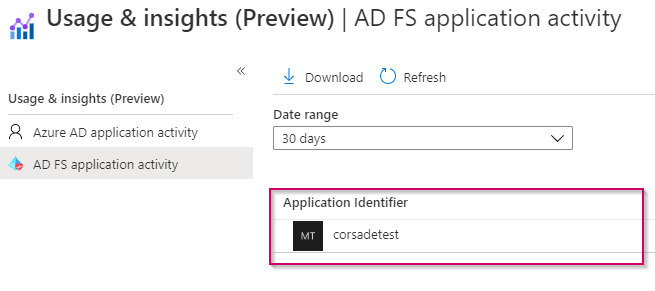
When the data is actually captured and has been analyzed by the Azure AD, you will see the AD FS applications which are connected to your AD FS farm, in this example I’ve only connected one application which is ‘corsadetest’.
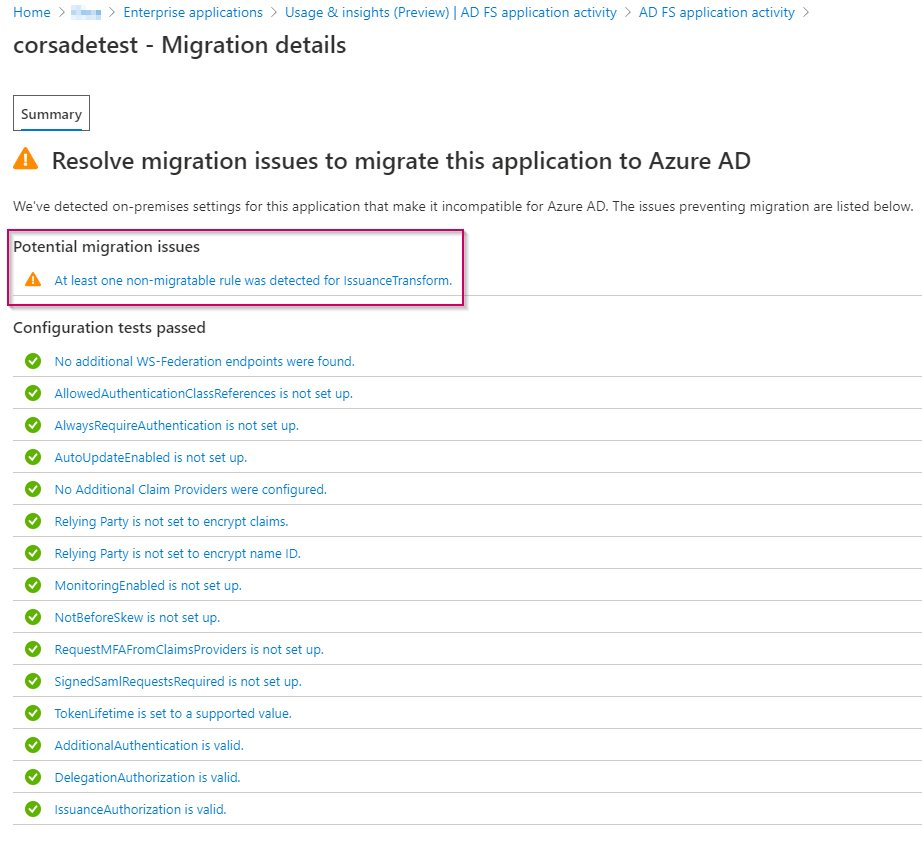
In the details you can see the app is used by only two users, and that the app requires additional steps for migration to Azure AD. In this case that’s correct as this is a test environment of myself which doesn’t contain a lot of users.

When you hit the ‘Additional steps required’ you can see exactly what you need to change to make sure the app can be migrated to the Azure AD.
In the above example we are using a claim which isn’t available within the Azure AD by default called ‘Windows Account Name’. There are several ways to solve this but the most common scenario in Azure AD is picking a new claim value and changing the identification within the application (user.onpremisessamaccountname) or transform a claim into the same value as the ‘Windows Account Name’. This last step can, for example, be achieved by using a join as claim which joins to values into one claim (user.netbiosname + \ + user.onpremisessamaccountname).
In part two of this blog, I will describe how you can alter and change these claims.

At this point you are aware of all AD FS applications which are used within your organization and you’re able to list those applications as to be migrated to Azure AD.
Discover 3rd party applications with Cloud App Security
The second option, to discover 3rd party web-based applications which you can connect to the Azure AD, is via the Cloud App Security admin center. Cloud App Security is an advanced tool that sits between cloud service users and cloud applications, and monitors all activity and is able to enforce security policies. Cloud App Security will therefore give you give you a very good insight on what kind of applications your end users are using, gives you options to protect those applications and asses the compliance of those application. In the example below I will only use the ‘discover’ functionality which is available within Cloud App Security and is called ‘Microsoft Cloud App Security Discovery’.
NOTE: In the example below I will only use the functionalities that are offered within an Azure AD Premium P1 license and will show you what other options you have to discover apps via Cloud App Security discovery if you own Microsoft Defender ATP licenses besides and Azure AD Premium P1 License.
Now the first step is to visit the Cloud App Security Admin Center, go to the ‘configuration cog’ in the right upper corner and hit ‘Settings’ to go to the settings of Cloud App Security.

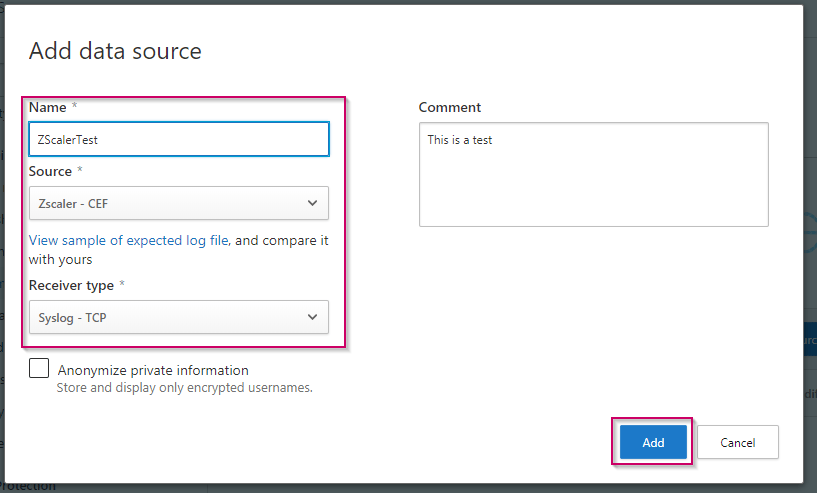
In the settings go to the ‘Automatic log upload’ and within the ‘Data Sources’ tab hit ‘Add data source’. In this example we are going to add a dummy collector for a ZScaler appliance, this is a non existing appliance and is only configured in Cloud App Security to show you how you can connect these proxy / firewall appliances to Cloud App Security for application discovery purposes.

Once you’ve clicked the ‘Add data source’ option the prompt below is shown, in here enter the Name, choose the Source and the Receiver type. Eventually fill in a comment and hit the ‘Add’ button.
Now as you can see the data source has been added.
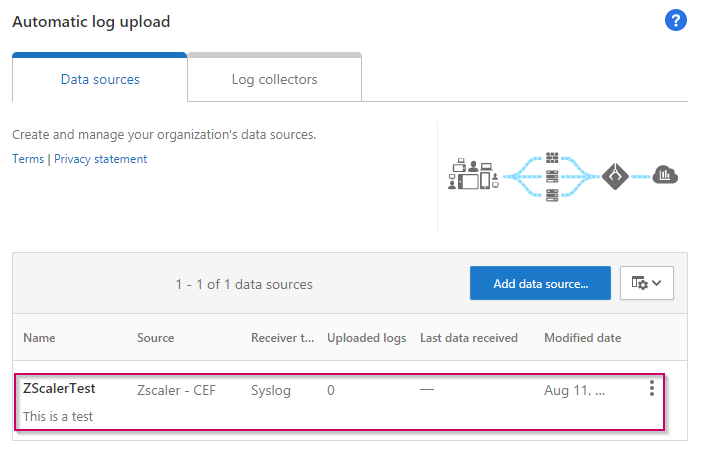
Now go to the ‘Log collectors’ tab and hit ‘Add log collector’.

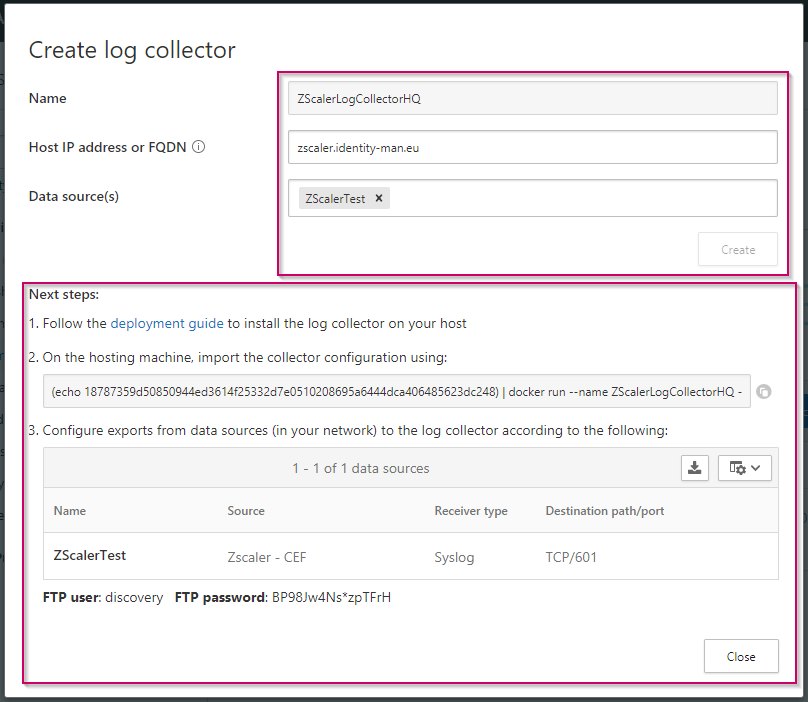
The create log collector screen opens, in here again enter the ‘Name’ of the log collector, enter the ‘IP address or FQDN’ of the device which is going to upload the logs to Cloud App Security and choose the ‘Data source(s)’, which we just created and belongs to this log collector. Once done hit ‘Create’.
Cloud App Security now knows the type of the device and has all the information which it needs to provide you with the command to enable automatic log upload from you appliance to the Cloud App Security portal. Next step is to configure your appliance to make sure the logs are sent over to Cloud App Security for analysis.
If you have configured the log collector correctly, Cloud App Security is receiving the logs from the appliance which you just configured. To get the full picture on what applications your users are using repeat these steps on each edge device that network communication flows through in your environment (i.e. Firewalls & Proxies). The more data Cloud App Security retrieves, the better it can analyze which applications are used within your organization.
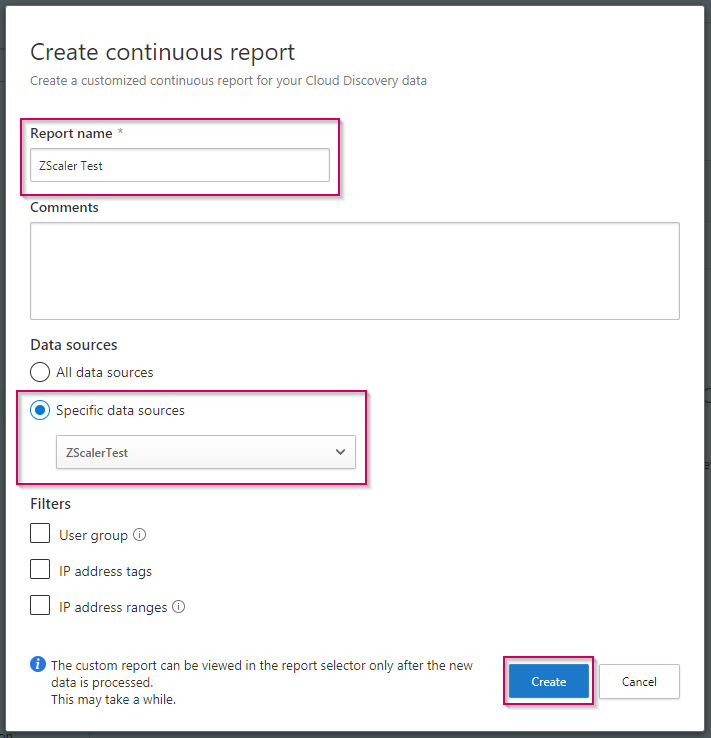
Once you have connected all appliances it’s time to create a report. By default there is a ‘Global’ report available, but possibly you want to split them either per appliance, location, or per proxy / firewall. For that within the settings of Cloud App Security go to ‘Continuous Reports’ and hit ‘Create report’.

In here you can define a ‘Report name’ and specify ‘Specific data sources’, as you can see in my example I’ve selected the data source ZscalerTest, meaning all log collectors which are using this ZScalerTest data source will be included in the report.
Now that this is done, all actions which are required and available within an Azure AD Premium P1 license are completed, but hold on there is more!
If you own Microsoft Defender ATP (MDATP) licenses and already enrolled all your Window 10 machines within MDATP, there is a better way to do the discovery. As you may have already noticed within the Cloud App Security settings there is an option called ‘Microsoft Defender ATP’.
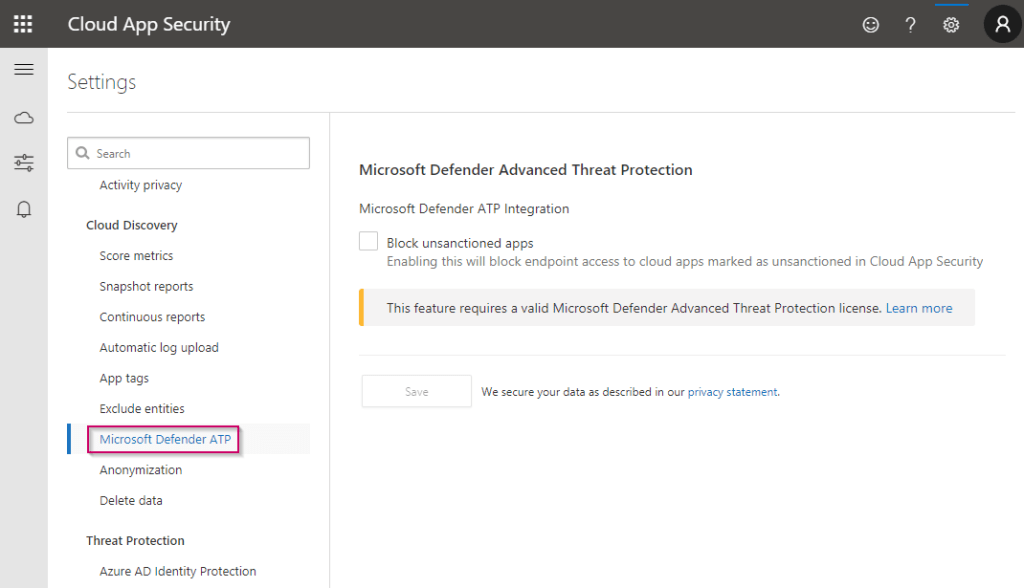
To be able to retrieve logs from Microsoft Defender ATP we need to go to the Microsoft Defender Security Center, please be reminded you do need Microsoft Defender ATP licenses for this!
Once you are within the Microsoft Defender Security center, please go to the ‘Settings’ tab and hit ‘Advanced Features’. In here search for the ‘Microsoft Cloud App Security’ option and make sure the toggle switch is set to ‘On’.
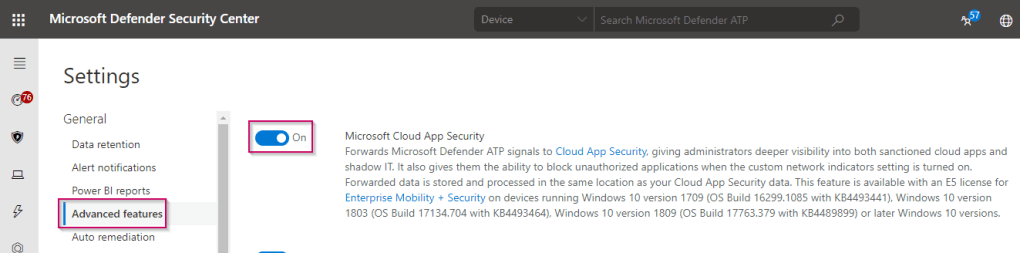
All data gathered within Microsoft Defender ATP is now forwarded to Cloud App Security and can be analyzed for application discovery. You can also see this if you visit the ‘Automatic log upload’ page within Cloud App Security (under Settings – Cloud Discovery – Automatic Log Upload) and check the ‘Data sources’. In here you will find a new line which has Microsoft Defender Advanced Threat Protection as source, this is what we just did enable via the Microsoft Defender Security Center.

Now go to the ‘Cloud Discovery dashboard’ within Cloud App Security and select in the right upper the ‘Continuous Reports’. As you can see you will only see reports which actually contain data. This means if your log collector didn’t upload any logs yet you won’t see that as a report within Cloud App Security.

In the example below you can see that I’ve opened the ‘Discovered apps’ tab with data of the report ‘Win10 Endpoint Users’ (which is data from Microsoft Defender ATP).
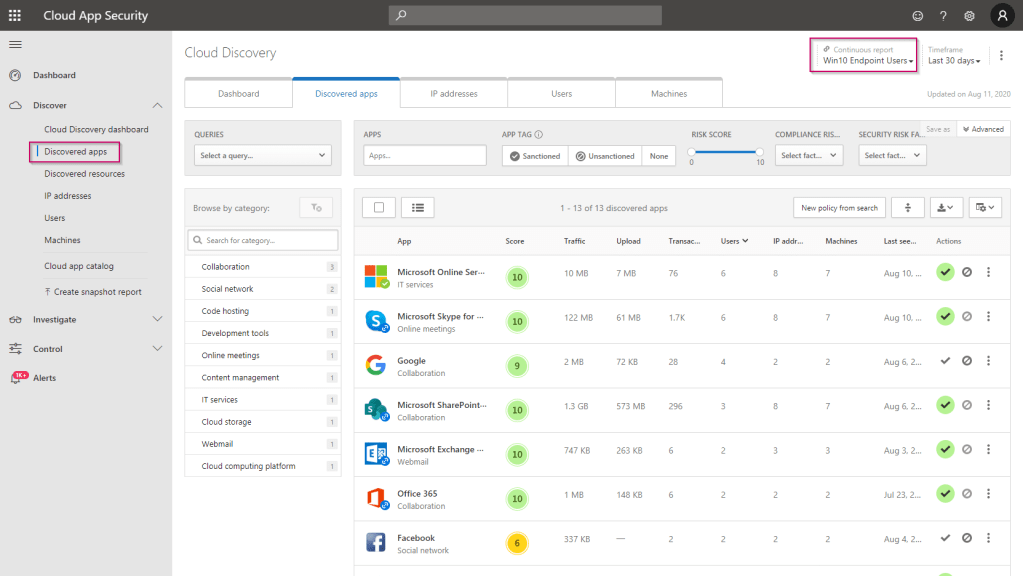
If you take a closer look you would be able to notice that there are also non Microsoft applications which my user is using and can be connected to Azure AD.

A good example would be GitHub, as you can see below this is an application which you can connect to the Azure AD.

Once you think your discovery is complete, note down the applications discovered via Cloud App Security next to the list of discovered applications via AD FS Application Activity.
Discover 3rd party applications via manual research
As a last step, if you think you’re missing applications in your list and inventory, you can always execute a manual inventory of applications used within your organization by approaching and asking your end users. Once this last step is done you have completed the application discovery process and have a good overview on what applications are used within your environment.
Now it’s time to look at our options and get them connected to the Azure AD. In part 2 of this blog I will provide you with two examples on how this can be done and how to get them to work with the Azure AD password-less experience. Followed with part 3 where I will describe how you can provision users within these applications from the Azure AD.
Again I hope you enjoyed reading my blog and stay tuned for part 2 & 3!
- Introduction to a password-less era
- Password-less 1 of 5: Going password-less with phone sign-in
- Password-less 2 of 5: Going password-less with Windows Hello for Business
- Password-less 3 of 5: Going password-less with Windows Hello for Business Hybrid
- Password-less 4 of 5: Going password-less with FIDO2 Security Keys Part 1
- Password-less 4 of 5: Going password-less with FIDO2 Security Keys Part 2
- Password-less 5 of 5: Expanding password-less to Azure AD Applications Part 1
- Password-less 5 of 5: Expanding password-less to Azure AD Applications Part 2
- Password-less 5 of 5: Expanding password-less to Azure AD Applications Part 3
- Password-less continued: Upgrading your password-less experience with Windows Hello for Business Hybrid cloud-trust.
- Password-less continued: Using the Passwordless Phone Sign-in experience for multiple accounts on iOS!
- Password-less continued: Using a Temporary Access Pass for Bootstrapping your Passwordless Journey
