IMPORTANT NOTE: This blog post is referring to the Windows Hello for Business Hybrid key-trust model. Since 16-02-2022 a new Windows Hello for Business Hybrid deployment model has been made available called cloud-trust. If you are using the latest Windows 10 / 11 builds (21H2) I would strongly recommend you to read this new blog to make use this new, simplified and improved Windows Hello for Business Hybrid cloud-trust model!
As described in my previous blog, we have implemented Windows Hello for Business for Azure AD Joined devices without making sure you can use those same credentials to authenticate against on-premises Active Directory and access on-premise resources.
This blog will focus on enabling Windows Hello for Business hybrid based on the key-trust model for both Hybrid Azure AD Joined devices as Azure AD joined devices. If you haven’t read my previous blog about enabling Windows Hello for Business I would strongly urge you to read it first to make sure you’ve completed all requirements.

NOTE: In case you’ve ignored my advice to read my previous blog first, please know we don’t implement the certificate-trust model. This is due to the fact that it requires your domains to be federated with the Azure AD and this breaks the password-less flow as described in this previous blog.
Requirements check-list:
- Certificate Authority based on Server 2012 or higher;
- Certificate Revocation List internally accessible;
- New KDC certificate deployed to Domain Controllers;
- Root & Intermediate certificates deployed to clients;
- Windows Server 2008 R2 domain and forest functional level;
- Windows Server 2016 domain controller, at least one on each site;
- Primary Domain Controller role hosted on a Server 2016 Domain Controller;
- Synchronized Identities via Azure AD Connect;
- Windows 10 Physical or Virtual Machine with TPM;
General required technical steps for WHfB Hybrid.
For both the Azure AD Joined and Hybrid Azure AD Joined devices there is some general steps we need to perform, these are listed down in this chapter and are a requirement to complete both of the scenario’s.
STEP 1: Make sure your Certificate Authority has a healthy CRL.
The first step is to make sure your Certificate Authority has a healthy CRL (Certificate Revocation List), even if we do use the key-trust model which doesn’t require certificates, your domain controllers does. This to make sure that your WHfB credentials (passport authentication) are accepted on the Domain Controllers and can be verified to issue Kerberos tickets.
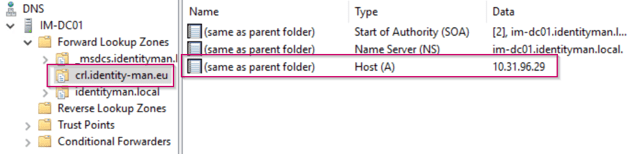
The first step is to pick a DNS name for the CRL if you don’t have one yet, I would recommend to keep things easy and to just use crl.companyname.com. For this create a DNS record pointing to the IIS webserver which will host the CRL files from both the Root and Intermediate CA, in my case I used crl.identity-man.eu. This record must at least be available on the internal DNS for all clients, but can also be made available to external clients (not required for WHfB Hybrid).
NOTE: Don’t be shocked if you don’t have an intermediate CA. It means your CA environment isn’t based on a best practice, especially not from a security perspective. It however still works perfectly with Windows Hello for Business Hybrid, you just have to ignore the intermediate steps within this blog :-).
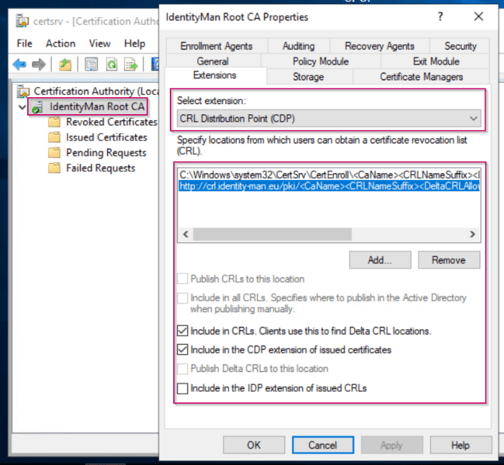
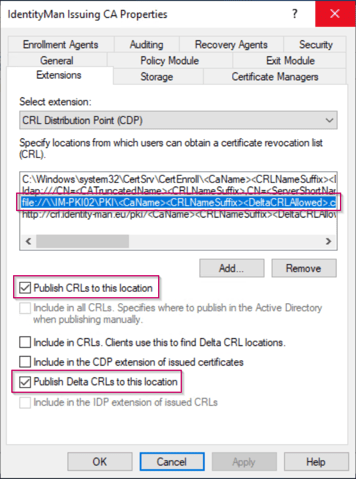
Once you’ve picked your DNS name for the CRL, open the Certificate Authority MMC and go to the properties of the Root CA, in there go to the Extension tab and make sure that there is a HTTP URL available pointing to the DNS name of the CRL (which in case you didn’t had one you just created it).
The CRL is in this example hosted on a IIS server, and again preferably this would be same server as your intermediate CA. Make sure that when publishing the CRL as URL the ‘Include in CRLs. Clients use this to find Delta CRL Locations’ and ‘Include in the CDP extension of issued certificates’ are both checked.
NOTE: Publishing this HTTP URL in the CRL extension will only put this data on the certificate, it won’t copy over the actual CRL file(s), for this I’ve created a script which copies all the data from ‘C:\Windows\System32\CertSrv\CertEnroll’ to the intermediate CA servers virtual directory which is hosted via IIS.
Now if you have changed the URL for the CRL the intermediate certificate must be re-issued again to get this new URL. In this blog I assume you’ve done this before, if not stop with whatever you’re doing right now because renewing an intermediate certificate can definitely have some implications on your production environment.
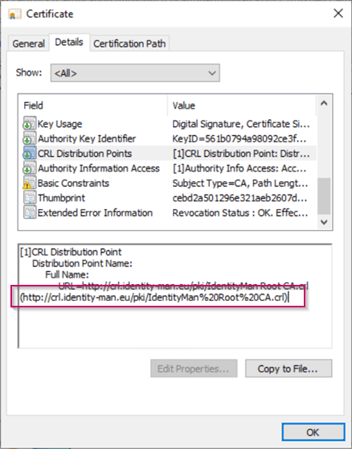
Once the intermediate certificate is renewed you can open the certificate and check the details for the ‘CRL Distribution Points’, in there you will find the URL you just have configured.
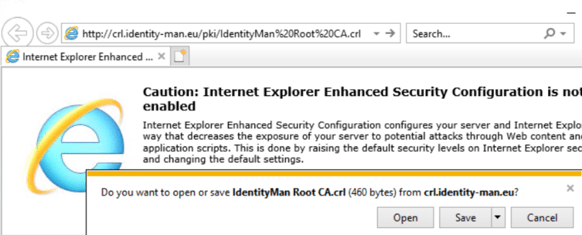
Now please copy and paste this URL into a browser, a successful download means everything is configured correctly for the Root CA, if you got an error you unfortunately have done something wrong, go through the steps again and verify if everything is configured correctly and make sure the CRL is available in the IIS Virtual Directory which is selected.
Now we have configured the Root CA, we need to walk through the same steps on the Intermediate CA. Again open the Certificate Authority MMC and open the Properties of the Intermediate CA and select the ‘Extensions’ tab. In here again make sure that the CRL is published to the CRL URL. Again make sure that when publishing the CRL as URL the ‘Include in CRLs. Clients use this to find Delta CRL Locations’ and ‘Include in the CDP extension of issued certificates’ are both checked.

Now if you have changed the URL for the CRL on the intermediate CA all the issued certificates from the intermediate CA need to be re-issued to get this new CRL. You can easily go to the issued certificates screen, check if certificates are renewed and if they contain the new or changed CRL (as shown below).

Now please copy and paste this URL into a browser, a successful download means everything is configured correctly for the Intermediate CA, if you got an error you unfortunately have done something wrong, go through the steps again and verify if everything is configured correctly.

NOTE: Same as for the Root CA Publishing this HTTP URL in the CRL extension on the Intermediate CA will only put this data on the certificate, it won’t copy over the actual CRL file(s). If you want this to be an automated process you need to configure an extra location within the Extension for the CRL on the Intermediate CA. Like the one shown below.
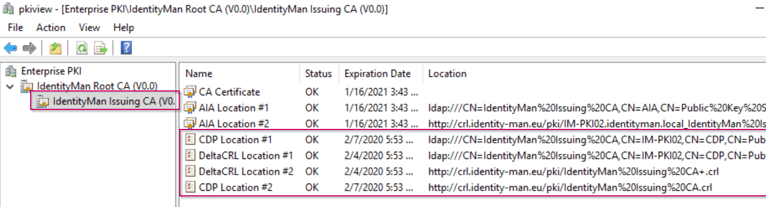
Now you’ve executed the above steps successful this means the whole CRL trust from the Root and Intermediate CA can be verified. You can easily verify this from the pkiview.msc MMC.
If you open the pkiview.msc MMC on the Intermediate CA server you are able to check the health of the whole CA environment. As you can see below the Root CA has a valid CRL (status ‘OK’).

If you open the Intermediate CA you will see again status ‘OK’. (For two CRL’s and two Delta CRL’s published via both HTTP and LDAP).
The CA is now ready to be used for WHfB Hybrid.
NOTE: Please make sure that all AD Joined clients get these new Root and Intermediate certificates, this can be achieved via a Group Policy.
STEP 2: Make sure AD Sites and Services and Server 2016 Domain Controller(s) are ready for WHfB Hybrid.
As the CA is now ready let’s make sure that the domain is also ready. As WHfB is based on passport-authentication at least server 2016 domain controllers are required for each Active Directory site within AD Sites and Services.
Let’s first verify what kind of domain controllers you do have in your environment per Site. You can easily do this via the OU ‘Domain Controllers’ (assuming all your domain controllers are in there of course 😉 ). In there you can easily see to which site each domain controller belongs an what version it is.
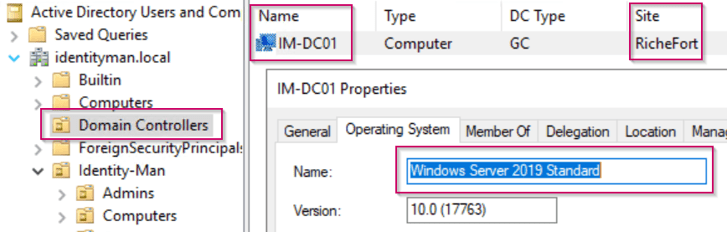
Now important to know is that each site needs at least one Server 2016 Domain Controller, and for the people who didn’t know… A site within AD Sites and Services without Domain Controllers belonging to the site does literally nothing. Now if you think: ‘Guilty’, no worries, you can just delete the site or make sure no subnets belong to that specific site to make it inactive.

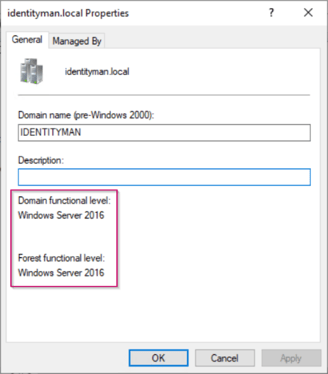
Now another thing to check within the Active Directory is the forest and domain functional level, please make sure that those are 2008 R2 or higher. If this isn’t the case it’s time for some maintenance as 2008 is already end-of-life :-).
STEP 3: Configure Azure AD Connect Service Account permissions.
Now this is all configured correctly and each site has an active Server 2016 Domain Controller there is only one step left to configure. This is making sure that the Azure AD Connect service account has the appropriate permissions to write-back the public key configure for Windows Hello for Business within the Azure AD back to the on-premises AD.
For this to happen the service account needs to be a member of the Key Admins group within Active Directory (or when using root and child domains the Enterprise Key Admins group).

If this group doesn’t exist, this is only for one single reason. The PDC (Primary Domain Controller) role of the domain isn’t hosted on a Server 2016 domain controller. (If you have multiple domains, this is something you have to repeat for each domain.
To make this group available ‘right click’ the domain for which you want to change the PDC role and first hit ‘Change Domain Controller…’ and select the 2016 domain controller which you want to use as PDC. Once done again ‘right click’ the domain and now select ‘Operations Masters…’.

Within the Operations Masters screen hit the second tab called PDC and hit ‘Change’, this will move the PDC role to the Server 2016 Domain Controller you just selected, the Key Admins (or Enterprise Key Admins group) is now available and ready for use.

We are now ready to start the Hybrid Azure AD Join experience.
Required technical steps for WHfB Hybrid on Hybrid Azure AD Joined devices.
Now imagine you have a big on-premises AD footprint and you also want benefit from the capabilities provided by Azure Active Directory like Windows Hello for Business, you can implement Hybrid Azure AD joined devices. These devices, are devices that are joined to your on-premises Active Directory and registered with your Azure Active Directory. AKA Hybrid Azure AD Joined devices.
STEP 1: Make the necessary changes within Azure AD Connect
To get your on-premises AD joined devices Hybrid Azure AD Joined, the first step we need to take is to update the Azure AD Connect configuration. To do this, go to the server where Azure AD Connect is running on and open the Azure Active Directory Connect wizard.
Once the wizard is open please click on ‘Configure Device Options’ and hit ‘Next’.

As you can see you can do two things beneath this option, the first one is the Hybrid Azure AD Join and the second one is device writeback. Please know that we only need Hybrid Azure AD Join, we do not need the device writeback option within a key-trust scenario. Now again please hit ‘Next’.
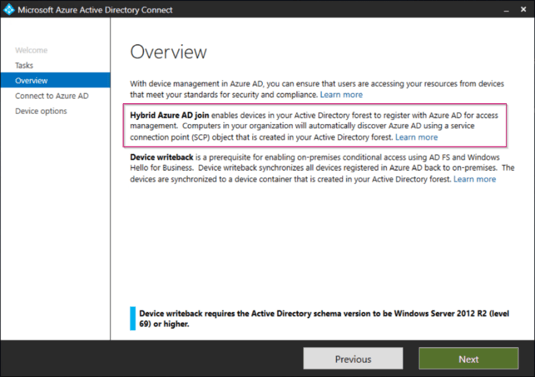
Select ‘Configure Hybrid Azure AD Join’ and select ‘Next’.

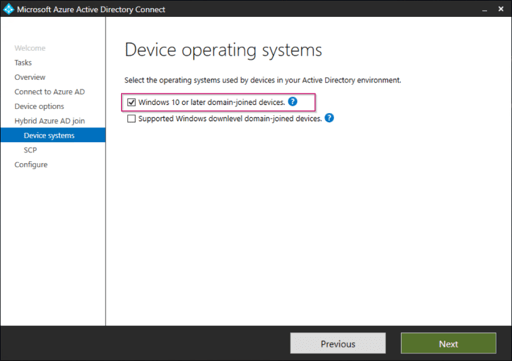
Select ‘Windows 10 or later domain-joined devices’ and select ‘Next’. (Reason why we only do Windows 10 is because WHfB is only available on Windows 10 :-)).
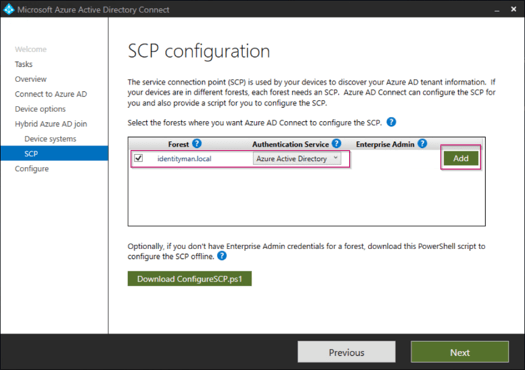
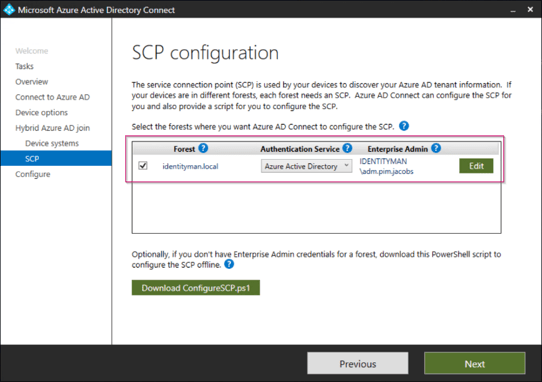
Now verify the forest of your domain joined clients is visible in the overview and hit ‘Add’.
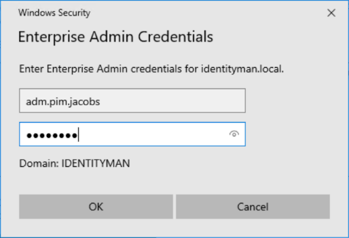
Once prompted enter the account details of an account which is a member of the ‘Enterprise Admins’ group within the Active Directory. Once done select ‘OK’.
Verify all settings are configured and hit ‘Next’.
Now the wizard is ready to configure the connectors, please hit ‘Configure’ and hit ‘Exit’ once the wizard has completed successfully.

As for Hybrid Azure AD Joined devices the source computer objects within Active Directory also need to be synced, please make sure that the OU containing these computers is synchronized (for big production environments I do recommend to start small for testing purposes and extend later on, just to be sure).

Another setting which is strongly advised to be turned on is ‘Password Hash Synchronization’ with ‘Enable Single sign-on’. This will bring a better end user experience to Hybrid Azure AD Joined devices.

STEP 2: Make the necessary changes within the Group Policies
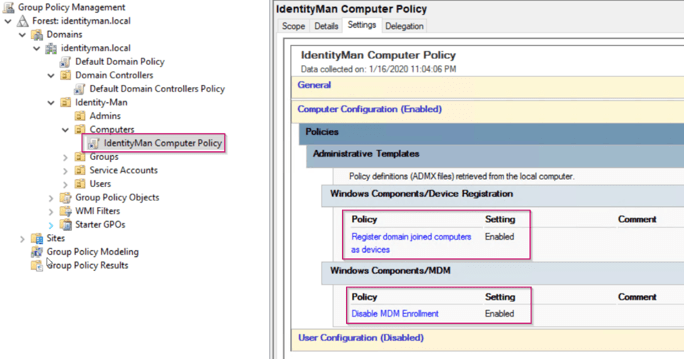
Especially for the Hybrid Azure AD Joined devices we have created a separate group policy for the following computer settings:
- Register domain joined computers as devices – Enabled.
(To make sure AD Joined devices are going to register in Azure AD). - Disable MDM Enrollment – Enabled.
(To make sure AD Joined devices won’t be managed with Intune).
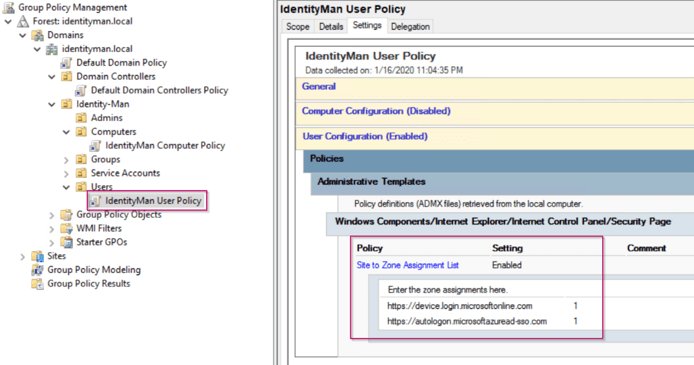
Now next to a computer policy another user policy is required to configure the intranet sites within the IE settings. Within this policy we specify that the following URL’s belong to the intranet zone to provide the user with a seamless logon experience to the Azure AD and to prevent certificate prompts:
- https://device.login.microsoftonline.com
(Required for Hybrid Azure AD Joined windows 10 devices). - https://autologon.microsoftazuread-sso.com
(Required with the enable single sign-on checkbox checked within Azure AD Connect).
STEP 3: Make sure that devices can be joined and monitor the process.
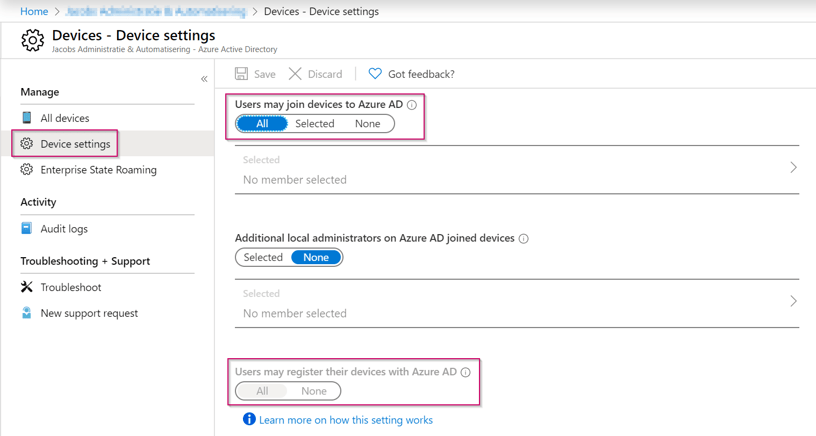
Now we are ready to join devices, if you’ve followed my previous blog post where we configured the Windows Hello for Business settings we also allowed Azure AD Joined devices. As we allowed Azure AD Joined devices we also allowed device registrations for all users (as you can see below within the ‘Azure Active Directory’ blade on the ‘Device Settings’ tab of the Azure AD Tenant.
Now when all things are configured correctly, with the next synchronization within Azure AD Connect, you will see in the export to the Azure AD (<yourtenantname>.onmicrosoft.com) that one device (which resides beneath the Computers OU which is checked for synchronization) is synchronized to the Azure AD.

If you now logon to this specific device with an account which is available within the Azure AD, the device will be registered and therefore Hybrid Azure AD Joined within your tenant (in some cases your machine needs a gpupdate /force).
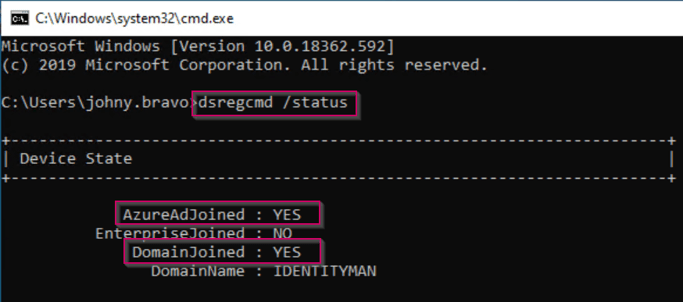
This can be verified within a command prompt by running the command ‘dsregcmd /status’. This will show that the device is Azure AD Joined and Domain Joined. Together this means Hybrid Azure AD Joined.
If you now go to the ‘Azure Active Directory’ blade and hit ‘Devices’, you will see beneath ‘All Devices’ that there is one (or more) Windows 10 devices with a join type ‘Hybrid Azure AD Join’. This means congratulations, you’ve successfully walked through the above steps :-). If this isn’t the case, you need to start troubleshooting because as long as the devices aren’t Hybrid Azure AD Joined, the Windows Hello for Business policy won’t be received. You can troubleshoot this via the “dsregcmd /status /debug” command in a command prompt, more details about troubleshooting this can be found here.

STEP 4: Enable Windows Hello for Business for Hybrid Azure AD Joined devices.
Now to make sure that Windows Hello for Business is enabled on these Hybrid Azure AD Joined machines, we go back to the user group policy we just created, and in here we enable the ‘Use Windows Hello for Business’ setting. (Please make sure that ‘Do Not start Windows Hello Provisioning after sign-in’ is disabled unless you want this to happen).
NOTE: This can also be done via Microsoft Endpoint Manager (aka Intune), so if you’re going to manage devices via Microsoft Endpoint Manager (which I assume you don’t in this part) you can ignore this step. This because Intune will automatically let computers retrieve this policy. If you aren’t using Microsoft Endpoint Manager yet as a management tool but you do have the licenses I would recommend you to start exploring your options as it’s a modern management tool compared to old fashioned group policies :-).

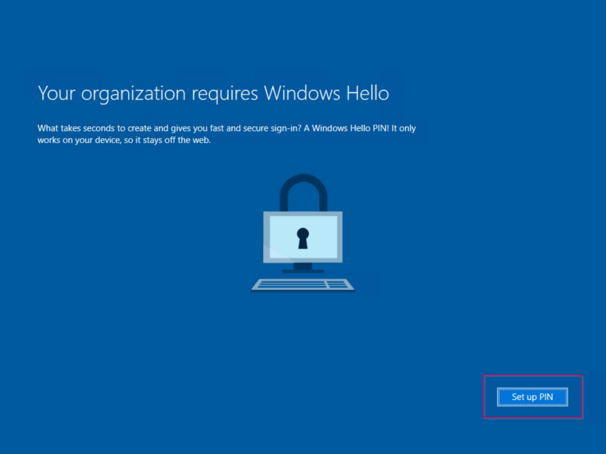
Now logon to the Hybrid Azure AD Joined machine, and if you have enabled this account for MFA the Windows Hello for Business policy will be received (which we have configured in the previous blog post). Make sure to het Set up PIN (as I’m working on a virtual machine).
Please configure your PIN, as also described in my previous blog you can see that the PIN policies from the Azure AD are honored.

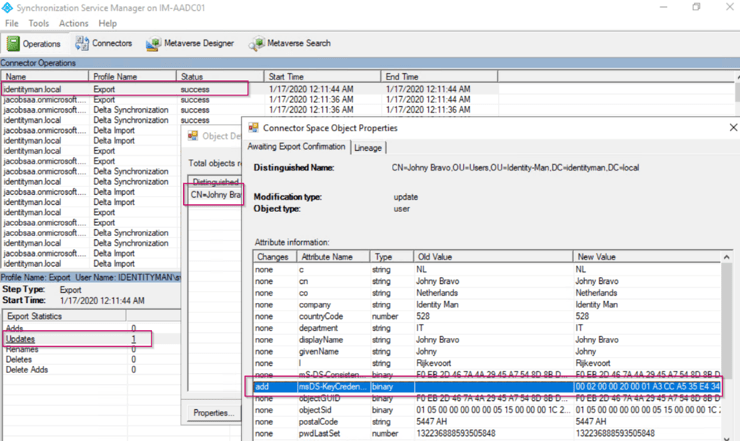
Now it takes 30 minutes to synchronize the public key from this Windows Hello for Business configuration back from the Azure Active Directory to the on-premises Active Directory. The attribute which is used in this case is the msDS-KeyCredentialLink (which is included in the schema if you have Server 2016 Domain Controllers, and you do otherwise this isn’t going to work).

NOTE: If you don’t see this value within the export back to the on-premises AD this means that Azure AD Connect doesn’t know there is a new schema applied in the meantime to the Active Directory. To make sure this is applied op the Azure AD Connect Wizard and hit the ‘Refresh Directory Schema’ option, once done you will see this value being synchronized.
STEP 5: Verify Windows Hello for Business Hybrid Works
If you now logon to the device with your PIN, Face or any other Windows Hello for Business authentication you can access your file shares seamlessly without any kind of prompt on Hybrid Azure AD Joined devices:-).

Required technical steps for WHfB Hybrid on Azure AD Joined devices.
In case you don’t like doing a Hybrid Azure AD Join and want to go Azure AD Joined straight away (which I would recommend you to do) there are some other steps you need to take. This as there is no relation between the on-premises AD and Azure AD besides the user account which you logon to your Azure AD Joined device.
STEP 1: Deploy a new Domain Controller Certificate Template to the Domain Controllers.
The first step which we need to take is to prepare the Domain Controllers with a certificate from our CA which supports Kerberos Authentication. This is due to the fact that everything you do with Windows Hello for Business on an Azure AD Joined device to your on-premises Active Directory requires Kerberos authentication.
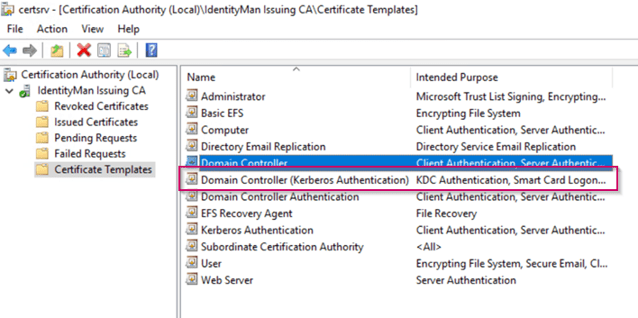
Therefore go to your Issuing CA, right click on ‘Certificate Templates’ and hit ‘Manage’. From the ‘Certificate Templates Console’ search for the ‘Kerberos Authentication’ certificate, right click on this certificate and hit ‘Duplicate Template’.

Now within the new template wizard based on the Kerberos Authentication certificate change the following:
- On the compatibility tab
- Change the Certificate Authority to the value hosting your certificate authority (minimal must be 2012). In my lab environment the whole CA is based on Server 2016, therefore 2016 is selected.
- Change the Certificate Recipient to the minimum version of Domain Controllers OS you have running. So if you’re environment is still running 2012 R2 domain controllers this should be 2012 R2. In my lab environment all domain controller are running 2016 or higher, therfore Windows 10 / Windows Server 2016 is selected.

- On the General tab definea Template display name, I’ve used ‘Domain Controller (Kerberos Authentication)’. Please note that you never use spaces in the template name as that could lead to weird issues.

- On the Cryptography tab make sure that the ‘Key Storage Provider’ and ‘RSA’ is selected. Next to the above the ‘key size’ should be set to 2048 and the ‘request hash’ setting should be set to SHA256.

- On the superseded Templates make sure to include all old domain controller templates:
- Domain Controller
- Domain Controller Authentication
- Kerberos Authentication
- Depending on what you did yourself you maybe need to add more.

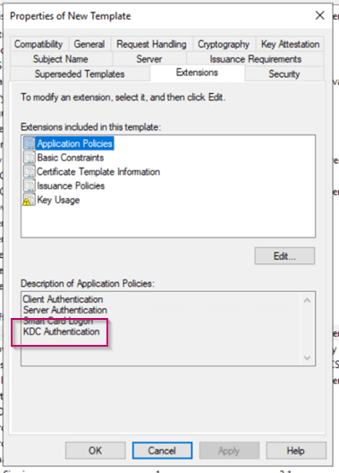
- Verify within the ‘Extension’ tab the ‘Application Policies’, this should list KDC Authentication, if not please go back to step 1 and verify what you did wrong (and double check you’re using server 2012 as an OS for your CA).
- Within the ‘Subject Name’ tab make sure that the ‘Subject name format’ is set to ‘None’ and that ‘DNS Name’ is selected as the only option.

Once done hit ‘Apply’ to create the certificate template.
As you can see within the overview the certificate template has been created, now it’s time to deploy the certificate to the domain controllers.

To do this ‘right click’ the ‘certificate templates’ option on your issuing CA and select ‘New’ and click on ‘Certificate Template to Issue’.

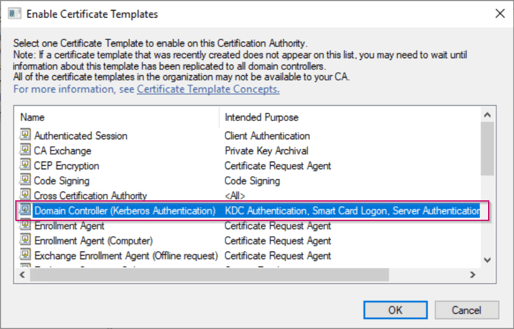
Select the new ‘Domain Controller (Kerberos Authentication)’ certificate and hit ‘OK’.
As you now can see the ‘Domain Controller (Kerberos Authentication)’ certificate is scheduled to be issued. This is still next to other Domain Controller certificates, which are set to be superseded by the ‘Domain Controller (Kerberos Authentication)’ certificate. So to clean up the MMC console I would recommend you to disable these certificate templates from being issued.
Now to make sure that your Domain Controllers get the updates automatically (which is super helpful because it will also renew certificates which are about to expiry). Go to the Group Policy Management Console and either create a new policy or edit the ‘Default Domain Controller Policy’. In the Group Policy make sure that the ‘Automatic Certificate management’ setting is set to ‘Enabled’ including the two options beneath this setting.

Now login to all your domain controllers and run a ‘gpupdate /force’ (or reboot the machines, but a gpupdate /force probably is faster 🙂 ).

Once done open the MMC Certificates snap-in and check the personal certificates beneath the computer account. In case you have done the above exactly as the described you should have the ‘Domain Controller (Kerberos Authentication)’ applied to the domain controllers, you can see this by looking at the ‘Certificate Template’ column within with the MMC.

The Certificate authority and your domain controllers are now configured correctly for Windows Hello for Business Hybrid for Azure AD Joined devices.
STEP 2: Deploy root and intermediate CA certificates to Azure AD Joined devices (Intune required).
Now we need to prepare our settings for Azure AD Joined devices… in this case I’m going to assume you manage devices via Intune, but if you don’t… Don’t worry this isn’t required, the only thing where we need Intune for in this case is to deploy the root and intermediate certificate to Azure AD Joined devices so it’s not a hard requirement but recommend by me though :-).
To make sure you can manage Azure AD Joined Devices logon to the Azure Portal and go to the ‘Azure Active Directory’ blade. Within the ‘Azure Active Directory’ blade select ‘Mobility (MDM and MAM)’. The screen below will open, in here either set the MDM user scope to a group or set it to ‘All’ like I did. This will make sure that when devices are joined to the Azure AD they are being managed with Intune. Please don’t change the URL’s configure over here and leave the MAM settings as is as that’s only required for Windows Information Protection.
NOTE: If set to a specific group this only counts for that group so that would be good for testing and piloting this feature or if you want to limit this to a specific group.

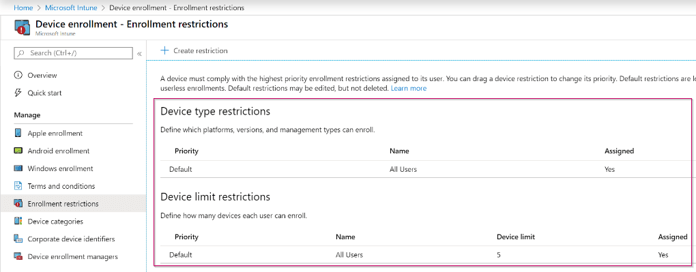
Now when you’ve done this it’s time to make a small bit of Intune Configuration. First let’s double check the Enrollment Restrictions, for this go to the Intune blade in the Azure Portal and from there select ‘Device Enrollment’. Within the Device Enrollment settings select ‘Enrollment Restrictions’.
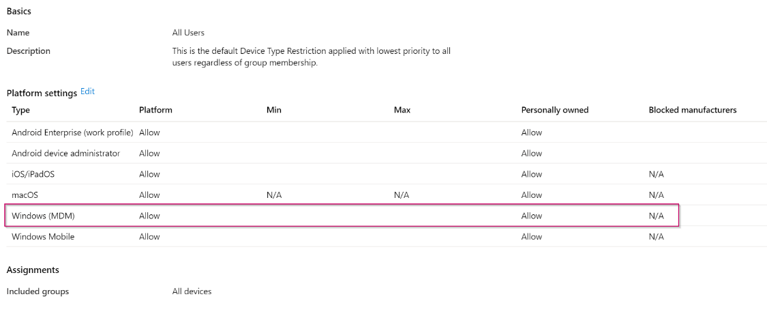
In here make sure that the ‘Default Device Type’ Restriction which is configured for all users at least has Windows (MDM) personally enabled, this will allow Windows 10 to managed for devices joined to the Azure AD which aren’t known within Windows Autopilot.
NOTE 1: Please also verify the Device Limit restriction and make sure that it’s set to an acceptable number.
NOTE 2: If you’ve configured separate settings within this pane for specific user groups also verify those as your users is maybe matching other settings that the default for ‘All Users’.
Now the enrollment restrictions are configured correctly, let’s go back to Microsoft Endpoint Manager and make sure to configure two ‘Device Configuration Profiles’ for the Root and Intermediate certificates.

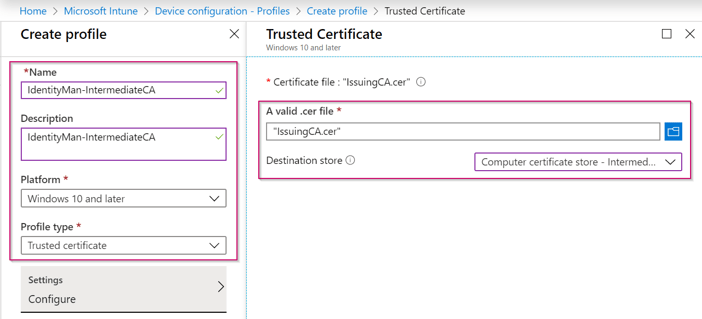
For this click on the ‘Create Profile’ button and give the Profile a ‘Name’. Select as the Platform ‘Windows 10 and later’ and as Profile Type ‘Trusted Certificate’. On the right side of the screen ‘browse to the root certificate and select the certificate’ and make sure that the destination store is set to ‘Computer certificate store – Root’. Once done hit ‘Create’. Now make sure the profile is assigned to a user group or to all users if you want to apply this for all users working on Windows 10 and later.
NOTE: After creating this policy the platform changes to Windows 8.1 and later, which is a bug within the Interface.

For the intermediate take exactly the same steps as above, but now select the intermediate (Issuing) certificate and make sure that the destination store is set to ‘Computer certificate store – Intermediate’. Once done again hit ‘Create’ and again make sure the profile is assigned to a user group or to all users like you did also for the root certificate.
Now you’re ready to Azure AD Join a device. In case you’ve followed my previous blog post you need to redo those steps again to make sure that the device is managed via Intune to get the Root and Intermediate certificates (as those devices weren’t managed via Intune).
STEP 3: Azure AD Join a device and enable Windows Hello for Business.
As describe above we are redoing an Azure AD Join by resetting the Windows 10 device to the factory defaults.
NOTE: if you want to Azure AD Join existing devices please read my previous blog post.
Now during the Out of Box Experience (OOBE) within Windows 10 we choose for the option ‘Set up for an organization’ and hit ‘Next’.

Now login with your business credentials, this automatically joins a device to the Azure AD.

After all the OOBE Screens you will be prompted for a WHfB enrollment (for which we have defined the settings in the previous blog post). Please hit ‘Set up PIN’ (as in this example this is a virtual machine with a TPM, this is my only option).

Now as the enrollment of Windows Hello for Business requires Multi-factor authentication (which we enabled in the first blog of this series), I’m prompted for verification with my Authenticator App.

NOTE: some people already asked me why this screen isn’t password-less. That’s due to the fact that password-less isn’t multi-factor authentication. Password-less is password-less authentication so there is a difference between them (but on the other hand the two also overlap).
On the next screen I’m asked for my PIN. When configuring Windows Hello for Business I always need to set a PIN besides my Fingerprint and Face recognition. Sometimes your fingerprint or face isn’t recognized in that situation the PIN functions as a fall back. As you can see the PIN requirements are matching the settings configured earlier within the tenant. Once you have typed in your PIN please hit ‘OK’.

Once the PIN is configured you can see everything is set correctly, please hit ‘OK’ to finish the Windows Hello for Business enrollment.
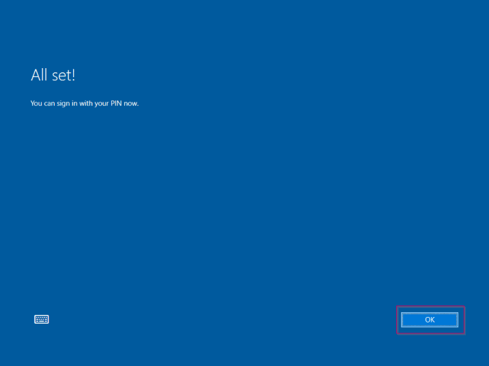
Now as you can see within the ‘Azure Active Directory’ my device is Hybrid Azure AD Joined and managed with Intune.

I can also find my device within Intune:

After a successful logon I can also see that my Root and Intermediate certificates are received on the Azure AD Joined device.
Root CA:

Intermediate CA:

Now the last step in this process is to wait for the public key of Windows Hello for Business for this particular end user & device to be written back to the Active Directory via Azure AD Connect. In normal circumstances this could take up to a maximum of 30 minutes. The attribute which is used in this case in the on-premises Active Directory to writeback this public key is the msDS-KeyCredentialLink (which is included in the schema if you have Server 2016 Domain Controllers, which you should have otherwise this isn’t going to work).
We are now ready to use Windows Hello for Business in a hybrid environment for Azure AD Joined devices!
STEP 4: Verify Windows Hello for Business Hybrid Works
If you now logon to the Azure AD Joined device with your PIN, Face or any other Windows Hello for Business authentication you can access your file shares seamlessly without any kind of prompt on Azure AD Joined devices :-). This way you can benefit from all the features cloud has to offer but fully work hybrid.

In this case you can also see that you’ve created a Kerberos ticket by executing the command ‘klist’ in a command prompt. In here you would see Kerberos tickets from the domain which you wouldn’t had if you had a misconfigured Windows Hello for Business environment on Azure AD Joined devices (or if your public key wasn’t yet written back to the Active Directory).

NOTE: Please note that connecting via RDP isn’t support or even working, this is still under investigation as described on this docs page of Microsoft.
Tips & Tricks:
As the environment which I’ve used is my blog is a greenfield environment it’s quite easy to describe and build a successful WHfB Hybrid environment. In practice I’ve seen several misconfigurations which resulted in a non-working Windows Hello for Business Hybrid environment. In some cases it even brought my some headaches so let me at least save you from them and explain the tips & tricks below to you 🙂 :
Verify if ‘old’ domain controller certificates are removed from the domain controllers:
In any normal circumstance superseding the old domain controller certificates with the new ‘Domain Controller (Kerberos Authentication)’ certificate should also remove old domain controller certificates on the domain controllers. In practice we aren’t always seeing this behavior (unfortunately). Therefore check if the old domain controllers certificates are removed and if not delete them via the MMC Certificates snap-in.

Verify Samaccountname value in Azure AD:
I hear you thinking, what is the samaccountname value still synchronized to the Azure AD? Yes it is, it however is called ‘Onpremissessamaccountname’ and can be explored via the Graph API. Please make sure that this value is the same as the samaccountname value in Active Directory.
To check this value in the Graph API run the following command:
https://graph.microsoft.com/v1.0/users/johny.bravo@identity-man.eu?$select=onPremisesSamAccountName
The output should be similar to the screen below:

And as you can see this value is the same as in the Active Directory:

And a ‘whoami’ on the Windows 10 box will tell me the same.

If this is different then you did something unsupported :-)… please check the synchronization rules in Azure AD Connect and make sure these are configured to the defaults… If you never have done something with the synchronization rules editor before, please ask some professional help because this defines everything which is synchronized to the Azure AD. One mistake can break your whole configuration and has immediate user impact.
Verify DNS Names on Domain Controller certificate:
Another thing which is important is to verify if the domain name with and without FQDN is available on the certificate including the name of the domain controller itself. If this isn’t the case there is something wrong with either the certificate template or the issued certificate. Please check both and deploy a new certificate to the domain controller(s) experiencing this issue.

Verify if the CRL isn’t expired or unreachable.
If the CRL is expired or not reachable all Azure AD Joined clients which are using Windows Hello for Business to logon to a file share as example, will have authentication issues. Please make sure the CRL is reachable and and not expired.
For the Root CA I advise to use a CRL lifetime of 6 months, for the intermediate a week including Delta CRL’s should be enough.
Verify if your subnet belongs to a site within AD Sites and Services where a Server 2016 Domain Controller is available.
It’s important to make sure your clients belongs to a specific site within Active Directory Sites and Services which has a Server 2016 Domain Controller available. You can do this by specifying a subnet within Active Directory sites and services.
First check the IP range which you’re using on your machine, in this case this is 10.31.96.0/24.

Please define this subnet within AD Sites and Services and make sure the subnet belongs to a site containing a Server 2016 Domain Controller.

NOTE: if you have more sites and not all sites have Server 2016 domain controllers this becomes extremely important. If you just have one site the above isn’t required.
Verify if the correct root and intermediate certificates are available on the end user machine
If you have changed your CA configuration you need to update your clients as well with this new root and intermediate certificate. Please remember you need to do this in Active Directory for Hybrid Azure AD Joined machines and within Intune for Azure AD Joined machines.
In the next two blogs I will continue explaining how to implement the password-less options from a technical and user point of view. When they are available the links below will become active:
- Introduction to a password-less era
- Password-less 1 of 5: Going password-less with phone sign-in
- Password-less 2 of 5: Going password-less with Windows Hello for Business
- Password-less 3 of 5: Going password-less with Windows Hello for Business Hybrid
- Password-less 4 of 5: Going password-less with FIDO2 Security Keys Part 1
- Password-less 4 of 5: Going password-less with FIDO2 Security Keys Part 2
- Password-less 5 of 5: Expanding password-less to Azure AD Applications Part 1
- Password-less 5 of 5: Expanding password-less to Azure AD Applications Part 2
- Password-less 5 of 5: Expanding password-less to Azure AD Applications Part 3
- Password-less continued: Upgrading your password-less experience with Windows Hello for Business Hybrid cloud-trust.
- Password-less continued: Using the Passwordless Phone Sign-in experience for multiple accounts on iOS!
- Password-less continued: Using a Temporary Access Pass for Bootstrapping your Passwordless Journey

Identity man strikes again 💪🏻
LikeLiked by 1 person
Hi , Superb article. The latest versions of AD connect , Create a cloud identity service account which therefore prevents me from adding the cloud service account into the key admins group.
LikeLike
Hi Sean,
This could be related to the inheritance being turned off on the service account which is created within the Azure AD Connect Wizard. Inheritance should be turned off on this account as that’s a best practice (see Restrict Permissions on the AD DS Connector Account on this docs page: https://docs.microsoft.com/en-us/azure/active-directory/hybrid/how-to-connect-configure-ad-ds-connector-account).
If inheritance is turned off on the account and the access permissions aren’t correct this would probably cause this issue. This as I’ve just reinstalled Azure AD Connect with this option and I’m allowed to make the account a member of the Key Admins group.
Hope this helps you out.
LikeLike
Hi Pim,
Thank you for this well written article. 😉
As you correctly pointed out the key trust model is not supported for RDP authentication. But every time you are trying to connect to a PC/server via RDP Windows, by default, use Windows Hello authentication asking for PIN/Fingerpring/Face Unlock. Do you know a workaround for bringing back the old user and password request?
LikeLike
Hi Andrea,
Unfortunately I don’t have a solution for that, the prompt is based on the credentials you use to unlock or login to your device, so if you would login with username and password instead you will see a different prompt. I know that’s not the answer you would want to hear….
I.E. if you would disable the username and password credential provider via the registery key on your Windows 10 devices, it won’t show up the option to logon with a username and password via an RDP session. Basically this means that the credentials you can use via RDP are based on the Windows 10 device you are using and therefore doesn’t have anything to do with the endpoint which you’re connecting too.
Let’s keep our fingers crossed and hope that Microsoft will change this in the future so we can provide our end users with a better passwordless experience for RDS or WVD connections which are using RDP :-).
LikeLike
Because of your very post, I could understand the requirements in this article correctly https://docs.microsoft.com/en-us/windows/security/identity-protection/hello-for-business/hello-identity-verification
Nice post
LikeLike
Thanks!
LikeLike
Very nice write-up. I certainly appreciate this website. Stick with it!
LikeLike
bookmarked!!, I really like your web site!
LikeLike
I don’t get it.
The screen above says “No certificate deployed to devices” and almost at the bottom you state: “After a successful logon I can also see that my Root and Intermediate certificates are received on the Azure AD Joined device.”
Also a question: is the “public key of Windows Hello for Business” generated on the device where the users logs on to? The AADJ device?
Very nice write-up BTW. I will use this!
LikeLike
Hi Tri,
Correct no end user / device certificates are deployed (that’s what you get with certificate trust). Therefore we only deploy the root and intermediate certificates. The public key on the other hand is generated on the AADJ device and written back to the Azure AD, the public key never leaves the device and with key trust is stored within the TPM.
I hope this helps and answers your questions.
Pim
LikeLike
Our AAD Connect service account is running as a local AAD_ user instead a ad account. How would I add that to the Key Admins group?
LikeLike
You probably are using an MSOL AD account, you can verify which account you are using, and therefore which account you need to make a member of the key admins group l, in the AAD Connect service. This can be checked here by opening the connectors screen, open the properties of the connector presenting your local AD and going to the tab ‘connect to active directory forest’. The user used in there shoudl be made a member of the key admins group. Hope that helps 🙂
LikeLike
You are right thanks, After i opened AAD Connect and went to the “View Current Configuration” I saw that under “Synchronized Directories” the AD account which matched MSOL which of course was in my local AD. Thanks again and happy 4th.
LikeLike
This is the best write-up I’ve seen so far. The MS docs really leave a lot to be desired and I wish I would have found this before I struggle-bussed my initial rollout. Two questions whose answers you may know and would be greatly appreciated:
1) Is there any risk or problem introduced by superceeding the DC kerberos certificate after user rollout/enrollment? We have a 2016 PKI, but by default the kerberos cert does not have the settings you listed. Still works fine for hybrid joined devices, but not for AD joined. I’d like to correct this now but want to ensure I won’t break anything by issue a new kerberos auth cert now.
2) We have a one way trust with an external domain. *Sometimes*, and I can find no rhyme or reason to when/why, the user gets a PIN pop-up when visiting web apps in this trusting domain, and it won’t take his PIN. Sometimes simply waiting 5 minutes and trying again works, sometimes the user has to log off and back on with password. Either way, when it doesn’t work, the following is recorded in the PC’s event log — “The Distinguished Name in the subject field of your smart card logon certificate does not contain enough information to identify the appropriate domain on an non-domain joined computer”. Any clue on how to resolve this? I can find zero information in regards to using Windows Hello across forest trusts.
Thanks again!
LikeLike
Hi Jason,
Thanks for reply, really appreciated! To respond to your questions:
1. No it will only add new methods to the current domain controller certificate so you’re safe to do this.
2. Windows Hello definitely works across forests, I’ve done the setup with a few customers and you don’t need to alter configuration in these forests to get it working. Did you verify if the CRL is configured correctly based on a http url and made sure AD Sites and Services is configured correctly as well? If the sign-in is coming from an IP not listed in sites and services it will just pick a server (if that’s not a 2016 server the pop-up is shown), by making sure the IP is listed within the correct site (which supports WHfB hybrid) you will make sure the authentication is directed to the right servers.
Hope this helps you out and let me know if you have other questions 🙂
LikeLike
I am just researching this for a deployment, is there a way to only enable this for a pilot group?
LikeLike
Yes for HAADJ devices you can use GPO’s who are only targeted to specific devices. For AADJ devices you can use an Identity Protection configuration policy from Endpoint Manager or an account protection policy within the Endpoint Security setting from Endpoint Manager. Both can be targeted to user groups.
Hope that helps you out?
LikeLiked by 1 person
We have had configured key trust for quite a long time and it worked in our WS2016 and W10 environment pretty well. Since we’ve started with W11, it just doesn’t work and I’m trying to figure out where this comes from. Have you had the chance to try the password less approach with WH4B and W11? Strange thing: cmd > klist is empty with W11 where W10 has the kerberos ticket available.
Cheers
LikeLike
I’ve did some testing with Windows 11, and yes it does definitely work with key-trust. Not sure if your problem still does exist but which version are you using of Windows 11?
LikeLike
It’s in reality a nice and helpful piece of info. I’m happy that you simply shared this helpful info with us.
Please stay us informed like this. Thanks for
sharing.
LikeLike
Hi thanks for your detailed explanation.
I wonder if you have ever done a ‘migration’ from Certificate Trust to Key Trust ?
Can’t find any documentation about this.
LikeLike
Hi Martijn,
Good question, unfortunately I haven’t. The only thing I do know is that you need to re-enroll Windows Hello for Business on your devices, this as the private key with certificate trust resides within the certificates and not within the TPM (which is the case with key-trust).
In your case I would test out the following steps within a lab:
1. Prepare all components for Key-trust.
2. Make sure the WHfB configuration isn’t applied on tenant level but on separate policies (which should already be the case with cert-trust).
3. Switch the user from policies (exclude from cert-trust policy in endpoint manager and include in key-trust policy in endpoint manager).
4. Run the following command for the user: certutil.exe -DeleteHelloContainer
5. logoff and logon and go to the sign-in options and re-enroll the user for WHfB, as the policy has landed that should now go via Key-Trust.
I know this is far from ideal but I hope the above guides you into the right direction!
Regards,
Pim
LikeLike