Welcome to another blog in the going passwordless series! In the past I’ve written a lot of blogs on how you can go passwordless and enable all these passwordless features within your environment. This however is resulting in only enabling these passwordless features within your environment but not requiring your end users to use one of these passwordless methods. Luckily with the authentication strengths feature now being generally available and a brand-new feature within the insider build of Windows 11, you can now require your users to use a passwordless method within your environment.
Having said that, let’s start with having a look at the authentication strengths feature first. An Authentication Strength in Entra ID is simply a combination of different authentication methods (e.g. Windows Hello for Business and FIDO2) which can be used within Conditional Access to provide access to resources. This will make sure the user needs to use one of these authentication methods configured within the authentication strength to access the desired resource. If the user does not have one of the authentication methods configured within his account, the user is denied access to the resource.

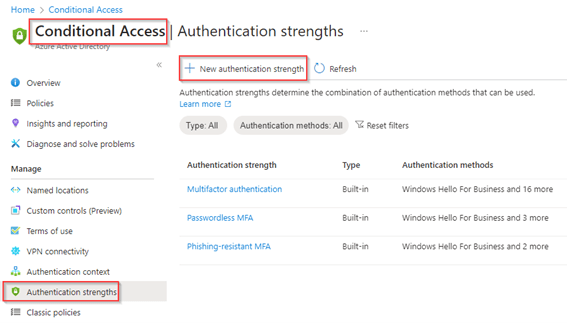
By default, Microsoft has determined three built-in authentication strengths, these are:
- Multifactor Authentication – FIDO2 Security Keys, Windows Hello for Business, Certificate-based authentication (Multi-Factor), Microsoft Authenticator (Phone Sign-in), Temporary Access Pass (One-time use AND Multi-use), Password + something you have, Federated single-factor + something you have & Federated Multi-Factor.
- Passwordless MFA – FIDO2 Security Keys, Windows Hello for Business, Certificate-based authentication (Multi-Factor) & Microsoft Authenticator (Phone Sign-in).
- Phishing-resistant MFA – FIDO2 Security Keys, Windows Hello for Business & Certificate-based authentication (Multi-Factor).
NOTE: ‘Something you have’ as mentioned above, refers to one of the following methods: SMS, voice, push notification, software OATH token and Hardware OATH token.
If one of the above methods doesn’t fit your scenario, don’t be worried, you can create up to 15 additional authentication strengths which you can fully customize to your own needs. This is great for our passwordless story, this as the built-in ‘Passwordless MFA’ authentication strength doesn’t include Temporary Access Pass options, which makes it quite hard to onboard users.
Now before we dive in and start the configuration, there are a few important things to keep in mind:
- Custom authentication strengths can be edited which does affect the connected conditional access policy, so be careful.
- Custom authentication strengths can only be deleted if they aren’t referenced in any conditional access policy.
- Conditional access policies are evaluated after the initial authentication (username + password or passwordless sign-in), so if the user is required to use Windows Hello for business but used phone sign-in, the user is re-prompted to use Windows Hello for Business as authentication method (if available).
- If a user signs-in and need to comply an authentication strength for which the user doesn’t have one of the authentication methods configured within the authentication strength, the user is denied access.
- Require multifactor authentication and require authentication strengths cannot be used together in the same policy. You can however use require multifactor authentication in policy 1 and require authentication strength in policy 2.
- Email OTP authentication is not included as an authentication strength (this can only be used for guests).
- When you want to apply an authentication strength to guest user accounts not all methods are supported from the resource tenant, meaning if you want to use the methods which are not available you need to work with cross tenant access and trust the Multifactor Authentication claim from the home tenant. More information about this can be found here on the learn pages.
Now you’re up to speed with Entra ID Authentication Strengths, let’s make use of that so only passwordless methods are allowed within your environment for end users. We can do that in four simple steps:
- Step 1 – Validate the usage of passwordless authentication methods;
- Step 2 – Create the custom passwordless authentication strength;
- Step 3 – Create the Passwordless Conditional Access policy;
- Step 4 – Different end user experiences and troubleshooting;
Now let’s dive in and start with Step 1 to know for sure your user base is ready and enabled and adopted passwordless methods.
Step 1 – Validate the usage of passwordless authentication methods
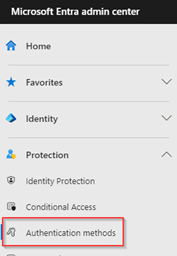
Before we are going to create any kind of configuration related to Authentication Strengths, let’s first check which users have passwordless capable methods registered beneath their account. For that let’s go to the Entra admin portal, go to ‘Protection’ and hit ‘Authentication Methods’.
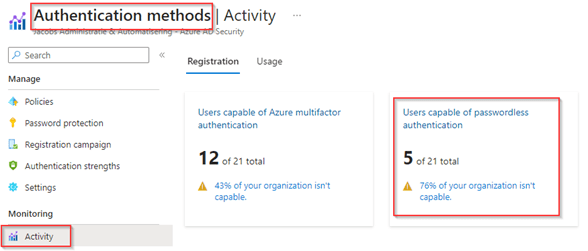
On the ‘Authentication methods’ blade you can go to ‘Activity’ and check the percentage of users in your organization who are capable of using passwordless authentication. In my case we see that 5 users (24)% of my organization is passwordless capable. This could indicate some adoption is required to our end users to make use of passwordless methods.
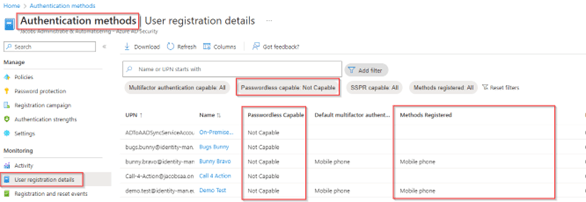
To know which users are passwordless capable go to the blade ‘User registration details’ on the left and make sure you’ve filtered ‘Passwordless capable’ to ‘Capable’ only. The list with accounts shown does support one or more passwordless methods. If you want to have this list in Excel you could download a .csv file. Important is to review the methods registered and see if users have more than one passwordless method registered e.g. Windows Hello and Phone Sign-in (for bootstrap or fallback purposes).

Now let’s have a look at the accounts which aren’t passwordless capable by switching the ‘Passwordless capable’ filter to ‘Not capable’ and check if this list contains accounts who you want to target for a passwordless requirement via an authentication strength.
Once you think your user base is ready and have adopted passwordless capabilities, let’s continue by creating the authentication strength.
Step 2 – Create the custom passwordless authentication strength
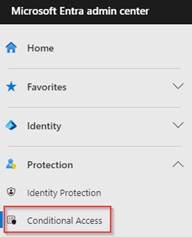
To create the custom passwordless authentication strength, go to the Entra admin portal, hit ‘Protection’ and select ‘Conditional Access’.
Within Conditional Access go to ‘Authentication Strengths’ and hit ‘+ New authentication strength’, we do this as the current Passwordless MFA method doesn’t contain the Temporary Access Pass methods, which we do need for bootstrapping devices and Passwordless methods (e.g. for joiners or re-bootstrapping passwordless methods).
Give the ‘New authentication strength’ a name and description and make sure that ‘Windows Hello for Business’, ‘FIDO2 Security key’, ‘Microsoft Authenticator (Phone Sign-in)’, ‘Temporary Access Pass (One-time use)’ and ‘Temporary Access Pass (Multi-use)’ are selected. Eventually you can even configure the ‘FIDO2 Security Key’ option within the authentication strength by hitting ‘Advanced Options’.
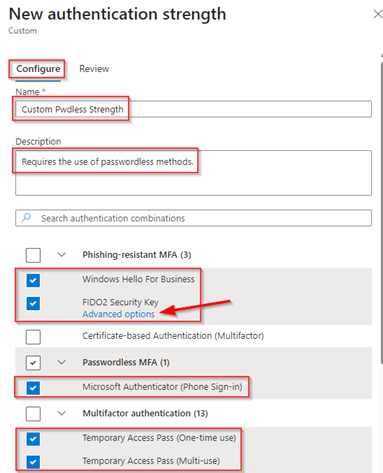
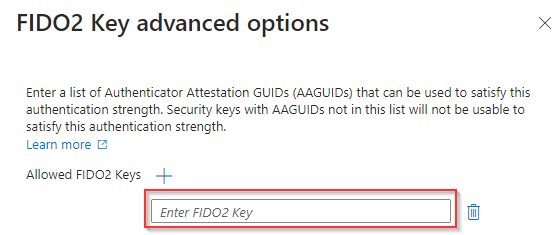
In the ‘Advanced options’ of FIDO2 Security key you can provide the AAGUIDs of the FIDO2 Security Keys which are allowed to be used by your end users when hitting this ‘Authentication Strength’ via Conditional Access. The AAGUIDs can be retrieved in various ways, for that I’ve written a blog earlier which you can find here.
In my example I’ve allowed any FIDO2 Security key to be used (so I didn’t configure any AAGUIDs here).
Once your configuration is in place, go to the ‘Review’ screen, here you can validate if you’ve selected all the methods which we have just added. Again, this is just an example, so you can fine-tune your ‘Custom Pwdless Strength’ according to your needs. Once ready hit ‘Create’.

We can now see the ‘Custom Pwdless Strength’ has been created and compared to built-in policies, we can easily ‘Edit’ and ‘Delete’ the authentication strength (something we can’t do with built-in authentication strengths).
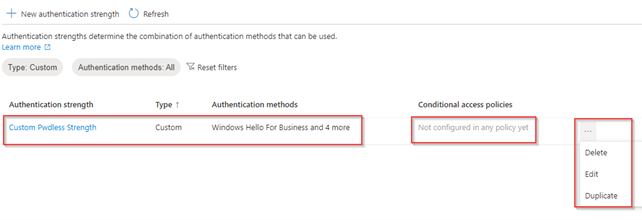
Now we have created the ‘Authentication Strength’ we can also see it’s not used by a Conditional Access Policy yet (as shown above). So, our next step is to create the ‘Conditional Access Policy’ and use the ‘Custom Pwdless Strength’ which we just created.
Step 3 – Create the Passwordless Conditional Access policy
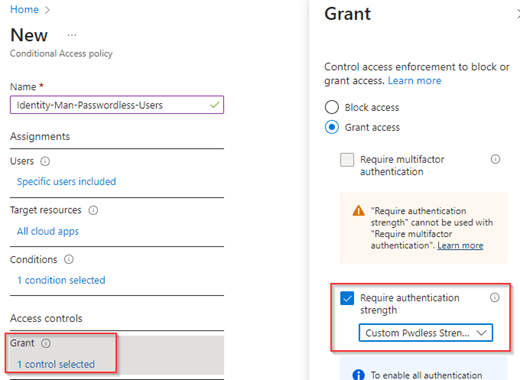
To create the Conditional Access Policy, in the Entra admin portal, go to ‘Protection’, hit ‘Conditional Access’, select ‘Policies’ and hit ‘+New Policy’.

Give the policy a name, e.g. ‘Identity-Man-Passwordless-Users’, make sure to include the users who were passwordless capable, select all cloud apps and select ‘Any location’ as the condition (no exceptions required, ‘zero-trust’ -eq ‘Always verify’).

Next, within the ‘Access Controls’ hit ‘Grant’ and hit the checkbox at ‘Require authentication strength’, as you can see the ‘Custom Pwdless Strength’ is available in the dropdown which we just created. You can see as well that the ‘Require multifactor authentication’ grant option is greyed out automatically for you now.
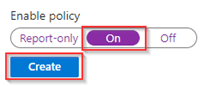
Now verify if the policy is configured correctly (please don’t include your ‘break the glass’ account, if so, make sure it’s excluded. This is the ‘break the glass account’ should not be impacted by an ‘Authentication strength’ or ‘Require multi factor authentication’ grant control as it could be used in case of emergencies, e.g. a Multifactor Authentication outage). Once ready make sure the ‘Enable policy’ setting is set to ‘On’ and hit ‘Create’.
Now we reviewed the users which are passwordless capable, we configured the authentication strength and the conditional access policy. Let’s have a look at the different user experiences and troubleshooting steps you can take.
Step 4 – Different end user experiences and troubleshooting
For the different end user experiences and troubleshooting with the ‘Custom Pwdless Strength’ let’s have a look at two different example scenarios.
Example 1: Sign in with passwordless methods registered
In example 1 we sign-in with our johny.bravo@identity-man.eu account with passwordless methods configured. Once we’ve typed in our user ID we can see that besides password there are ‘Other ways to sign-in’.
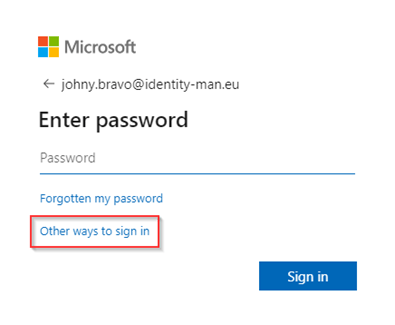
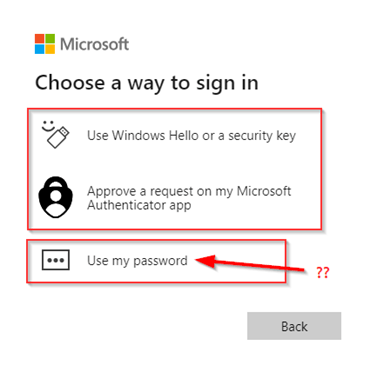
Once you hit ‘Other ways to sign in’ other sign-in options are shown, which are ‘Windows Hello or a security key’, ‘Approve a request on the Microsoft Authenticator app’ and ‘Use my password’. Wait… what? I haven’t selected ‘Password‘ as a method within the ‘Custom Pwdless Strength’? Correct, as explained at the start of this blog, at this time Entra ID wasn’t able to check which ‘Authentication Strength’ my user needs to match. So, let’s see what happens when I ‘Use my password’.
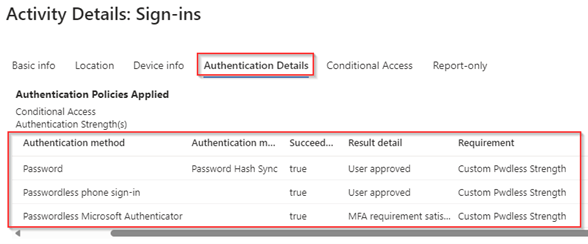
Once the correct password is entered, I’m getting prompted within the Authenticator App and if approved I’m signed in, should that really happen?

Well, the answer is yes, this as the Authenticator App is enabled for Phone sign-in and with the above prompt you simply signed in with Phone sign-in. This can also be seen in within the sign-in logs under the ‘Authentication Details’. As you can see, I’ve typed in my password and afterwards used passwordless phone sign-in to get into my account. With that I’m matching the ‘Custom pwdless strength’ requirement as you can see as well.
If we would have signed in with a method which isn’t selected within the ‘Custom Pwdless Strength’ we would be able to see that the sign-in is interrupted and I’m pro-actively getting prompted with another method being available beneath my account which is matching the ‘Custom Pwdless Strength’. In the sign-in logs you can see this ‘interrupted’ behaviour as well and we can see that the Conditional Access policy ‘Identity-Man-Passwordless-Users’ is causing this and set the status to ‘Failure’ (which is correct). After this ‘interrupted’ behaviour I’m automatically prompted with one of the methods within my account which do match the ‘Custom Pwdless Strength’ and once successful I’m signed in.
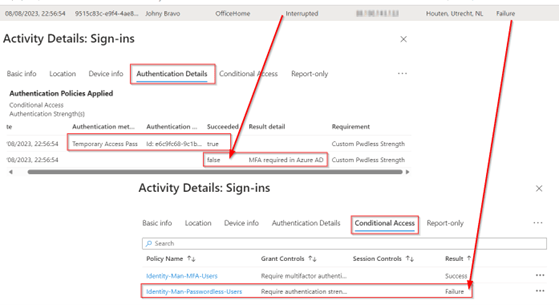
NOTE: To produce this example I’ve removed the ‘Temporary Access Pass (one-time use)’ from my ‘Custom Pwdless Strength’.
Example 2: Sign in without passwordless methods registered
Now let’s have a look at what happens when we sign in but don’t have any method available which would match the ‘Custom Pwdless Strength’ we configured. After a sign-in with for example a username and password and regular number matching we get the message ‘More information required’ and only can hit ‘Next’.
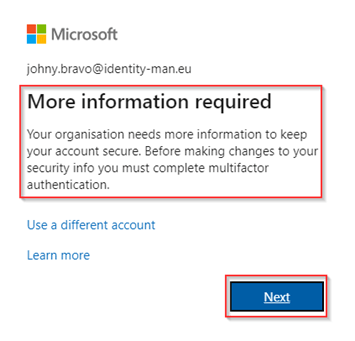
Once you’ve hit ‘Next’ you get the message to contact your admin to get a Temporary Access Pass and make sure to bootstrap your account with Passwordless methods.

This is a big improvement compared to when this feature went public preview. At that time the user went into a loop of sign-ins and wasn’t presented with the above message, so the user was unsure why the sign-in loop was happening. Luckily that’s not the case anymore!
Now we have configured your users to require passwordless methods and check the behaviour, let’s wrap up to a conclusion!
Conclusion
Now we’ve walked through the list of users who are Capable of Passwordless, we created the ‘Custom Pwdless Strength’ underneath Authentication Strengths in Entra ID, configured the Conditional Access Policy to use the Authentication Strength as a requirement and looked at the user behavior with this policy applied. You should be fully ready to implement the authentication strengths feature for requiring passwordless methods in your own environment.
It’s time to ban passwords from your environment and with this awesome feature we are finally able to require this with our end users. Having said that there are a few important things left to know:
- When you are going to onboard users passwordless via a Temporary Access Pass generated with e.g. Lifecycle Workflows as mentioned on my blog here. It’s important that your workplace deployment is configured correctly without unexpected reboots during the OOBE process. Once a reboot happens during the OOBE process users must type in their password as they didn’t reach the Windows Hello for Business enrollment yet. The next blog will show you how to work around this matter, however it’s better to solve the actual root cause of the problem.
- Authentication Strengths are not applied during the Windows Sign-in of Windows 10/11. So, users are unfortunately still able to use their password with a sign-in from the logon screen. The next blog will show how we can get this fixed for our end users.
- And at last, always start with a pilot group when implementing Entra ID Authentication Strengths in your environment. You don’t want to lock yourself out!
I again hope you enjoined reading this blog and are now ready to continue your passwordless journey with the use of an Authentication Strengths. In the next blog we will focus on a new exiting feature (which is available in the latest Windows Insider Builds) to hide the password option from the logon screen, so stay tuned! :-).
Other related password-less blogs:
- Introduction to a password-less era
- Password-less 1 of 5: Going password-less with phone sign-in
- Password-less 2 of 5: Going password-less with Windows Hello for Business
- Password-less 3 of 5: Going password-less with Windows Hello for Business Hybrid
- Password-less 4 of 5: Going password-less with FIDO2 Security Keys Part 1
- Password-less 4 of 5: Going password-less with FIDO2 Security Keys Part 2
- Password-less 5 of 5: Expanding password-less to Azure AD Applications Part 1
- Password-less 5 of 5: Expanding password-less to Azure AD Applications Part 2
- Password-less 5 of 5: Expanding password-less to Azure AD Applications Part 3
- Password-less continued: Upgrading your password-less experience with Windows Hello for Business Hybrid cloud-trust
- Password-less continued: Using the Passwordless Phone Sign-in experience for multiple accounts on iOS!
- Password-less continued: Using a Temporary Access Pass for Bootstrapping your Passwordless Journey
- Password-less continued: Using Authentication Strengths to require Passwordless methods in your environment
- Password-less continued: Start hiding the password option from the login screen in Windows 11
