A warm welcome to my next blog in the Identity Governance series (which is the last one of the year 2023), and the first one about recertifying access by using Entra Access Reviews. In this first out of two blogs we will look at ‘How to setup an Access Review successfully in your organization’, in the second blog we will use the API of Access Reviews and learn ‘How to enable Access Reviews on scale’ within Microsoft Entra.
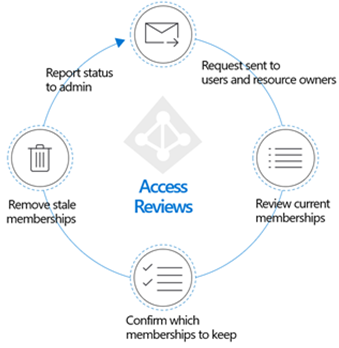
But first, let’s start why recertifying access is important which has everything to do with securing access to your resources or applications. If we look at the Zero-trust model recertifying your access falls beneath the ‘least privilege’ option. This as we verify if the user still needs the access to a particular resource or application, he or she has been provided access to in the past. With that you can think about users who have been (temporarily) participating in a project but their participation in the project has ended. Or users who have switched roles within the organization and with that should be denied from accessing information they had access to in their previous job role.
Knowing this, Microsoft Entra Access reviews are a critical part of your zero-trust journey and in some cases crucial to be configured. When configuring an Access Review, let’s first look at the resources we can protect with Entra Access Reviews today, these are:
- Applications – Applications integrated with Microsoft Entra ID for single sign-on (and provisioning), such as SaaS and line of business applications.
- Groups – Group membership synchronized to Microsoft Entra ID, or created in Microsoft Entra ID or Microsoft 365, including Microsoft Teams.
- Access Packages – Access package that groups resources such as groups, apps, and sites into a single package to manage access.
- Directory Roles – Microsoft Entra roles as defined in Privileged Identity Management.
- Azure Roles – Microsoft Azure resource roles as defined in Privileged Identity Management.
Now you know the resources you can protect today with an Entra Access Review, let’s look at the limitations which we have today as well:
- Access Reviews are resource centric, so the access being reviewed is the access to the resources not in particular to review all access a specific user has.
- When you create Access Reviews in bulk it doesn’t create a single Access Review instance, instead it will create a single Access Review per resource.
- Access Reviews today don’t support reviewing the access within an application, for instance review the access given within SAP. We can only review who has access to the SAP application connected in Entra ID.
- When application access is reviewed and should be revoked the user can easily be removed from accessing the application. However, when the application isn’t configured for outbound provisioning (with SCIM or the ECMA connector) the user isn’t ‘deprovisioned’ within the application. Therefore, it’s important to setup provisioning when it’s supported.
- Access Reviews can be applied to Entra Dynamic Groups, however when users should be revoked from accessing the dynamic group they won’t be removed from the Entra Dynamic Group as the Dynamic Query is in control of the membership.
- Access Reviews can be applied to groups synchronized from the on-premises Active Directory. Decisions made in Access Reviews can’t however be committed automatically to these synchronized groups.
- Access Reviews on guests in Microsoft Entra can also disable and delete these accounts, this option isn’t available for regular user accounts in Microsoft Entra Access Reviews.
Now we know why it’s important to have Access Reviews in place, which resources an Access Review can be applied to, and we are aware of the limitations. Let’s dive into ‘How to setup an Access Review successfully in your organization’ with Microsoft Entra Access Reviews!
How to setup an Access Review successfully in your organization
Step 1 – Creating the Access Review in your environment
Within Microsoft Entra ID we have multiple places to create an access review, directly on the group, application, access package or at Microsoft Entra roles or Azure roles within Privileged Identity Management. To make sure you know all about it and some of the differences we are going to configure two example access reviews in the steps below. The first one will be all about configuring an Access Review on a security group in Microsoft Entra, which has eligible role assignments and administrators as members of the group. The second example will be all about configuring an access review directly on a role in Microsoft Entra to review active or eligible memberships.
But first let’s make sure we have the right permissions to do so, therefore make sure you’ve permissions to create an access review, the full list who can create an access review within your tenant can be found here on the learn pages.
Example 1 – Configuring an Access Review on a Security Group
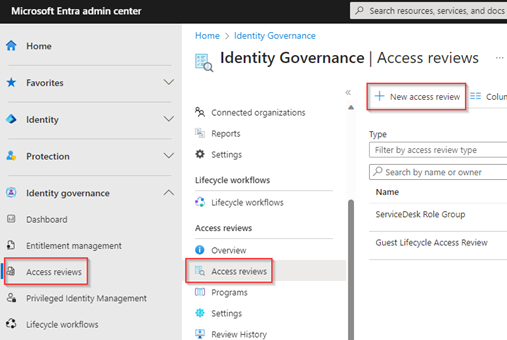
Once the permissions are arranged, let’s configure the first Access Review. For that go to the Entra Admin portal, click on ‘Identity Governance’, hit ‘Access Reviews’ and select ‘+ New access review’.
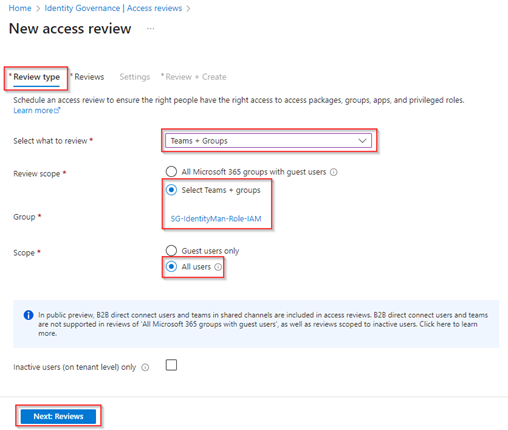
Select to review ‘Teams + Groups’ and at the scope select one or more groups, in our example we are creating a review for a Security group which has eligible role assignments and administrators as members of the group and is therefore crucial to be reviewed. Therefore, at the scope we select ‘All Users’. Once you’re ready hit ‘Next: Reviews’.
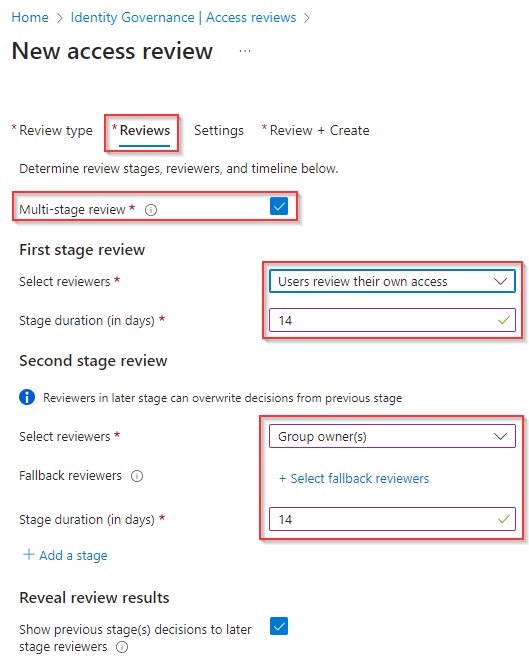
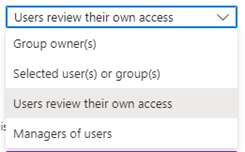
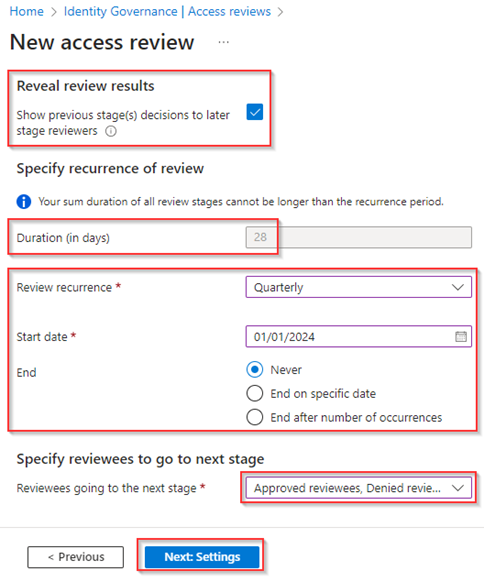
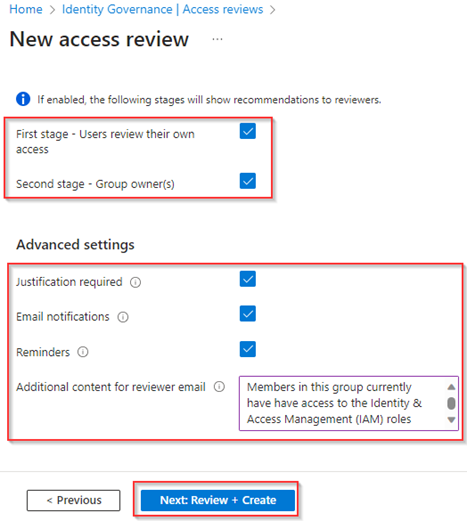
At the ‘Reviews’ tab let’s select ‘Multi-stage review’, which is not mandatory but good to know what this more advanced experience looks like. At the first stage review select ‘Users review their own access’ and let’s give them ‘14 days’ to respond to the access review. At the second stage review let’s select the ‘Group Owner(s)’ as reviewer and here also give them ’14 days’ to respond to the access review (eventually you could configure fallback reviewers in case no group owners are defined). This will make sure that users first need to review their own access and after 14 days the review is then forwarded to the second reviewer which is the group owner. At last, we select ‘show previous stage(s) decisions to later stage reviewers’ to make sure that the group owners can see what the outcome was of the self-review and (maybe) based on the first review result alter their initial thought on their decision.
NOTE: Important to know is that there are more options available besides the above two as the reviewer, these are:
- Manager of the users – This will use the manager field on the user account to send the access review to.
- Selected user(s) or group(s) – This will use the selected users or the members of the selected group to perform the access review.
Now as you can see the duration of the Access Review (which can also be seen as the time you have to respond to the Access Review) is automatically set to 28 days (2 * 14 days) and can’t be changed here. After these 28 days the results are committed to the resource being reviewed, not earlier! What we can configure however is the recurrence, the start date and if the access review will end after a specific date or number of occurrences. In my case I’ve selected ‘Quarterly’ and select the ‘1st of January 2024’ as the start date and without an end date by selecting ‘Never’, this as a quarterly review on a group providing privileged permissions is in my opinion crucial. At last, we select that all users in this review go to the next stage by selecting all options under ‘Reviewees going to the next stage’. Once ready hit ‘Next: Settings’.
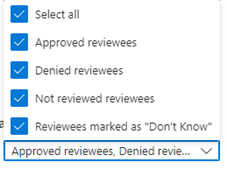
NOTE: The following ‘Reviewees going to the next stage’ options are available:
- Approved reviewees – If the previous access review stage has been approved move to the next stage.
- Denied reviewees – If the previous access review stage has been denied move to the next stage.
- Not reviewed reviewees – If the previous access review stage has not been reviewed move to the next stage.
- Reviewees marked as ‘Don’t know’ – If the previous access review stage has been marked as ‘Don’t know’ move to the next stage.
Important to know is that upon completion of the entire access review results will be committed to the resource, even if some users haven’t been to all stages (stages are important here to make sure that people don’t make the wrong decision as these can have consequences).
Next, at the ‘Settings’ tab, make sure to select ‘Auto apply results to resource’ as that will make sure to commit the outcome of the access review to the group, but also select ‘No change’ at ‘If reviewers don’t respond’ as people need to get used to respond to the access review. If needed select a user to be informed at the end of the review and make sure to enable both decision helpers so this information is provided during the actual review to the reviewers.
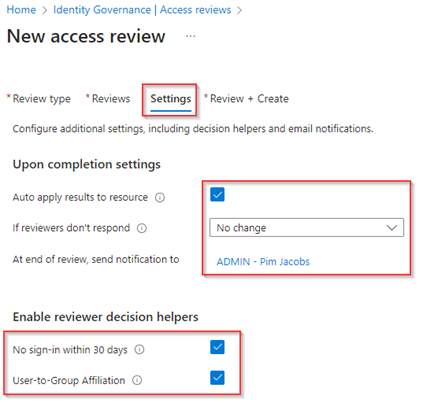
Our next step is to define to whom these decision helpers are shown, in this case we selected both of the stages. Next, under the ‘Advanced settings’, we made sure that the justification is required, email notifications are send out with a reminder in the middle of the review (in our case 7 days). Furthermore, we provided some additional context in the ‘Additional content for reviewer email’ setting, in which you could put some crucial additional information. Once ready hit ‘Next: Review + Create’.
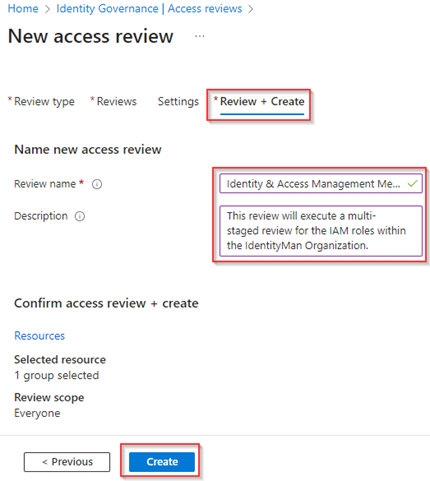
At last, provide a ‘Review Name’ and a ‘Description’. The ‘Review Name’ is shown to reviewers in the email, while the description is just a description only visible in the Entra Admin Portal. To privileged users. Once chosen wisely, verify the settings of the access review and once ready hit ‘Create’ to create the access review.
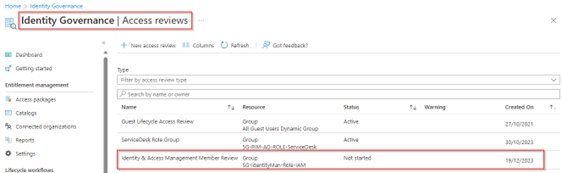
Now the access review is created we can see it in the overall overview of the Access Reviews for Groups and Applications.
But we can also see the access review directly at the resource level, the group in my example.

In step two we will take a look at how you should pilot and with that prepare your organization for the implementation of Access Reviews, but first let’s look at second example.
Example 2 – Configuring an Access Review on a Microsoft Entra Role
In the first example we looked at how to create an access review for an application or group, now let’s look at how to create an access review for a Microsoft Entra role (or Azure Role). Important to know is that these are configured at a different place and aren’t shown in the overall overview of Access Reviews under the ‘Identity Governance’ section.
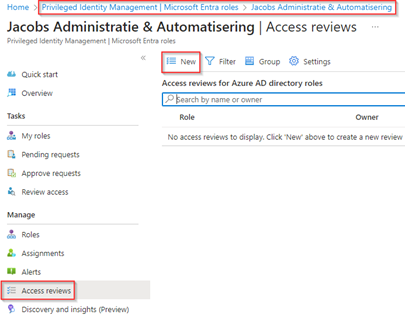
For that go to the Entra Admin Portal and hit ‘Privileged Identity Management’ and go to the ‘Microsoft Entra Roles’ pane.

In here hit ‘Access Reviews’ and hit ‘New’
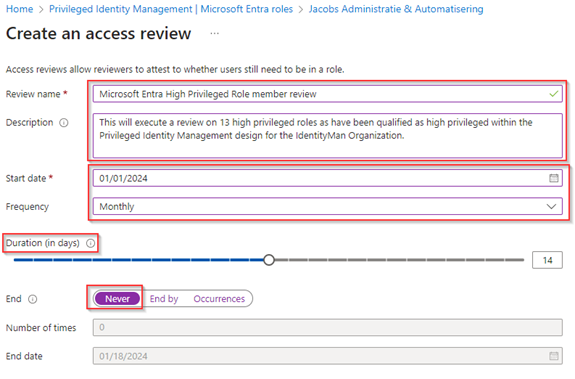
Within the ‘Create an access review’ define a ‘Review name’ & ‘Description’, again here as well it’s important to be aware that the review name is shown in the review email(s) send to the reviewer. Once chosen wisely, configure the ‘Start Date’ and the ‘Frequency’. In this case I selected to run from the ‘1st of January’ however with a ‘monthly recurrence’ instead of quarterly this as privileged permissions whom are active should be reviewed more often! For the duration we selected ‘14 days’, which indicates reviewers have 14 days’ time to review the reviewees. And as also used in the first example we haven’t configured an end date by selecting ‘Never’, which means this review will reoccur each month until someone delete the access review.
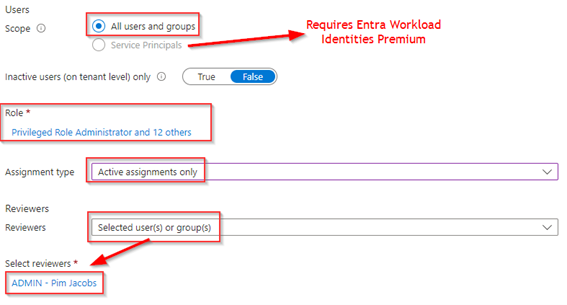
Once the settings are configured select the scope of the access review, in this case we have selected ‘All users and groups’. As you can see, we it’s possible to select ‘Service Principals’ here as well, however to review service principal (workload identities) you require the additional ‘Entra Workload Identities Premium’ license (which at this time was expired in my tenant). Once selected, we did select ‘13 different Microsoft Entra roles’ whichin this example are roles we classified as high privileged roles according to a privileged identity management design and therefore require an access review (think of Global Administrator, Privileged Role Administrator and more). Furthermore, we have selected to only review the ‘Active assignments’ and not the ‘Eligible assignments’ and selected a specific reviewer, in this case my own account.
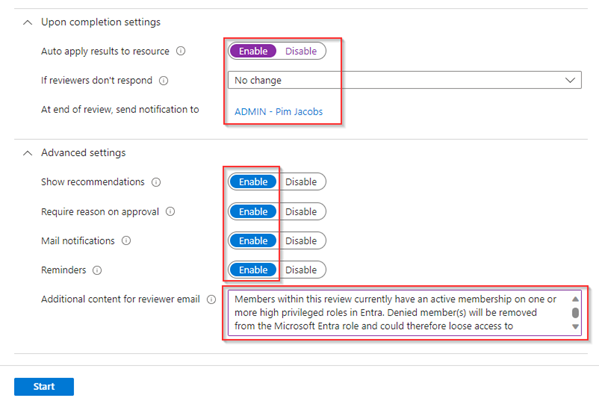
Once these items are configured let’s look at the completion and advanced settings. Also here let’s enable to ‘auto apply results to the resource’ and select ‘No change’ if reviewers don’t respond. Next make sure to enable all advanced settings to make sure recommendation are shown, a reason for approval is required, mail notifications and reminders are sent out. At last, make sure to provide additional content which is shown as instruction in the reviewer email. Once ready hit ‘Start’ to create the actual review.
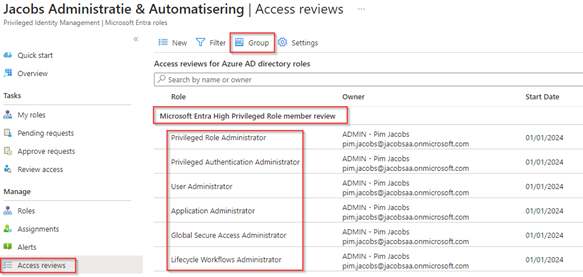
As you can see multiple access reviews are created now (one per role), luckily we can ‘Group’ these by ‘Review name’ by hitting the ‘Group’ button.
Now we have created two access reviews within our tenant, let’s have a look at how to pilot and prepare your organization for the use of access reviews. This is important to get this new method of review access adopted in your organization.
Step 2: Piloting the Access Review in your environment.
Now let’s pilot both access reviews in your organization, this is important to make sure we verify that people are responding to the access review and if necessary, provide some additional instructions to users so they can successfully complete the access review. Once the response is good, and everyone is making access review decisions we can also alter some of the settings in the Access Review to be more restrictive in approvals.
Example 1 – Reviewing the access for the Security Group
At the start of the first access review the end user will receive an email to self-review his access (first stage). As you can see here the Access Review language is respecting the preferredLanguage value set on the user account, in the case of Johny Bravo this is Dutch. Once ready hit ‘Review Access’.
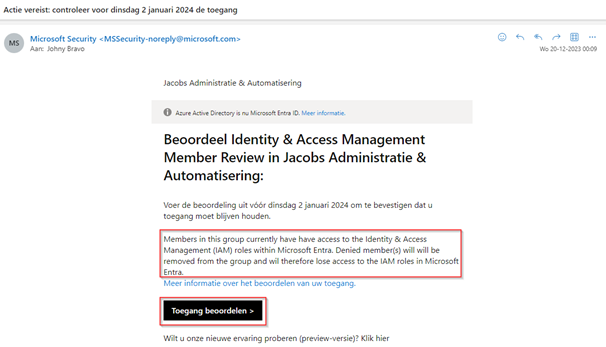
NOTE: If the PreferredLanguage value is not configured the language configured on the mailbox is used. If that’s not configured the email will fall back to the default language set in your tenant.
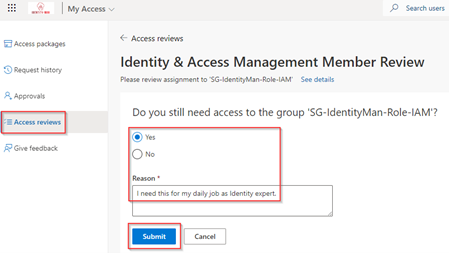
Once you’ve hit the ‘Review Access’ button in the email users are redirected to the My Access portal and are able to directly review their access, and define if they still need access and explain why.
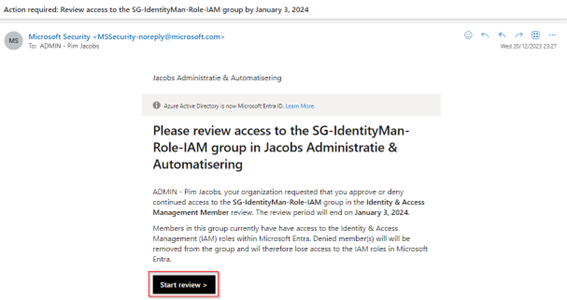
After the first stage has finished (which is set to 14 days), the second stage will start running whereby my account is the owner of the group and therefore receives the access review. As you can see the preferredLanguage for this account is set to en-US and therefore the email is received in an English language. To continue, let’s hit ‘Start review’.
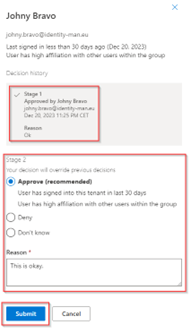
We are now (again) redirected to the My Access Portal and brought to the Access Review, in here we can see the previous stage result(s) and we can see the recommendation which is both really helpful for the reviewer to make a decision.
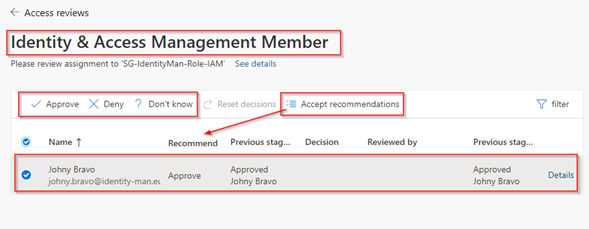
If we hit the ‘Details’ link, we can even see the reasoning of approval from the first stage and are able to hit on approve and provide our own reason for approval. If we would hit ‘Deny’ here the user would be removed from the group at the end of the review.
As I selected to inform my user account at the end of the review, I’m receiving the email below once the review ended.
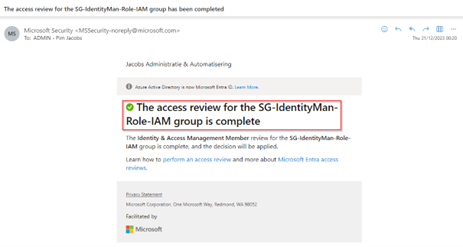
With that I’m also receiving a second email which contains a link to the actual review results of the access review. For that hit ‘Review Results’ (I fully agree with you that this needs alteration as ‘Review Results’ isn’t readable).
Hitting ‘Review Results’ will bring you to the results of the Access Review which provides you a clear overview of all the decisions made during the review and by whom.
Now let’s have a look at the second review.
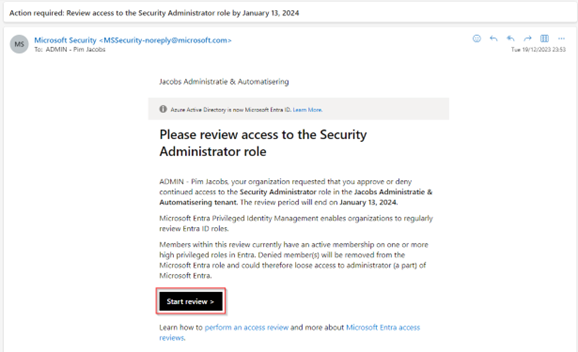
Example 2 – Reviewing the access for the Security Administrator role
In the second example review we are review ‘active assignments’ to the ‘Security Administrator role’. As you can see, I’m receiving an email for this as well to review access, however we can see directly from the text in the review this is not about an application or group but it’s about permissions to an administrative role. Once you are ready to start, hit ‘Start review’.
As we are now reviewing access to roles in Microsoft Entra or Microsoft Azure, we are being brought to the Azure portal for the review. In here you will see the same components as we have seen in the first example of the review. We can see the recommendation, we can provide a reason and then hit ‘Approve’ or ‘Deny’.
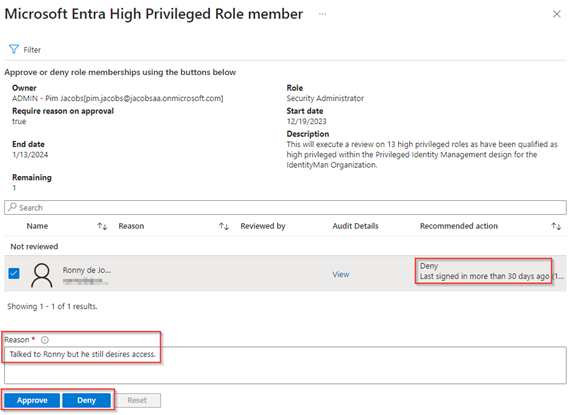
NOTE: Once you did hit ‘Approve’ or ‘Deny’ the user is not shown anymore in the overview, if you per accident made a mistake you can change the filter to include all outcomes and from there, you’re able to revise your decision.
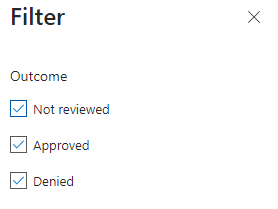
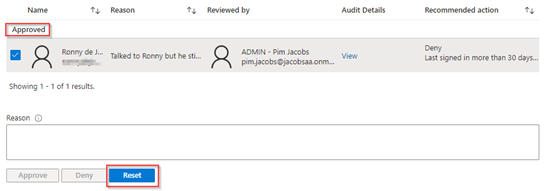
Now let’s say I realized a made the wrong decision and want to revise it to ‘Deny’. So, let’s change the filter, hit ‘Reset’, eventually provide a reason and hit ‘Deny’.
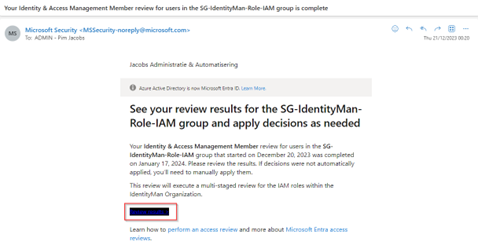
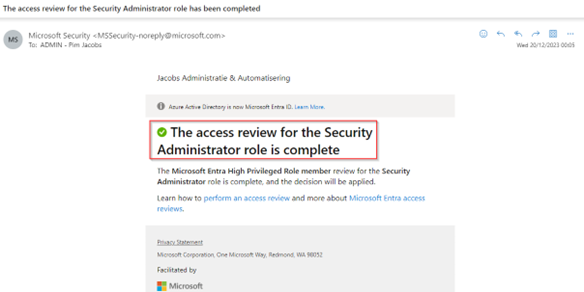
As I selected in the review settings to inform my user account at the end of the review, I’m receiving the email below at the end of the review. In which I can see the review for the Security Administrator role has completed.
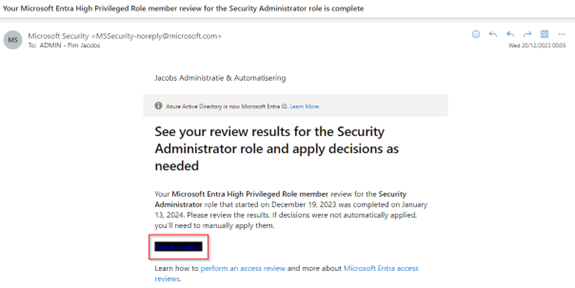
Also here the second email contains a link which brings us to the actual review results of the access review. For that hit ‘Review Results’.
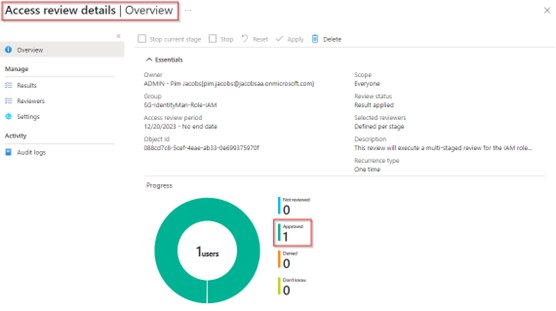
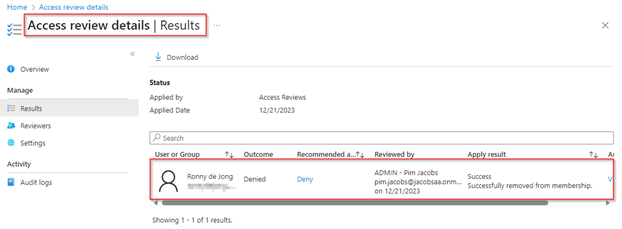
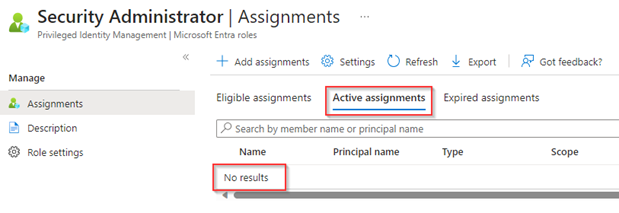
As you can see you will be brought to the results of the Access Review which provides you a clear overview of all the decisions made during the review, again on the Azure portal. In this case we can see that we have ‘denied’ access. With that the user and is ‘Successfully removed from membership’, meaning the user has been removed from the Security Administrator role.
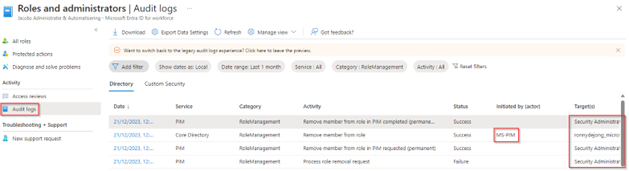
We can also see in the ‘Audit Logs’ that these permissions have been removed, as you can see this process is initiated by MS-PIM (Privileged Identity Management).
And if we look at the active assignments on the security administrator role, we can see that it has been removed as well as has been decided in the Access Review.
We’ve now walked through the process to execute the review and we’ve tested the review so, it’s time to let the organization adopt this new technology. This does require (in most cases) communication as it’s simply a change where end users need to act on and is different compared to the previous experience. So, the preparation of your users is key here to get this new experience adopted within your organization.
In some examples the results could help you indicate more communication is required to your end users to react on these Access Reviews, for instance when reviewers simply don’t respond we need to tell them it’s important to execute the review. Also, when reviewers vote for ‘Don’t know’ there is homework to do as this indicates the reviewer tried to review the access but isn’t able to decide for ‘Approve’ or ‘Deny’.
Once you see that most of the reviews are being responded to, we can decide to alter the Access Review. This will make sure that once someone doesn’t respond to the access review actions are being taken as well, which can be a crucial part in your zero-trust journey.
Step 3: Setting the Access Review to commit actions if reviewers don’t respond
Now your organization has adopted the access reviews, and most reviewers are responding to the Access Reviews we are ready for some of the Access Reviews to take a next step. This next step isn’t always necessary or required but is helpful for critical resources which do need some ‘additional or extra’ protection.
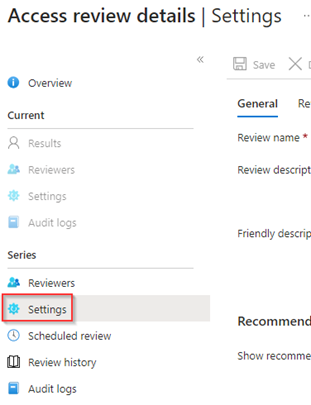
For this go to one of the created access reviews and hit ‘Settings’. In this example I’ve edited the access review which is configured on all the high privileged roles as it’s crucial to protect these roles.
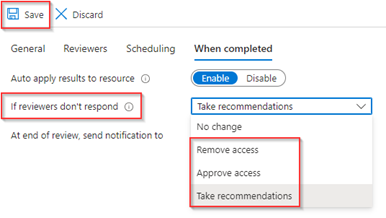
Go to the ‘When completed’ tab and change the setting ‘If reviewers don’t respond’ to ‘Take recommendations’, this will make sure that accounts which are inactive for 30-days (no sign-in) are being removed from the resource at the end of the review, unless chosen otherwise by the reviewer. Once ready hit ‘Save’.
Now we’ve walked through the reporting part as well, let’s wrap up to the conclusion of our first blog about Microsoft Entra Access Reviews.
Conclusion
Now we’ve walked through the above two examples, you know the how to create an Access Review, the difference between single-stage and multi-stage, know the different portals where to configure an Access Reviews and. you have seen the user experience. Besides you now do understand how to prepare your organization to adopt Microsoft Entra Access Reviews, this by using the Access Review Results to verify the results and make alterations when the organization is ready, without creating too much impact.
With this we can conclude that by implementing Access Reviews we can make sure that access is being recertified and only users who should have access, have access. Which is an important part in your zero-trust journey as it’s part of the least privilege and always verify journey.
Furthermore, you’ve seen that Access Reviews can also be used to cleanup ‘active’ privileged permissions, which will help you to secure down your environment based on privileged permissions. As you’ve seen however management at scale isn’t today not that easy when it comes to Microsoft Entra Access Reviews. Therefore, in our next blog therefore we will look at how we can use sensitivity labels, configured in Microsoft Purview, on Microsoft 365 groups to apply Microsoft Entra Access Review at scale in your organization!
With that being said, I hope you enjoyed reading this new blog within the Microsoft Entra Identity Governance series! Stay tuned for my next blog which is all about how we can enable Access Reviews on scale in Microsoft Entra for Microsoft 365 Groups.
- An Introduction to Azure AD Identity Governance
- Identity Governance 1 of 10: Implementing a Strong Identity Foundation
- Identity Governance 2 of 10: Implementing Identity Lifecycle management for guest users – part 1
- Identity Governance 2 of 10: Implementing Identity Lifecycle management for guest users – part 2
- Identity Governance 2 of 10: Implementing Identity Lifecycle management for guest users – part 3
- Identity Governance 3 of 10: Configuring Provisioning in 3rd party apps for (guest) users
- Identity Governance 4 of 10: Implementing LifeCycle Workflows – Configure the basics
- Identity Governance 4 of 10: Implementing LifeCycle Workflows – Configure onboarding workflows
- Identity Governance 4 of 10: Implementing LifeCycle Workflows – Configure offboarding workflows
- Identity Governance 5 of 10: Using the hidden gems in Azure AD access packages, all you need to know! – Part 1
- Identity Governance 5 of 10: Using the hidden gems in Azure AD access packages, all you need to know! – Part 2
- Identity Governance 5 of 10: Using the hidden gems in Azure AD access packages, all you need to know! – Part 3
- Identity Governance 5 of 10: Using the hidden gems in Azure AD access packages, all you need to know! – Part 4
- Identity Governance 6 of 10: Using the brand new Entra Inbound Provisioning API for Identity Lifecycle Management!
- Identity Governance 7 of 10: Recertify access by using Microsoft Entra Access Reviews! – Part 1
- Identity Governance 7 of 10: Recertify access by using Microsoft Entra Access Reviews! – Part 2
- Identity Governance 8 of 10: Implementing Privileged Identity Management
- Identity Governance 9 of 10: Implementing a Terms of use
- Identity Governance 10 of 10: Review by Monitoring and reporting
