A warm welcome to my next blog in the Identity Governance series, which is the first part in how to manage admin accounts in your tenant with Entra ID Governance. Every organization is using admin accounts, this as you should drastically avoid using your regular office account for admin purposes for many security reasons. This also means that every organization must deal with access and lifecycle management around these admin accounts and for most organizations this is a massive struggle.
I see admin accounts not being deactivated together with the user account, permissions set on admin accounts not being reviewed or removed and accounts not being cleaned up once the admin has left the organization. That’s why it’s time for some change and see how we can streamline this process into Entra ID Governance.
To manage the identity and access lifecycle of admin accounts, I’m going to use different features within Entra ID Governance which I’ve therefore split up in multiple blogs:
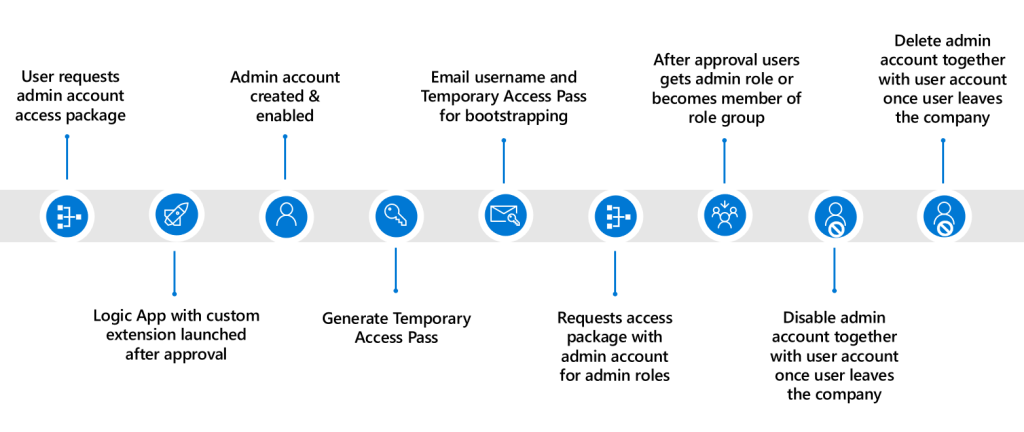
- In this first blog we will look at the creation of admin accounts using access packages – In which we will use a custom extension attached to an access package which will create an admin account for us and link it to the user account. This is the start of the identity lifecycle process for admin accounts.
- In the second blog we will look at disabling and deleting the admin accounts by using lifecycle workflows – In which I will show you how to offboard admin accounts together with user accounts once the user leaves the company. This concludes the entire identity lifecycle management process for admin accounts.
- In the third blog we will look at three ways to implement privileged identity management for your administrators – In which I will show you how you can apply roles individually, based on role assignable groups or based on PIM for groups and make sure permissions are reviewed occasionally.
- In the last blog, we will look at how to enrich your privileged identity management deployment by using access packages – In which I will show you how you can configure access packages to let admins request single admin roles or access to role assignable groups themselves to execute their tasks based on least privilege and a fully automated process.
As this is the first part of this blog serie, time to dive in and build the custom extension for the creation of admin accounts using access packages in Entra ID Governance.
Automating admin account creation with access packages
Step 1 – Creating the custom extension
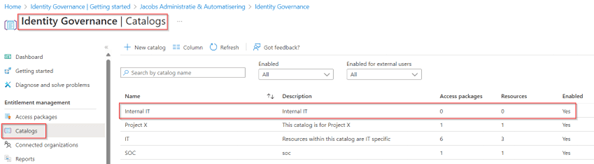
The first step to get started is to create the custom extension within Entitlement Management so we can use it within an access package, as you may know already, from my previous blogs, custom extension needs to be created from within a Catalog. Therefore, go to the Entra Admin portal, hit ‘Identity Governance’, select ‘Entitlement Management’ and go to ‘Catalogs’. Either create a new catalog or select an existing one to use so we can create the custom extension within the catalog. As you can see below, I create a separate catalog already called ‘Internal IT’ which is only available to internal (non-guest users).
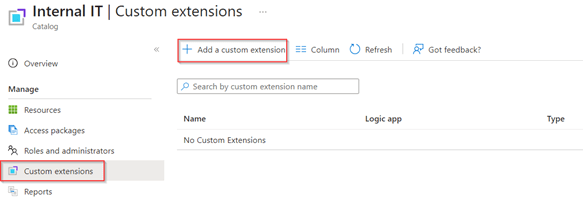
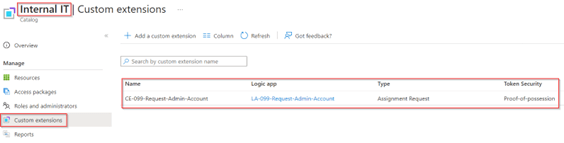
Once you’re in the catalog, select ‘Custom Extension’ and hit ‘+ Add a custom extension’.
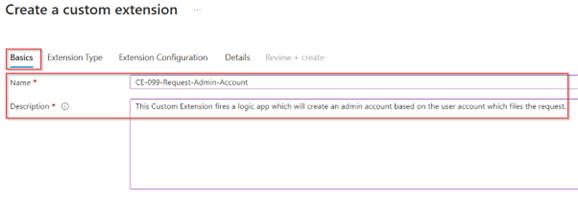
In the create a custom extension wizard on the ‘Basics’ tab, provide the custom extension a friendly name and description. In my case I always try to re-use the naming of the custom extension with my logic app as well, this so I know they belong together.
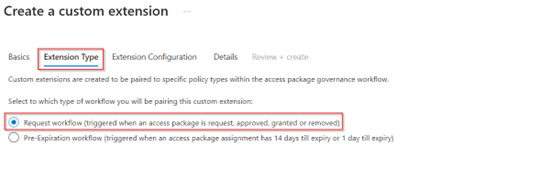
Once ready continue to the ‘Extension Type’ tab, in here we can select two different options, custom extension to be used during a request workflow and custom extension for pre-expiration workflows. As we are providing access during a request workflow we choose the first option. Go to the next screen when you’re ready.
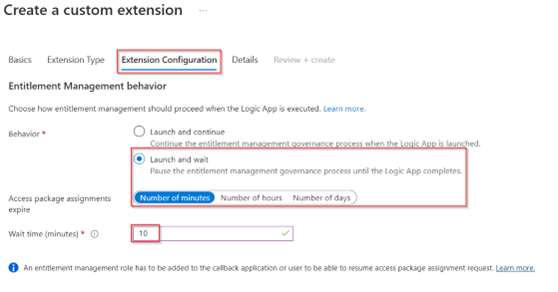
In the next screen ‘Extension Configuration’ we can determine the behavior of the custom extension, should it wait for the logic app or is it just fire and forget. As we do want to provide a return call to audit if the account creation was successful, we pick ‘Launch and wait’ and to make sure that the logic app has done its job we wait for a maximum of ‘10 minutes’. Once configured go to the next screen.
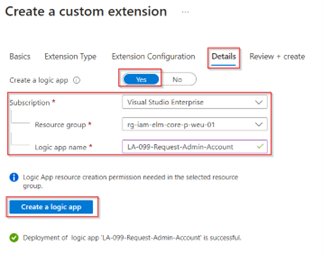
In the next screen we can configure the ‘Details’ of the custom extension, this is where we create the logic app. I highly recommend creating the logic app from this wizard as it makes sure the right authorizations are set on the logic app and the trigger is configured correctly. Therefore, hit ‘Yes’ at create a logic app, select a ‘Subscription’, ‘Resource Group’ and provide the logic app a name, in my case ‘LA-099-Request-Admin-Account’. As you can see this name is being re-used from the custom extension name, this so I know these belong together. Once ready hit ‘Create a logic app’ and wait until it’s created.
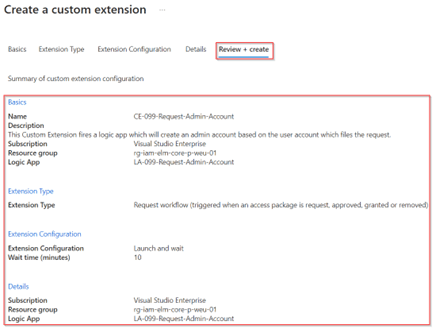
Once the logic app is created, go to the ‘Review + Create’ tab and verify the details of the custom extension. Once you’re happy and all is configured correctly, hit ‘Create’.
The custom extension and logic app are now created and ready for use for access packages within the ‘Internal IT’ catalog.
Now the custom extension within the catalog is configured, let’s create an Access Package so users can request an admin account from the MyAccess portal.
Step 2: Configuring the access package
To create the access package, so users can request the admin account, go to the Entra admin portal, hit ‘Identity Governance’ and select ‘Entitlement Management’ and go to ‘Access Packages’. In here hit ‘+ New access package’.

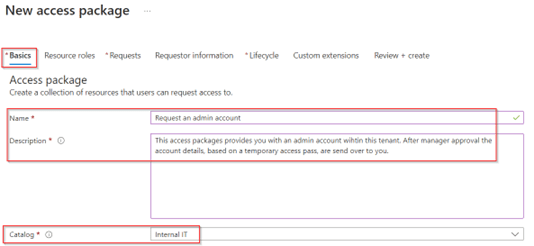
In the ‘New access package’ wizard, on the ‘Basics’ tab, give the access package a name and description and select the catalog in which we just created the custom extension. Important to know is that the name and description here are visible to end users so choose them wisely. Once ready move forward to ‘Resource Roles’.
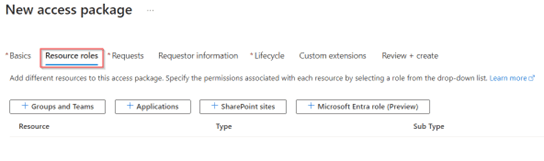
As in this case we won’t add the user to any group, application, SharePoint site or Microsoft Entra role, this means we leave the configuration for the ‘Resource roles’ empty. Therefore, go to the ‘Requests’ pane.
In the ‘Requests’ tab I’ve made sure that only users in my directory can request access to this access package, and to be even more specific only users within the dynamic group ‘SG-IdentityMan-IT-Department’. As you can guess already this group contains all users within the department IT and possible need an admin account for their admin tasks (in my example the department value is coming from my HR system via Inbound Provisioning as described in this blog).

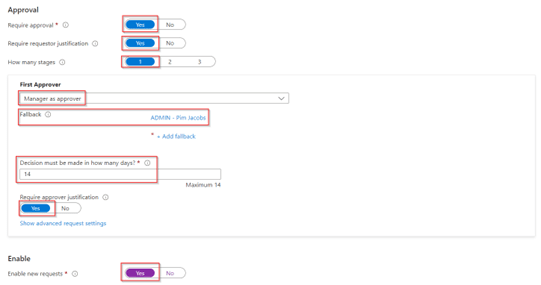
In the approval section I’ve made sure that an approval is required by the manager within 14 days. Both requestor and approver need to provide a justification for the request and approval, this is important for auditing reasons. At the end of the ‘Requests’ tab don’t forget to hit ‘Yes’ at enable new requests as otherwise the access package won’t pop-up within the MyAccess portal. Once ready go to the ‘Requestor information’ tab.
In the ‘Requestor information’ tab we can ask additional questions to the requestor. In this case I’ve left this section empty, however some organizations do want to request additional information at the time of requesting, if that’s the case this is the place to configure this (which could be especially helpful for approval or auditing reasons). Once ready go to the ‘Lifecycle’ tab.

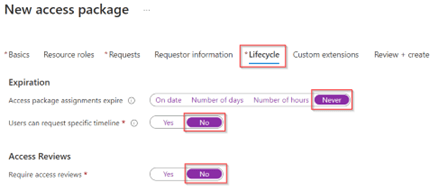
In the ‘Lifecycle’ tab we can configure expiration and access reviews. This normally does make sense to configure, however as we ‘tie’ the lifecycle of the admin account to the actual user account we set the ‘Expiration to ‘Never’, make sure ‘No specific timeline’ can be requested and access reviews are set to ‘No’. Once you’re ready go to the ‘Custom extensions’ tab.
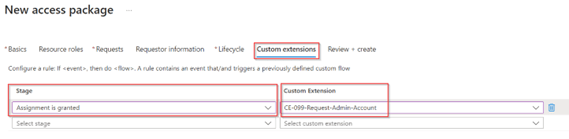
Within the ‘Custom Extensions’ tab we can trigger the custom extension at different stages. In our case we want to run our custom extension after the assignment has been granted to the access package and the user is a member. Therefore, we select the ‘Assignment is granted’ stage and at the custom extension we select the custom extension we just created. Once ready go to the ‘Review + Create’ tab.
Now review the access package configuration, and once you’re happy, hit ‘Create’.
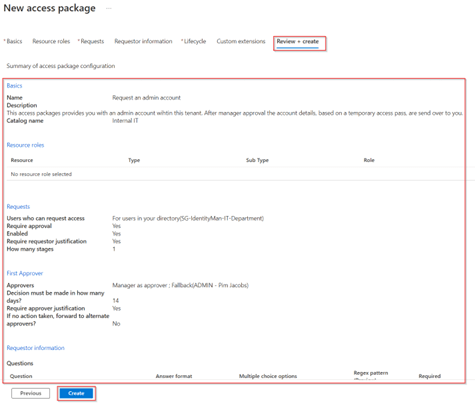
The access package has now been created and is ready to be requested by users within the ‘SG-IdentityMan-IT-Department’ group.

However, since the logic app is still empty no account will be created yet, so let’s continue with the last configuration step, which is to enrich the logic app with the right steps and permissions to create an admin account, create a temporary access pass and send an email.
Step 3: Configuring the custom extension logic app
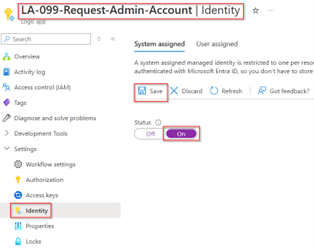
The logic app which we created in step 1, during the creation of the custom extension first needs to be provided with a managed identity. Therefore, we go to the Azure portal, we go to ‘Logic Apps’ and we select the logic app ‘LA-099-Request-Admin-Account’. Within the logic app go to the ‘Settings’ and hit ‘Identity’ on the left side. Here, toggle the status to ‘On’ and hit ‘Save’ to enable a ‘System assigned’ managed identity.
Once the system assigned managed identity is enabled on the logic app, we need to provide it with the right permissions. The table below describes the permissions which need to be applied, in total these are three Microsoft Graph permissions and one Microsoft Entra role which needs to be applied.
| Permission Source | Application Permission(s) | Comment |
| Microsoft Graph | User.ReadWrite.All EntitlementManagement.ReadWrite.All Mail.Send | Required to create the user, execute the callback to entitlement management with logic app result and being able to send an email via a Microsoft Graph API call. |
| Microsoft Entra Role | Authentication Administrator | Required to generate the temporary access pass for a non-privileged user account (as the account will not have permissions assigned directly). |
NOTE 1: The Microsoft Graph permissions can easily be given with the following PowerShell script with a user which has Global Admin or Privileged Role Administrator assigned.
NOTE 2: The authentication administrator role needs to be manually assigned as permanently active to the managed identity within Microsoft Entra.
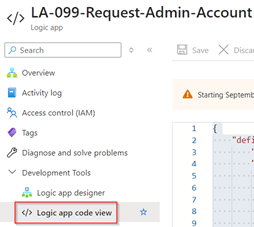
Once the above permissions are provided, the logic app can be configured. For that copy the contents from this JSON file on my GitHub page. Now go to the Logic App and hit ‘Logic App code view’ and paste the entire content of the JSON file you just copied into the code view and hit ‘Save’.
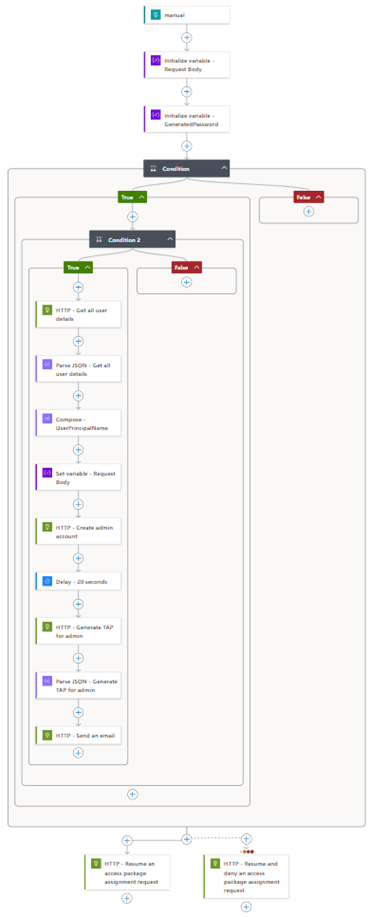
Once the logic app is saved, hit ‘Logic app designer’ and verify the steps look like the output below.
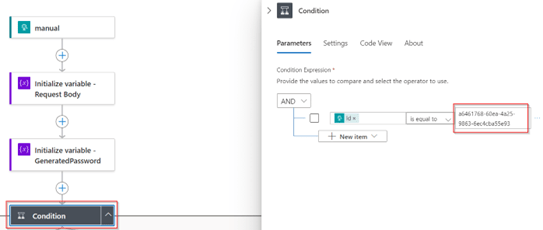
After the Logic App has been successfully saved, we need to fine-tune it to your environment. For that open the first condition and make sure that the ‘ObjectID value’ marked in the screen below is set to the ObjectID of your catalog, this can be found on the ‘Overview’ page of the catalog which contains your custom extension.
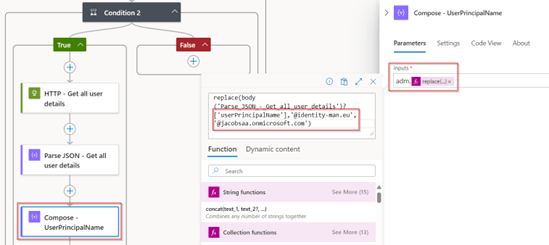
Once this is configured, the second step is to make sure the UserPrincipalName is defined correctly for your environment. For that open the step ‘Compose – UserPrincipalName’ and change the input with a prefix (or remove it if you rather don’t want this) and edit the replace statement. Within the replace statement we replace the UserPrincipalName domain to the tenant domain, in my case we replace ‘@identity-man.eu’ for ‘@jacobsaa.onmicrosoft.com’ which is my tenant name and perfectly usable for cloud-only admin accounts. Once you’re ready which changes to the replace statement don’t forget to hit ‘update’, otherwise changes won’t be applied.
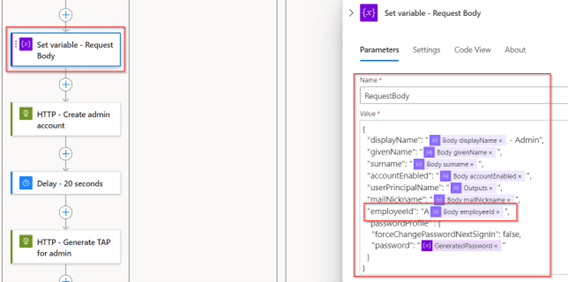
In the next step ‘Set variable – Request Body’ we build the request body for the Microsoft Graph call to create the admin account. In this case we take attributes from the regular user account to create the admin account, if you want to have more attributes this is the place to do so. In my case I’ve also copied the EmployeeID and put an ‘A’ in front of it, this is of crucial importance for the next blog for offboarding scenarios. Therefore, I strongly recommend leaving this in place (in my example the EmployeeID value is coming from my HR system via Inbound Provisioning as described in this blog).
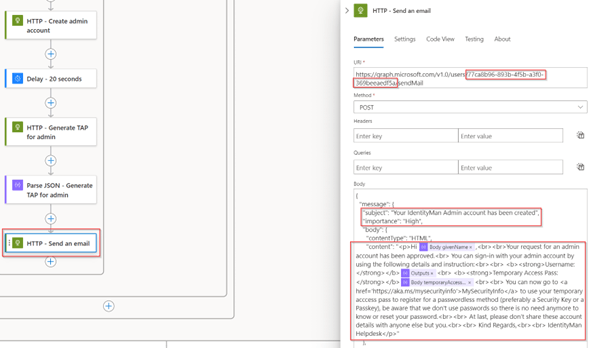
The next step is to configure the ‘HTTP – Send an email’ step according to your needs. This step will send out an email to the user who requested the admin account. Within this step it’s first important to configure the mailbox in the ‘URI’ as you can see in the image below, we can specify an ‘ObjectID’ of the mailbox which will send out the email. Once you’ve replaced the ObjectID value within the URI call, the next step is to fine-tune the Subject and Content of the email to match your needs. The Content is fully HTML based so it’s quite easy to edit this on your own.
NOTE 1: If you want to have a sensitivity label applied this can be done with the PidTagSensitivity property, more details around this functionality can be found here on learn.
NOTE 2: By using the Send.Mail Microsoft Graph permissions the managed identity by default is allowed to send email on behalf of all your mailboxes. To limit this down to a single mailbox, the one which is selected in the above step, you can configure an application access policy in Exchange Online. All details on the configuration for this matter can be found here on learn.
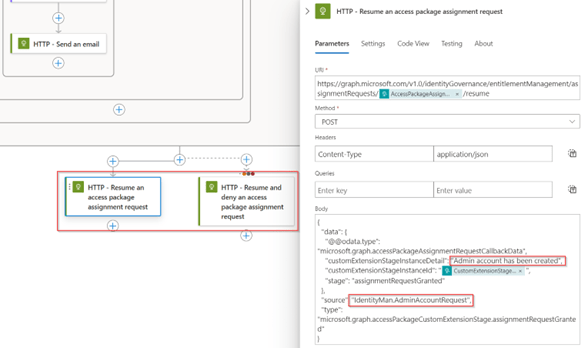
Once you’re ready with the configuration of the email, the last step to fine-tune is the callback to the API of Entitlement Management. This will make sure that we can see the output of the logic app within the access package request itself. For that make sure to configure the ‘CustomExtensionStageInstanceDetail’ and the ‘Source’ within both last steps. Especially the ‘customExtensionStageInstanceDetail’ is important as this is the output we will see within the access package request details as output from the custom extension.
Once all steps have bene fully configured, please don’t forget to hit ‘Save’ to save all the changes you’ve made within the logic app.

Now we’ve configured the custom extension, we’ve created the access package and we’ve configured the logic app in the Azure portal we are ready for the last step which is testing the behavior and see if it’s fully operational.
Step 4: Request the admin account
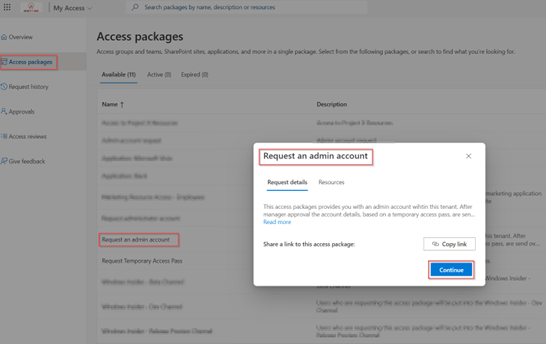
Now everything is configured, let’s look at the entire behaviour. For this with your regular account go to the MyAccess portal and hit ‘Access Packages’, select the ‘Request an admin account’ access package and hit ‘Continue’.
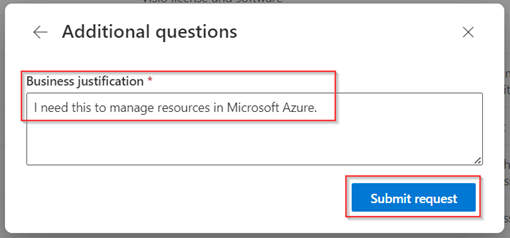
As configured you need to fill in the business justification and hit ‘Submit Request’.
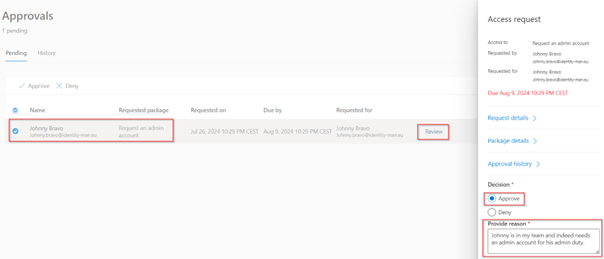
The manager now gets the approval email and once the manager clicks on the link they can ‘Approve or Deny’ the request. In this case I select ‘Approve’, fill in the ‘Approval reason’ and hit ‘Submit’.
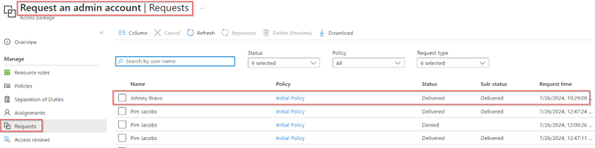
On the backend we can see that instantly the request is delivered, which means the logic app ran successfully.
If we select the request and look at the ‘Request details’ we can also see that the ‘Custom extension instance’ has delivered some output, for that hit the ‘1 instance(s)’ link.
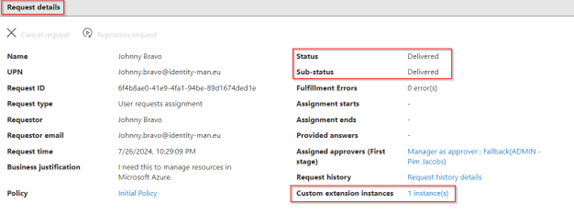
In the ‘Selection details’ of the custom extension we can see that the callback received was ‘Admin account has been created’, which is the output we give back if the logic app was end-to-end successful.

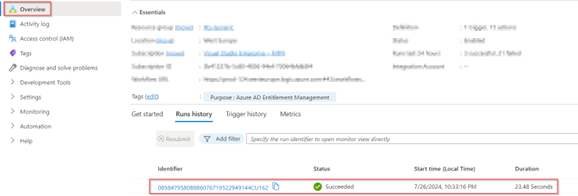
The logic app also reports the status as succeeded as you can see below.
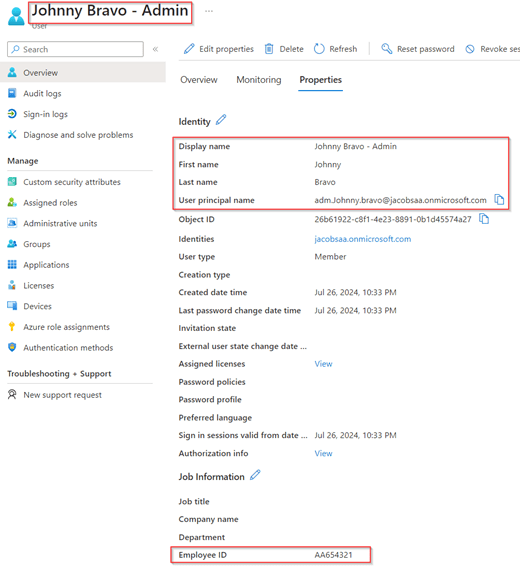
If we now look at Microsoft Entra ID, we can see that the user has been created and the EmployeeID of the regular user account has been copied with an additional ‘A’ in front so it’s still identical and can be matched to the regular user account.
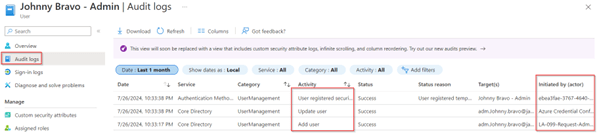
If we look in the ‘Audit Logs’ we can also see this is a brand-new user created by the managed identity of the Logic App and has a Temporary Access Pass generated on the account, a few seconds later.
In the email the end user received we provided direct instructions for onboarding which is helpful for the right onboarding of the account (preferably phishing resistant with Passkeys of course).
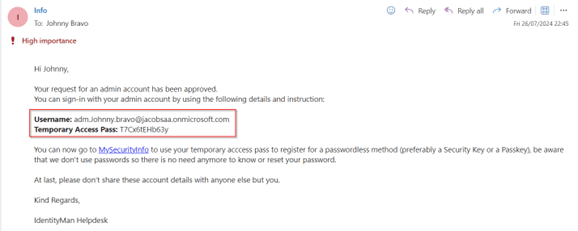
NOTE: This email contains both Username and Temporary Access Pass, for safety reasons you should send out two emails, one with the username and one with the Temporary Access Pass (or send the Temporary Access Pass by SMS instead of email).
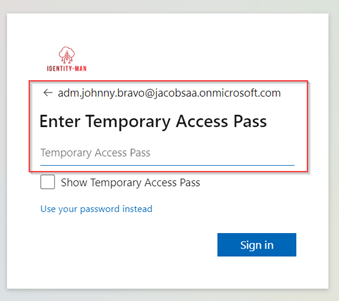
With these details, the admin can sign-in directly with a one-time use temporary access pass and bootstrap the admin account with phishing resistant credentials and from here gather permissions on this account (which is something we look into at part 4 of this blog serie).
Now we have walked through the end-to-end configuration and experience, let’s wrap it up to the conclusion.
Conclusion
Now we’ve walked through the above four steps, you now know how to create the custom extension within a catalog, you know how to create the access package and how to configure the logic app so you can automate the admin account creation. With that you’re able to streamline admin account creation in your organization based on a standard and an automated process in your organization. More importantly we now have a way to attach these admin accounts to regular user accounts, in my example I’ve used the EmployeeID attribute, but you could also stamp the UPN of the user account into an extension attribute (use your own imagination).
With this solution we can conclude that we could do the same for test accounts in your environment or even functional or service accounts if wanted.
Furthermore, we can conclude that access packages can do way more than just providing access to applications or resources. With custom extension sky is literally the limit.
With that being said, I hope you enjoyed reading this new blog within the Azure AD Identity Governance series! Stay tuned for my next blog which will be all about the offboarding process of admin accounts generated via the above process. This whereby we will take a closer look in disabling and deleting the admin accounts by using lifecycle workflows.
- An Introduction to Azure AD Identity Governance
- Identity Governance 1 of 10: Implementing a Strong Identity Foundation
- Identity Governance 2 of 10: Implementing Identity Lifecycle management for guest users – part 1
- Identity Governance 2 of 10: Implementing Identity Lifecycle management for guest users – part 2
- Identity Governance 2 of 10: Implementing Identity Lifecycle management for guest users – part 3
- Identity Governance 3 of 10: Configuring Provisioning in 3rd party apps for (guest) users
- Identity Governance 4 of 10: Implementing Lifecycle Workflows – Configure the basics
- Identity Governance 4 of 10: Implementing Lifecycle Workflows – Configure onboarding workflows
- Identity Governance 4 of 10: Implementing Lifecycle Workflows – Configure offboarding workflows
- Identity Governance 5 of 10: Using the hidden gems in Azure AD access packages, all you need to know! – Part 1
- Identity Governance 5 of 10: Using the hidden gems in Azure AD access packages, all you need to know! – Part 2
- Identity Governance 5 of 10: Using the hidden gems in Azure AD access packages, all you need to know! – Part 3
- Identity Governance 5 of 10: Using the hidden gems in Azure AD access packages, all you need to know! – Part 4
- Identity Governance 6 of 10: Using the brand new Entra Inbound Provisioning API for Identity Lifecycle Management!
- Identity Governance 7 of 10: Recertify access by using Microsoft Entra Access Reviews! – Part 1
- Identity Governance 7 of 10: Recertify access by using Microsoft Entra Access Reviews! – Part 2
- Identity Governance 8 of 10: How to manage admin accounts with Entra ID Governance – Part 1
- Identity Governance 8 of 10: How to disable and delete admin accounts with Entra ID Governance – Part 2
- Identity Governance 8 of 10: How to implement Privileged Identity Management for your admin accounts – Part 3
- Identity Governance 8 of 10: How to enrich Privileged Identity Management with access packages – Part 4
- Identity Governance 9 of 10: Implementing a Terms of use
- Identity Governance 10 of 10: Review by Monitoring and reporting
